BioErrorLog Tech Blog

試行錯誤の記録

Generative ArtでNFTアート画像生成 | p5.js, Processing

GenerativeArtNFTで使ったアート画像生成ロジックをメモします。

はじめに

こんにちは、@bioerrorlogです。

先日、@hoosan16さん@ClankPanさんと参加したDfinityのハッカソンの一環として、Generative ArtのNFTを作成しました。

github.com

※ハッカソンで提出したメインプロダクト - Flippyがデモ用途で利用するNFT実装です。

本記事では、このGenerativeArtNFTのアート画像生成ロジックをまとめておきます。

Generative ArtでNFTアート画像生成

やりたいこと

TokenIdをinputとして無限で多様なGenerative Artを生成する、というのがやりたいことです。

アプローチとしては、TokenIdのhash値からパラメータを抽出し、Generative Artを生成するようにしました。 Generative Artの生成にはp5.jsを使っています。

アート模様はパーリンノイズをベースにして、カラーもhash値に応じて変わるようにする、というのが当初のアイデアです。

元バージョン: Reactコンポーネントとしてのプロトタイプ

もともとはフロントサイドで画像生成する想定だったので、Reactコンポーネントの形でプロトタイプを実装しました。

github.com

import React from 'react';
import p5 from 'p5';
import md5 from 'md5';

const sketch = (p: p5) => {
  const TokenId = 1 // pseudo TokenId

  const hashedNftSeed = md5(String(TokenId))
  console.log(hashedNftSeed)

  const getSlicedNum = (x: number, y: number) : number => {
    return parseInt(hashedNftSeed.slice(x, y), 16)
  }

  const lineLengthSeed = getSlicedNum(0, 2) + 1; // 1~257

  const strokeColorV1 = getSlicedNum(2, 4); // 0~255
  const strokeColorV2 = getSlicedNum(4, 6); // 0~255
  const strokeColorV3 = getSlicedNum(6, 8); // 0~255

  const noiseScale = (getSlicedNum(8, 11) % 1000) / 10000; //0.0001~0.1000

  const rotateSeed = getSlicedNum(11, 13); // 0~255

  const backgroundColorV1 = getSlicedNum(15, 17); // 0~255
  const backgroundColorV2 = getSlicedNum(17, 19); // 0~255
  const backgroundColorV3 = getSlicedNum(19, 21); // 0~255

  const drawIterateVal = getSlicedNum(21, 26) + 100000; // 100000~1000000

  const randomSeedVal = getSlicedNum(26, 29); // 0~4096
  const noiseSeedVal = getSlicedNum(29, 32); // 0~4096

  p.setup = () => {
    p.createCanvas(500, 500).parent('p5sketch');
    p.background(backgroundColorV1, backgroundColorV2, backgroundColorV3, 255);
  
    p.randomSeed(randomSeedVal);
    p.noiseSeed(noiseSeedVal);
   
    for (let i = 0; i < drawIterateVal; i++){
      const x = p.random(p.width);
      const y = p.random(p.height);
      const noiseFactor = p.noise(x*noiseScale, y*noiseScale);
      const lineLength = noiseFactor * lineLengthSeed;
      
      p.push();
      p.translate(x, y);
      p.rotate(noiseFactor * p.radians(rotateSeed));
      p.stroke(strokeColorV1, strokeColorV2, strokeColorV3, 3);
      p.strokeWeight(1);
      p.line(0, 0, lineLength, lineLength);
      p.pop();
    }
  }
}

// ref. https://discourse.processing.org/t/instance-mode-creating-two-canvas/14121
new p5(sketch);

const DemoNft: React.FC = () => {
  return (
    <div id = "p5sketch">
      {/* p5 instance will be created here --> */}
    </div>
  );
}

export default DemoNft;

TokenIdがハードコードされているのは、プロトタイプだったからということでご容赦を。。

TokenIdをhash化した上で、アート画像を生成するための各パラメータをhash値のsliceから割り当てる、という方法をとってみました。

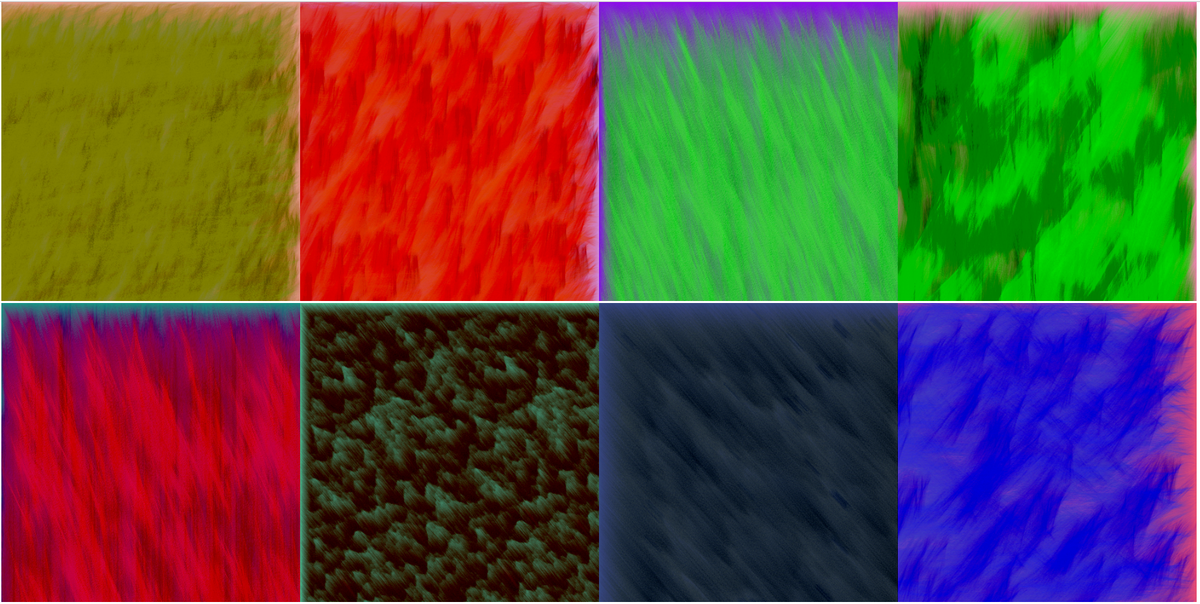
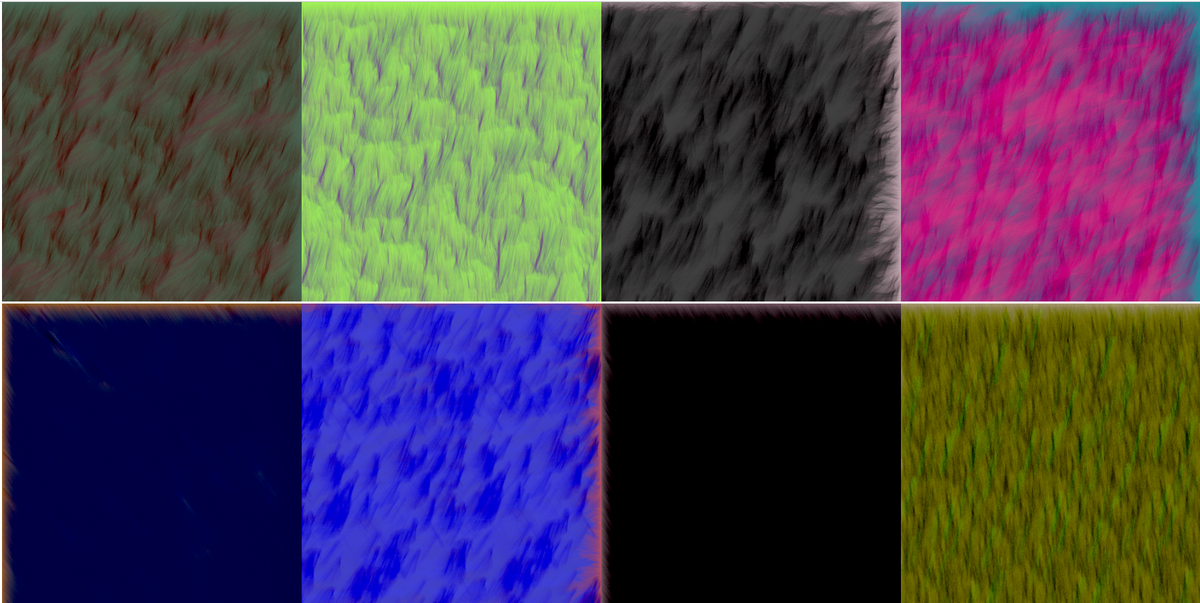
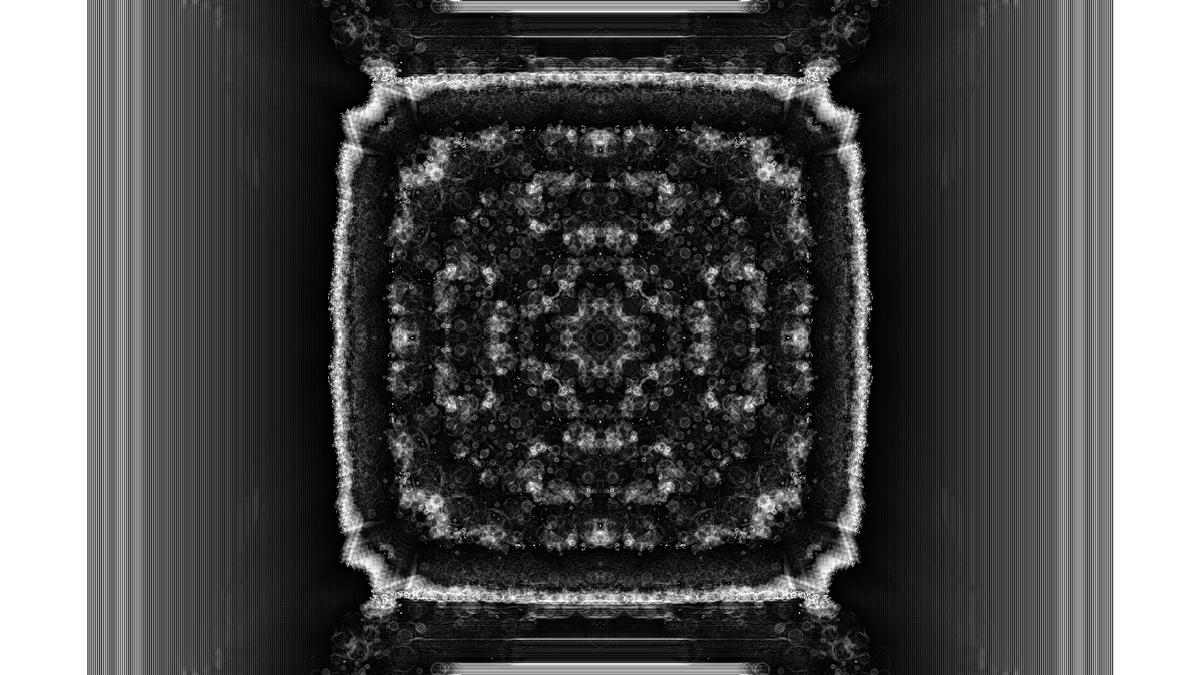
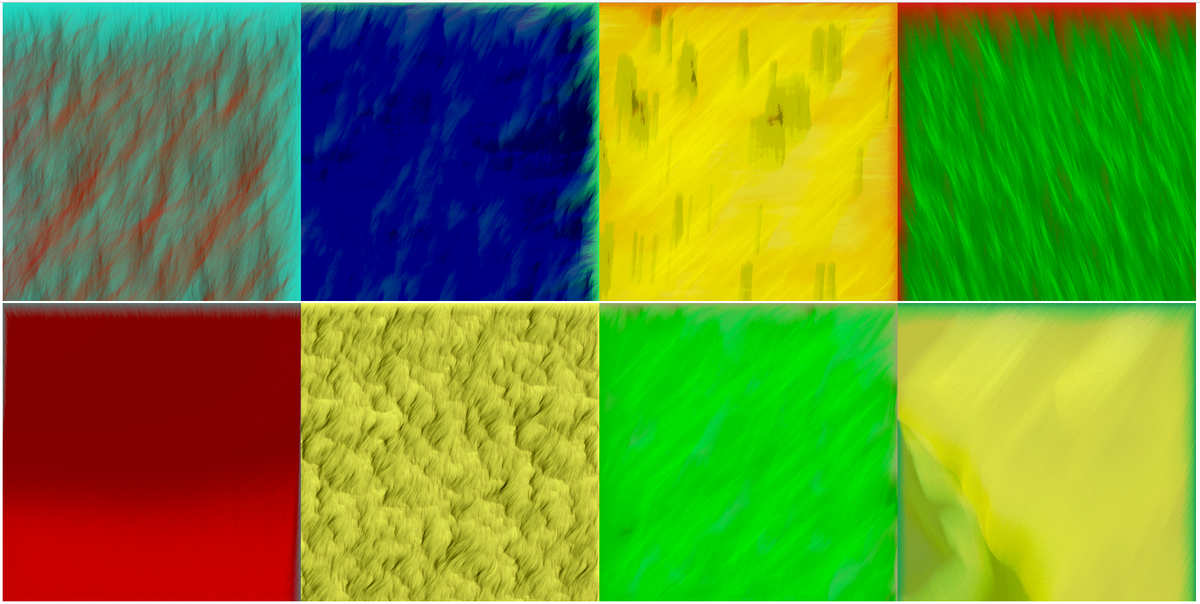
発想はシンプルですが、それぞれのTokenIdから全く異なるテイストのアート画像を生成することに成功しています。

出力アート画像例:

入力TokenId, 左上から順に1~4, 5~8

入力TokenId, 左上から順に1000~1003, 1004~1007

入力TokenId, 左上から順に1000000001~1000000001, 1000000005~1000000005

最終バージョン: ts-nodeで実行

上記をベースとしつつも、修正した上で最終プロダクトに利用しています。

  1. Reactコンポーネントではなく、ts-nodeスクリプトとして実行できる形にする
  2. アート画像生成ロジック/出力結果を軽くする

フロントエンド側で都度アート画像生成をさせるのは処理が重すぎるので、あらかじめ生成したアート画像をCanisterにアップロードするよう設計を変更しました。

それでもまだ表示速度に問題があったので、生成画像サイズを軽くする変更を加えています。

最終的なソースコードはこちら: github.com

おわりに

以上、GenerativeArtNFTで使ったアート画像生成ロジックをメモしました。

久しぶりにGenerative Artなコードを書きましたが、普通のエンジニアリングとはまた違った試行錯誤が求められて、やはり楽しいですね。

調べてみると、最近はまたいろいろなクリエイティブコーディングツールがでてきているようです。 Rustで書けるnannouなんかも面白そう。

Generative Art人工生命は以前から興味の対象でしたので、また遊びがてら書いていきたいところです。

[関連記事]

www.bioerrorlog.work

www.bioerrorlog.work

www.bioerrorlog.work

参考

Flippy (NFT Barter) | Devpost

GitHub - Japan-DfinityInfoHub/generative-art-nft

GitHub - Japan-DfinityInfoHub/nft-barter

NFTの絵柄を生成するコード · Issue #2 · Japan-DfinityInfoHub/generative-art-nft · GitHub

GitHub - bioerrorlog/p5-in-react: PoC for demo NFT implementation

home | p5.js

Perlin noise - Wikipedia

GitHub Actionsでdfx/vessel/mocをインストールする | Motoko, Internet Computer

GitHub Actionsでdfx / vessel / mocをインストールする便利な方法を紹介します。

はじめに

こんにちは、@bioerrorlogです。

dfxによるcanister操作や、Motokoのコンパイル&Unitテストの実行をGitHub Actionsで行いたいときは、dfx / vessel / moc をGitHub Actionsのjob内でインストールする必要があります。

律儀にそれぞれをコマンドでインストールしてもよいのですが、コミュニティから開発されているactionsを使えば、とても簡単にインストールできます。

今回は、そのactionsを使ってdfx / vessel / mocをインストールする方法を紹介します。

GitHub Actionsでdfx/vessel/mocをインストールする

aviate-labs/setup-dfx の紹介

aviate-labsのsetup-dfxを使えば、簡単にdfx / vessel / mocを簡単にインストールすることが出来ます。

github.com

このactionsのinputは下記の3つです。

inputs:
  dfx-version:
    description: 'The dfx version to download.'
  install-moc:
    description: 'Whether to install moc through dfx.'
    default: false
  vessel-version:
    description: 'The vessel version to download.'
  • dfx-version: 指定したバージョンのdfxがインストールされる
  • install-moc: dfx経由でmocをインストールするかどうかを指定できる
  • vessel-version: 指定したバージョンのvesselがインストールされる

dfx-versionvessel-versionはそのまま読んで字のごとくです。 指定したバージョンがインストールされ、指定しなかった場合はインストールされません。

一方、install-mocは少し意図を捉えにくいですね。 一言でいうと、install-moctrueにすることでmocコマンドをmocで実行できるようになります。 (PATHが通った状態になる)

少しややこしいので、mocインストールの背景から軽く整理しましょう。

mocバイナリの置かれる場所には、大きく二つあります。

  • dfx cache配下
  • vessel bin配下

dfx cache配下に置かれたmocを実行するには、下記のようなコマンドを使います。

$(dfx cache show)/moc

一方vessel bin配下のmocを実行するには、下記のようなコマンドが使われます。

$(vessel bin)/moc

ここでsetup-dfxのinstall-mocパラメータに話を戻すと、install-moctrueに指定することでdfx cache showの結果がPATHに登録されるようになります:

        // Install dfx cache to get moc.
        if (core.getBooleanInput('install-moc')) {
            cp.execSync(`${dfxPath} cache install`);
            const cachePath = infoExec(`${dfxPath} cache show`).trim();
            core.addPath(cachePath);

            const mocPath = await io.which('moc');
            infoExec(`${mocPath} --version`);
        }

ソースコードより

よって、$(dfx cache show)/mocとやらなくてもmocだけでmocコマンドを実行できるようになる、ということです。

実装例

では、actionsの実装例を軽く示します。

name: Setup dfx

on:
  push:

jobs:
  setup-dfx:
    runs-on: ubuntu-latest

    env:
      VESSEL_VERSION: 0.6.3
      DFX_VERSION: 0.9.3

    steps:
      - uses: actions/checkout@v2
      - uses:  aviate-labs/setup-dfx@v0.2.3
        with:
          dfx-version: ${{ env.DFX_VERSION }}
          install-moc: true
          vessel-version: ${{ env.VESSEL_VERSION }}
      - name: Show versions
        run: |
          dfx --version
          moc --version
          vessel --version
      - name: Motoko type checking
        run: |
          for i in src/*.mo ; do moc $(vessel sources) --check $i ; done

dfx/moc/vesselを全てインストールし、Motoko type checkを実行する例です。

Motoko type checkについての詳細は本記事では割愛しますが、それぞれのコマンドがGitHub Actions内で使えるようになったことが分かります。

おわりに

GitHub Actionsでdfx / vessel / mocをインストールする便利な方法を紹介しました。

Internet Computerのcanister開発においても、Actionsを使いこなして良いCICDライフを送りたいものです。

[関連記事]

www.bioerrorlog.work

www.bioerrorlog.work

www.bioerrorlog.work

参考

GitHub - aviate-labs/setup-dfx: Set up your GitHub Actions workflow with a specific version of the Internet Computer SDK

GitHub - dfinity/sdk: The DFINITY Canister Software Development Kit (SDK)

GitHub - dfinity/vessel: Simple package management for Motoko

Compiler reference | Internet Computer Home

actions-tests/setup-dfx.yml at main · bioerrorlog/actions-tests · GitHub

cancan/scripts at main · dfinity/cancan · GitHub

GitHub - Japan-DfinityInfoHub/nft-barter

"an NFT" or "a NFT"?

"an NFT" なのか "a NFT" なのか、混乱してしまったときのための備忘録です。

はじめに

こんにちは、@bioerrorlogです。

"NFT"という単語を英文の中で書くとき、単数形が"an NFT"なのか"a NFT"なのか、油断すると混乱してしまうことありませんか?

口に出して喋っているときは迷わないのに、手を動かして書くとおや?となってしまうのは私だけでしょうか。

同じ混乱を体験してしまった方のために、恥を忍んで備忘録を書きます。

"an NFT" or "a NFT"?

an NFT

が正です。


そもそもの頭の整理をすると、"an" を付けたくなるは後続の発音が母音のときですよね。

"NFT"という単語は、口に出して発音すると "en-ef-tee" です。

・・・はい、母音なので"an"を付けましょう。


念には念を入れていくつか文献をあたってみると、

Non-fungible tokens (NFT) | ethereum.org

Non-fungible token - Wikipedia

EthereumのドキュメントもWikipediaも、"an NFT"と記載していますね。

おわりに

言葉というものは、油断すると混乱してしまことがありますよね。(ないですか?)

以上、ちょっとした備忘録でした。

[関連記事]

www.bioerrorlog.work

www.bioerrorlog.work

www.bioerrorlog.work

参考

articles - "An NFT" vs "a NFT" - English Language Learners Stack Exchange

Non-fungible tokens (NFT) | ethereum.org

Non-fungible token - Wikipedia

dfx deploy と dfx canister install の違いをソースコードから理解する | Dfinity, Internet Computer

Internet ComputerのSDKコマンドdfx deploydfx canister installの違いを整理し、ソースコードからこれらを読み解きます。

はじめに

こんにちは、@bioerrorlogです。

dfx deploydfx canister installは共に、Internet Computerのcanisterをデプロイするコマンドです。

dfx deployはいろいろと勝手にやってくれるコマンド、dfx canister installdfx buildとかいろいろ事前にやっておかないといけないやつ、くらいの認識はあっても、ふとした瞬間に両者を混同しがちです。

--helpフラッグのコマンド解説に互いへの言及が無いのも、分かりにくいポイントでしょう。

そこで今回は、dfx deploydfx canister installの違いを整理し、ソースコードからもこれらを読み解いていきます。

dfx deploy と dfx canister install の違い

dfx deploydfx canister installの違いは、ドキュメントで説明されています。

整理すると、dfx deploy下記の3つのコマンドをまとめて実行するコマンドと言えます。

dfx canister create --all
dfx build
dfx canister install --all

dfx deployはデフォルトで全てのcanister(上記における--all)を対象としますが、この辺りはパラメータから変更可能です。

これらのコマンドの使い分け方針としては、

  • 特にこだわりがない場合はdfx deployが簡単
  • 各ステップ(create/build/install)の実行タイミングを制御したいときは個別コマンドが良い
  • 各ステップ(create/build/install)でオプションを細かく設定したいときは個別コマンドが見やすい

といった感じでしょうか。

上手いこと使い分けていきたいところですね。

ソースコードから読み解く

dfx deploydfx canister installの違いは理解できましたが、せっかくなのでソースコードからも読み解いていきます。

github.com

dfx deployの実装

まずは↓を出発点としましょうか。

pub fn exec(env: &dyn Environment, cmd: Command) -> DfxResult {
    match cmd {
        Command::Bootstrap(v) => bootstrap::exec(env, v),
        Command::Build(v) => build::exec(env, v),
        Command::Cache(v) => cache::exec(env, v),
        Command::Canister(v) => canister::exec(env, v),
        Command::Config(v) => config::exec(env, v),
        Command::Deploy(v) => deploy::exec(env, v),
        Command::Generate(v) => generate::exec(env, v),
        Command::Identity(v) => identity::exec(env, v),
        Command::LanguageServices(v) => language_service::exec(env, v),
        Command::Ledger(v) => ledger::exec(env, v),
        Command::New(v) => new::exec(env, v),
        Command::Ping(v) => ping::exec(env, v),
        Command::Remote(v) => remote::exec(env, v),
        Command::Replica(v) => replica::exec(env, v),
        Command::Start(v) => start::exec(env, v),
        Command::Stop(v) => stop::exec(env, v),
        Command::Toolchain(v) => toolchain::exec(env, v),
        Command::Upgrade(v) => upgrade::exec(env, v),
        Command::Wallet(v) => wallet::exec(env, v),
    }
}

sdk/mod.rs at 3e3127acb87bd6782a537d96190f0f897655cd5e · dfinity/sdk · GitHub

この部分から、dfxに与えられるサブコマンド毎に実行されるコードを辿ることができます。 Command::Deploy(v)からはdeploy::exec(env, v)が実行されているようです。

deploy::execの実装を見に行きしょう。

pub fn exec(env: &dyn Environment, opts: DeployOpts) -> DfxResult {
    let env = create_agent_environment(env, opts.network)?;

    let timeout = expiry_duration();
    let canister_name = opts.canister_name.as_deref();
    let argument = opts.argument.as_deref();
    let argument_type = opts.argument_type.as_deref();
    let mode = opts
        .mode
        .as_deref()
        .map(InstallMode::from_str)
        .transpose()
        .map_err(|err| anyhow!(err))?;

    let with_cycles = opts.with_cycles.as_deref();

    let force_reinstall = match (mode, canister_name) {
        (None, _) => false,
        (Some(InstallMode::Reinstall), Some(_canister_name)) => true,
        (Some(InstallMode::Reinstall), None) => {
            bail!("The --mode=reinstall is only valid when deploying a single canister, because reinstallation destroys all data in the canister.");
        }
        (Some(_), _) => {
            unreachable!("The only valid option for --mode is --mode=reinstall");
        }
    };

    let runtime = Runtime::new().expect("Unable to create a runtime");

    let call_sender = runtime.block_on(call_sender(&env, &opts.wallet))?;
    let proxy_sender;
    let create_call_sender = if !opts.no_wallet && !matches!(call_sender, CallSender::Wallet(_)) {
        let wallet = runtime.block_on(Identity::get_or_create_wallet_canister(
            &env,
            env.get_network_descriptor()
                .expect("Couldn't get the network descriptor"),
            env.get_selected_identity().expect("No selected identity"),
            true,
        ))?;
        proxy_sender = CallSender::Wallet(*wallet.canister_id_());
        &proxy_sender
    } else {
        &call_sender
    };
    runtime.block_on(fetch_root_key_if_needed(&env))?;

    runtime.block_on(deploy_canisters(
        &env,
        canister_name,
        argument,
        argument_type,
        force_reinstall,
        timeout,
        with_cycles,
        &call_sender,
        create_call_sender,
    ))
}

sdk/deploy.rs at 3e3127acb87bd6782a537d96190f0f897655cd5e · dfinity/sdk · GitHub

ちょっと長いですね。

でも落ち着いて読んでみると、最終的に実行されているのは以下の部分のようです。

   runtime.block_on(deploy_canisters(
        &env,
        canister_name,
        argument,
        argument_type,
        force_reinstall,
        timeout,
        with_cycles,
        &call_sender,
        create_call_sender,
    ))
}

deploy_canistersというそれっぽい名前の関数が実行されていますね。

この関数は、

use crate::lib::operations::canister::deploy_canisters;

インポートされています

これを頼りにdeploy_canistersの実装元を見に行きましょう。

pub async fn deploy_canisters(
    env: &dyn Environment,
    some_canister: Option<&str>,
    argument: Option<&str>,
    argument_type: Option<&str>,
    force_reinstall: bool,
    upgrade_unchanged: bool,
    timeout: Duration,
    with_cycles: Option<&str>,
    call_sender: &CallSender,
    create_call_sender: &CallSender,
) -> DfxResult {
    let log = env.get_logger();

    let config = env
        .get_config()
        .ok_or_else(|| anyhow!("Cannot find dfx configuration file in the current working directory. Did you forget to create one?"))?;
    let initial_canister_id_store = CanisterIdStore::for_env(env)?;

    let network = env.get_network_descriptor().unwrap();

    let canisters_to_build = canister_with_dependencies(&config, some_canister)?;

    let canisters_to_deploy = if force_reinstall {
        // don't force-reinstall the dependencies too.
        match some_canister {
            Some(canister_name) => {
                if config.get_config().is_remote_canister(canister_name, &network.name)? {
                    bail!("The '{}' canister is remote for network '{}' and cannot be force-reinstalled from here",
                    canister_name, &network.name);
                }
                vec!(String::from(canister_name))
            },
            None => bail!("The --mode=reinstall is only valid when deploying a single canister, because reinstallation destroys all data in the canister."),
        }
    } else {
        canisters_to_build.clone()
    };
    let canisters_to_deploy: Vec<String> = canisters_to_deploy
        .into_iter()
        .filter(|canister_name| {
            !matches!(
                config
                    .get_config()
                    .get_remote_canister_id(canister_name, &network.name),
                Ok(Some(_))
            )
        })
        .collect();

    if some_canister.is_some() {
        info!(log, "Deploying: {}", canisters_to_deploy.join(" "));
    } else {
        info!(log, "Deploying all canisters.");
    }

    register_canisters(
        env,
        &canisters_to_build,
        &initial_canister_id_store,
        timeout,
        with_cycles,
        create_call_sender,
        &config,
    )
    .await?;

    build_canisters(env, &canisters_to_build, &config)?;

    install_canisters(
        env,
        &canisters_to_deploy,
        &initial_canister_id_store,
        &config,
        argument,
        argument_type,
        force_reinstall,
        upgrade_unchanged,
        timeout,
        call_sender,
    )
    .await?;

    info!(log, "Deployed canisters.");

    Ok(())
}

sdk/deploy_canisters.rs at 1625fefc0e0dc028875b704031dd8f9a3f83cb19 · dfinity/sdk · GitHub

これまた長いですね。

落ち着いて読んでみると、最終的に以下が実行されていることが分かります。

    register_canisters(
        env,
        &canisters_to_build,
        &initial_canister_id_store,
        timeout,
        with_cycles,
        create_call_sender,
        &config,
    )
    .await?;

    build_canisters(env, &canisters_to_build, &config)?;

    install_canisters(
        env,
        &canisters_to_deploy,
        &initial_canister_id_store,
        &config,
        argument,
        argument_type,
        force_reinstall,
        upgrade_unchanged,
        timeout,
        call_sender,
    )
    .await?;

register_canisters/build_canisters/install_canisters三段階に分かれていますね。

先ほど、dfx deployは下記の3つのコマンドをまとめて実行するコマンド、とお伝えしました。

dfx canister create --all
dfx build
dfx canister install --all

この各コマンドと上記の三段階 (register_canisters/build_canisters/install_canisters) の処理にそれぞれ対応していれば、納得感があります。

それぞれ見ていきましょう。

register_canistersとdfx canister create

register_canistersdfx canister createが同じ処理をしているのかを見ていきます。

まずはregister_canistersの実装をもう少し追いかけてみましょう。

register_canistersは、deploy_canistersと同じmoduleに実装されています。

async fn register_canisters(
    env: &dyn Environment,
    canister_names: &[String],
    canister_id_store: &CanisterIdStore,
    timeout: Duration,
    with_cycles: Option<&str>,
    call_sender: &CallSender,
    config: &Config,
) -> DfxResult {
    let canisters_to_create = canister_names
        .iter()
        .filter(|n| canister_id_store.find(n).is_none())
        .cloned()
        .collect::<Vec<String>>();
    if canisters_to_create.is_empty() {
        info!(env.get_logger(), "All canisters have already been created.");
    } else {
        info!(env.get_logger(), "Creating canisters...");
        for canister_name in &canisters_to_create {
            let config_interface = config.get_config();
            let compute_allocation =
                config_interface
                    .get_compute_allocation(canister_name)?
                    .map(|arg| {
                        ComputeAllocation::try_from(arg.parse::<u64>().unwrap())
                            .expect("Compute Allocation must be a percentage.")
                    });
            let memory_allocation =
                config_interface
                    .get_memory_allocation(canister_name)?
                    .map(|arg| {
                        MemoryAllocation::try_from(
                        u64::try_from(arg.parse::<Bytes>().unwrap().size()).unwrap(),
                    )
                    .expect(
                        "Memory allocation must be between 0 and 2^48 (i.e 256TB), inclusively.",
                    )
                    });
            let freezing_threshold =
                config_interface
                    .get_freezing_threshold(canister_name)?
                    .map(|arg| {
                        FreezingThreshold::try_from(
                            u128::try_from(arg.parse::<Bytes>().unwrap().size()).unwrap(),
                        )
                        .expect("Freezing threshold must be between 0 and 2^64-1, inclusively.")
                    });
            let controllers = None;
            create_canister(
                env,
                canister_name,
                timeout,
                with_cycles,
                call_sender,
                CanisterSettings {
                    controllers,
                    compute_allocation,
                    memory_allocation,
                    freezing_threshold,
                },
            )
            .await?;
        }
    }
    Ok(())
}

sdk/deploy_canisters.rs at 1625fefc0e0dc028875b704031dd8f9a3f83cb19 · dfinity/sdk · GitHub

ざっくり、create_canisterがcanisterの数だけ実行されていることが分かります。

useによるインポートを確認すると、このcreate_canistercrate::lib::operations::canisterに宣言されています。

use crate::lib::operations::canister::{create_canister, install_canister};

sdk/deploy_canisters.rs at 1625fefc0e0dc028875b704031dd8f9a3f83cb19 · dfinity/sdk · GitHub

よってregister_canistersは、crate::lib::operations::canistercreate_canisterが、canisterの数だけ実行される、と読み取れます。


では次に、dfx canister createも同じ処理を処理をしているのかを見にいきましょう。

dfx deployのときと同じ手順でdfx canister createの実装を辿っていくと、下記のコードに行き当たります。

pub async fn exec(
    env: &dyn Environment,
    opts: CanisterCreateOpts,
    mut call_sender: &CallSender,
) -> DfxResult {
    let config = env.get_config_or_anyhow()?;
    let timeout = expiry_duration();

    fetch_root_key_if_needed(env).await?;

    let with_cycles = opts.with_cycles.as_deref();

    let config_interface = config.get_config();
    let network = env.get_network_descriptor().unwrap();

    let proxy_sender;
    if !opts.no_wallet && !matches!(call_sender, CallSender::Wallet(_)) {
        let wallet = Identity::get_or_create_wallet_canister(
            env,
            env.get_network_descriptor()
                .expect("Couldn't get the network descriptor"),
            env.get_selected_identity().expect("No selected identity"),
            false,
        )
        .await?;
        proxy_sender = CallSender::Wallet(*wallet.canister_id_());
        call_sender = &proxy_sender;
    }

    let controllers: Option<Vec<_>> = opts
        .controller
        .clone()
        .map(|controllers| {
            controllers
                .iter()
                .map(
                    |controller| match CanisterId::from_text(controller.clone()) {
                        Ok(principal) => Ok(principal),
                        Err(_) => {
                            let current_id = env.get_selected_identity().unwrap();
                            if current_id == controller {
                                Ok(env.get_selected_identity_principal().unwrap())
                            } else {
                                let identity_name = controller;
                                IdentityManager::new(env)?
                                    .instantiate_identity_from_name(identity_name)
                                    .and_then(|identity| {
                                        identity.sender().map_err(|err| anyhow!(err))
                                    })
                            }
                        }
                    },
                )
                .collect::<DfxResult<Vec<_>>>()
        })
        .transpose()?;

    if let Some(canister_name) = opts.canister_name.as_deref() {
        if config
            .get_config()
            .is_remote_canister(canister_name, &network.name)?
        {
            bail!("Canister '{}' is a remote canister on network '{}', and cannot be created from here.", canister_name, &network.name)
        }
        let compute_allocation = get_compute_allocation(
            opts.compute_allocation.clone(),
            config_interface,
            Some(canister_name),
        )?;
        let memory_allocation = get_memory_allocation(
            opts.memory_allocation.clone(),
            config_interface,
            Some(canister_name),
        )?;
        let freezing_threshold = get_freezing_threshold(
            opts.freezing_threshold.clone(),
            config_interface,
            Some(canister_name),
        )?;
        create_canister(
            env,
            canister_name,
            timeout,
            with_cycles,
            call_sender,
            CanisterSettings {
                controllers,
                compute_allocation,
                memory_allocation,
                freezing_threshold,
            },
        )
        .await?;
        Ok(())
    } else if opts.all {
        // Create all canisters.
        if let Some(canisters) = &config.get_config().canisters {
            for canister_name in canisters.keys() {
                if config
                    .get_config()
                    .is_remote_canister(canister_name, &network.name)?
                {
                    info!(
                        env.get_logger(),
                        "Skipping canister '{}' because it is remote for network '{}'",
                        canister_name,
                        &network.name,
                    );

                    continue;
                }
                let compute_allocation = get_compute_allocation(
                    opts.compute_allocation.clone(),
                    config_interface,
                    Some(canister_name),
                )?;
                let memory_allocation = get_memory_allocation(
                    opts.memory_allocation.clone(),
                    config_interface,
                    Some(canister_name),
                )?;
                let freezing_threshold = get_freezing_threshold(
                    opts.freezing_threshold.clone(),
                    config_interface,
                    Some(canister_name),
                )?;
                create_canister(
                    env,
                    canister_name,
                    timeout,
                    with_cycles,
                    call_sender,
                    CanisterSettings {
                        controllers: controllers.clone(),
                        compute_allocation,
                        memory_allocation,
                        freezing_threshold,
                    },
                )
                .await?;
            }
        }
        Ok(())
    } else {
        unreachable!()
    }
}

sdk/create.rs at 633ce44308755a34acd994d682af1627d201c275 · dfinity/sdk · GitHub

少し長いですが落ち着いて読んでみましょう。

いくつか分岐がありますが、いずれもcreate_canisterが必要分呼ばれていることが読み取れます。 register_canistersと同じですね。


以上より、dfx deployの第一段階register_canistersは、dfx canister createと大体同じ処理をしていることが分かりました。

build_canistersとdfx build

つぎはbuild_canistersdfx buildが同じ処理をしているのかを見ていきます。

build_canistersの実装はこちらです。

fn build_canisters(env: &dyn Environment, canister_names: &[String], config: &Config) -> DfxResult {
    info!(env.get_logger(), "Building canisters...");
    let build_mode_check = false;
    let canister_pool = CanisterPool::load(env, build_mode_check, canister_names)?;

    canister_pool.build_or_fail(&BuildConfig::from_config(config)?)
}

sdk/deploy_canisters.rs at 1625fefc0e0dc028875b704031dd8f9a3f83cb19 · dfinity/sdk · GitHub

canister_pool.build_or_fail(&BuildConfig::from_config(config)?)が実行されていることが分かります。


一方dfx buildの実装を辿っていくと、下記のコードにたどり着きます。

pub fn exec(env: &dyn Environment, opts: CanisterBuildOpts) -> DfxResult {
    let env = create_agent_environment(env, opts.network)?;

    let logger = env.get_logger();

    // Read the config.
    let config = env.get_config_or_anyhow()?;

    // Check the cache. This will only install the cache if there isn't one installed
    // already.
    env.get_cache().install()?;

    let build_mode_check = opts.check;
    let _all = opts.all;

    // Option can be None in which case --all was specified
    let canister_names = config
        .get_config()
        .get_canister_names_with_dependencies(opts.canister_name.as_deref())?;

    // Get pool of canisters to build
    let canister_pool = CanisterPool::load(&env, build_mode_check, &canister_names)?;

    // Create canisters on the replica and associate canister ids locally.
    if build_mode_check {
        slog::warn!(
            env.get_logger(),
            "Building canisters to check they build ok. Canister IDs might be hard coded."
        );
    } else {
        // CanisterIds would have been set in CanisterPool::load, if available.
        // This is just to display an error if trying to build before creating the canister.
        let store = CanisterIdStore::for_env(&env)?;
        for canister in canister_pool.get_canister_list() {
            store.get(canister.get_name())?;
        }
    }

    slog::info!(logger, "Building canisters...");

    canister_pool.build_or_fail(
        &BuildConfig::from_config(&config)?.with_build_mode_check(build_mode_check),
    )?;

    Ok(())
}

sdk/build.rs at 3e3127acb87bd6782a537d96190f0f897655cd5e · dfinity/sdk · GitHub

build_canistersよりだいぶ長いコードに見えますが、最終的には同じcanister_pool.build_or_failが実行されています。


以上より、build_canistersdfx buildも似たような処理をしていることが分かりました。

install_canistersとdfx canister install

最後にinstall_canistersdfx canister installも同じ処理をしているのかを見ていきます。

install_canistersの実装はこちらです。

async fn install_canisters(
    env: &dyn Environment,
    canister_names: &[String],
    initial_canister_id_store: &CanisterIdStore,
    config: &Config,
    argument: Option<&str>,
    argument_type: Option<&str>,
    force_reinstall: bool,
    upgrade_unchanged: bool,
    timeout: Duration,
    call_sender: &CallSender,
) -> DfxResult {
    info!(env.get_logger(), "Installing canisters...");

    let agent = env
        .get_agent()
        .ok_or_else(|| anyhow!("Cannot find dfx configuration file in the current working directory. Did you forget to create one?"))?;

    let canister_id_store = CanisterIdStore::for_env(env)?;

    for canister_name in canister_names {
        let (install_mode, installed_module_hash) = if force_reinstall {
            (InstallMode::Reinstall, None)
        } else {
            match initial_canister_id_store.find(canister_name) {
                Some(canister_id) => {
                    match agent
                        .read_state_canister_info(canister_id, "module_hash", false)
                        .await
                    {
                        Ok(installed_module_hash) => {
                            (InstallMode::Upgrade, Some(installed_module_hash))
                        }
                        // If the canister is empty, this path does not exist.
                        // The replica doesn't support negative lookups, therefore if the canister
                        // is empty, the replica will return lookup_path([], Pruned _) = Unknown
                        Err(AgentError::LookupPathUnknown(_))
                        | Err(AgentError::LookupPathAbsent(_)) => (InstallMode::Install, None),
                        Err(x) => bail!(x),
                    }
                }
                None => (InstallMode::Install, None),
            }
        };

        let canister_id = canister_id_store.get(canister_name)?;
        let canister_info = CanisterInfo::load(config, canister_name, Some(canister_id))?;

        let maybe_path = canister_info.get_output_idl_path();
        let init_type = maybe_path.and_then(|path| get_candid_init_type(&path));
        let install_args = blob_from_arguments(argument, None, argument_type, &init_type)?;

        install_canister(
            env,
            agent,
            &canister_info,
            &install_args,
            install_mode,
            timeout,
            call_sender,
            installed_module_hash,
            upgrade_unchanged,
        )
        .await?;
    }

    Ok(())
}

sdk/deploy_canisters.rs at 1625fefc0e0dc028875b704031dd8f9a3f83cb19 · dfinity/sdk · GitHub

Canisterをfor loopで回してinstall_canisterを実行しています。 ちょうどregister_canistersと似たような実装ですね。


一方dfx canister installの方はというと、

pub async fn exec(
    env: &dyn Environment,
    opts: CanisterInstallOpts,
    call_sender: &CallSender,
) -> DfxResult {
    let config = env.get_config_or_anyhow()?;
    let agent = env
        .get_agent()
        .ok_or_else(|| anyhow!("Cannot get HTTP client from environment."))?;
    let timeout = expiry_duration();

    fetch_root_key_if_needed(env).await?;

    let mode = InstallMode::from_str(opts.mode.as_str()).map_err(|err| anyhow!(err))?;
    let canister_id_store = CanisterIdStore::for_env(env)?;
    let network = env.get_network_descriptor().unwrap();

    if mode == InstallMode::Reinstall && (opts.canister.is_none() || opts.all) {
        bail!("The --mode=reinstall is only valid when specifying a single canister, because reinstallation destroys all data in the canister.");
    }

    if let Some(canister) = opts.canister.as_deref() {
        if config
            .get_config()
            .is_remote_canister(canister, &network.name)?
        {
            bail!("Canister '{}' is a remote canister on network '{}', and cannot be installed from here.", canister, &network.name)
        }

        let canister_id =
            Principal::from_text(canister).or_else(|_| canister_id_store.get(canister))?;
        let canister_info = CanisterInfo::load(&config, canister, Some(canister_id))?;

        let maybe_path = canister_info.get_output_idl_path();
        let init_type = maybe_path.and_then(|path| get_candid_init_type(&path));
        let arguments = opts.argument.as_deref();
        let arg_type = opts.argument_type.as_deref();
        let install_args = blob_from_arguments(arguments, None, arg_type, &init_type)?;
        let installed_module_hash =
            read_module_hash(agent, &canister_id_store, &canister_info).await?;

        install_canister(
            env,
            agent,
            &canister_info,
            &install_args,
            mode,
            timeout,
            call_sender,
            installed_module_hash,
        )
        .await
    } else if opts.all {
        // Install all canisters.

        if let Some(canisters) = &config.get_config().canisters {
            for canister in canisters.keys() {
                if config
                    .get_config()
                    .is_remote_canister(canister, &network.name)?
                {
                    info!(
                        env.get_logger(),
                        "Skipping canister '{}' because it is remote for network '{}'",
                        canister,
                        &network.name,
                    );

                    continue;
                }
                let canister_id =
                    Principal::from_text(canister).or_else(|_| canister_id_store.get(canister))?;
                let canister_info = CanisterInfo::load(&config, canister, Some(canister_id))?;
                let installed_module_hash =
                    read_module_hash(agent, &canister_id_store, &canister_info).await?;

                let install_args = [];

                install_canister(
                    env,
                    agent,
                    &canister_info,
                    &install_args,
                    mode,
                    timeout,
                    call_sender,
                    installed_module_hash,
                )
                .await?;
            }
        }
        Ok(())
    } else {
        unreachable!()
    }
}

sdk/install.rs at 3e3127acb87bd6782a537d96190f0f897655cd5e · dfinity/sdk · GitHub

こちらもcanisterごとにinstall_canisterを実行しています。

install_canistersと同じですね。

まとめ

以上より、

  • dfx deployregister_canisters / build_canisters / install_canisters の三段階の処理で構成される
  • register_canistersdfx canister createコマンドと似たような処理をやっている
  • build_canistersdfx buildコマンドと似たような処理をやっている
  • install_canistersdfx canister installコマンドと似たような処理をやっている
  • よってdfx deployコマンドはdfx canister create / dfx build / dfx canister install の三つのコマンドをまとめたようなものである

ということが理解できました。

おわりに

今回は、dfx deploydfx canister installの違いを整理したうえで、ソースコードを読み込んでみました。

最近Rustに入門したことでDfintiy / Internet Computer関連のソースコードも抵抗なく読めるようになりました。 楽しみがまたひとつ増えたのは嬉しいことです。

今後も都度ソースコードをあたりながら、この界隈を深く楽しんでいければと思っています。

[関連記事]

www.bioerrorlog.work

www.bioerrorlog.work

www.bioerrorlog.work

参考

dfx deploy :: Internet Computer

GitHub - dfinity/sdk: The DFINITY Canister Software Development Kit (SDK)
ローカル開発でCandid UIを利用する | Dfinity, Internet Computer

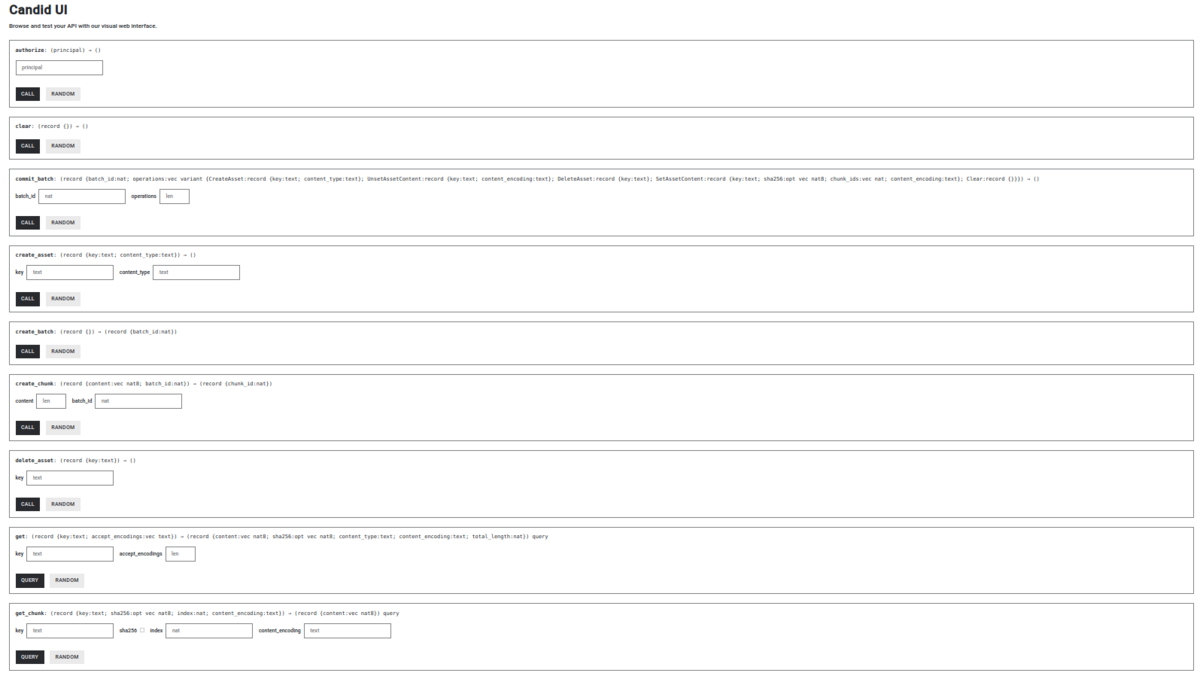
下記の手順でCandid UIを表示できます。

# Candid UI canisterのidを取得
dfx canister id __Candid_UI
# 例: r7inp-6aaaa-aaaaa-aaabq-cai

# Candid UI canister idをURLに埋め込んでブラウザアクセス
# http://127.0.0.1:8000/?canisterId=<CANDID-UI-CANISTER-IDENTIFIER>
# 例:
http://127.0.0.1:8000/?canisterId=r7inp-6aaaa-aaaaa-aaabq-cai

# さらにCandid UIからcallしたいcanister idをURLに埋め込んでおけばすぐに使える
dfx canister id my_candid
# rrkah-fqaaa-aaaaa-aaaaq-cai
http://127.0.0.1:8000/?canisterId=r7inp-6aaaa-aaaaa-aaabq-cai&id=rrkah-fqaaa-aaaaa-aaaaq-cai

はじめに

こんにちは@bioerrorlogです。

Candid UIを使うと、手軽にcanisterの関数をcallすることができます。

dfx canister callコマンドを使ってももちろんcanisterを叩くことが出来ますが、手軽にGUIでぽちっとcallできるのは嬉しい機能です。

自分はCandid UIの使い方をよく忘れてググり直しているので、今回はそのCandid UIの使い方を備忘録として書いておきます。

Candid UIを利用する

使い方

まず、Candid UI canisterのidを取得します。

# Candid UI canisterのidを取得
dfx canister id __Candid_UI
# 例: r7inp-6aaaa-aaaaa-aaabq-cai

取得したidを下記のようにURLに埋め込むと、ブラウザからcanister選択画面にアクセスできます。

# Candid UI canister idをURLに埋め込んでブラウザアクセス
http://127.0.0.1:8000/?canisterId=<CANDID-UI-CANISTER-IDENTIFIER>
# 例:
http://127.0.0.1:8000/?canisterId=r7inp-6aaaa-aaaaa-aaabq-cai

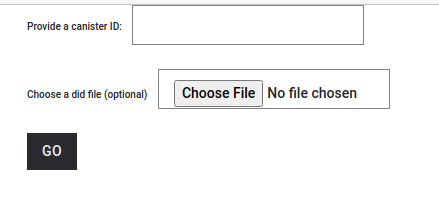
Candid UI: canister選択画面

この画面でcall対象のcanister idを入力すれば、canister関数のcall画面に遷移します。

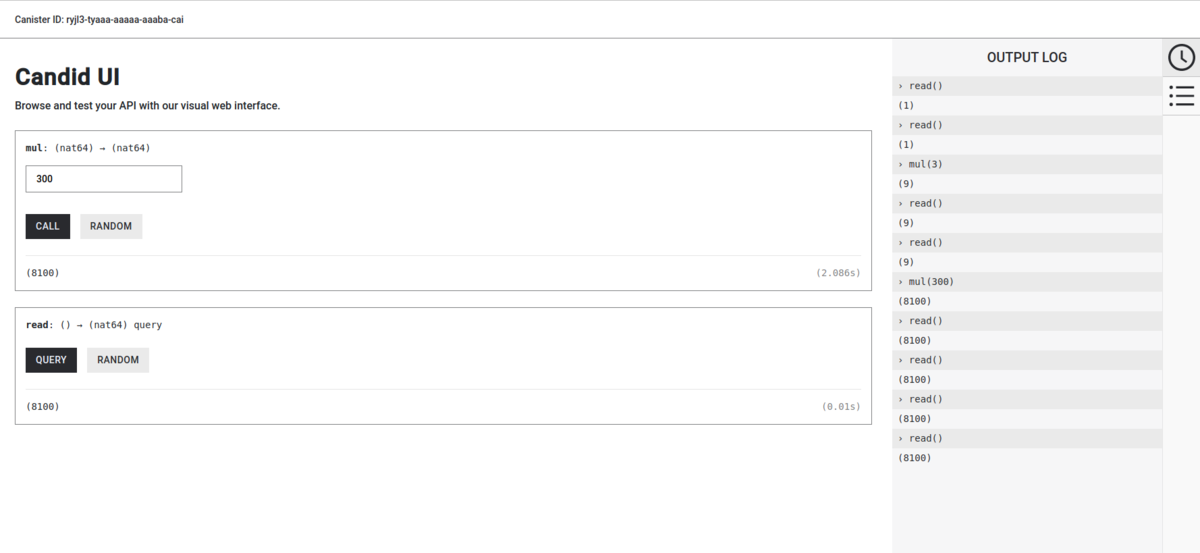
Candid UI: call画面

あるいは、はじめからcall対象のcanister idをURLに埋め込んでおけば、すぐcanister関数のcall画面を使うことができます。

# callしたいcanister idを取得
dfx canister id my_candid
# rrkah-fqaaa-aaaaa-aaaaq-cai

# canister idをURLに埋め込む
http://127.0.0.1:8000/?canisterId=<CANDID-UI-CANISTER-IDENTIFIER>&id=<call対象のcanister id>
# 例
http://127.0.0.1:8000/?canisterId=r7inp-6aaaa-aaaaa-aaabq-cai&id=rrkah-fqaaa-aaaaa-aaaaq-cai


ちなみに、ローカル開発の場合はcanister idが大抵同じ値です。

  • Candid UI: r7inp-6aaaa-aaaaa-aaabq-cai
  • バックエンドCanister: rrkah-fqaaa-aaaaa-aaaaq-cai

なので、下記のURLをブックマークしておけばCandid UIをすぐに利用できるのでオススメです。

http://127.0.0.1:8000/?canisterId=r7inp-6aaaa-aaaaa-aaabq-cai&id=rrkah-fqaaa-aaaaa-aaaaq-cai

余談1: Asset canisterのcandid

ちなみにみなさん、フロント側のcanister(asset canister)のcandidを眺めたことはありますか?

実はこのasset canister、デフォルトで面白いcandidインターフェースが実装されています。

Asset canisterをCandid UIで表示 (抜粋)

Asset canisterのcandidをCandid UIで確認するには、本記事で書いた通りの手順に従えばOKです。

# Candid UI canisterのidを取得
dfx canister id __Candid_UI
# r7inp-6aaaa-aaaaa-aaabq-cai

# Asset canisterのidを取得
dfx canister id  my_canister_assets
# r7inp-6aaaa-aaaaa-aaabq-cai

# 下記URLにアクセス
http://127.0.0.1:8000/?canisterId=r7inp-6aaaa-aaaaa-aaabq-cai&id=ryjl3-tyaaa-aaaaa-aaaba-cai

Asset canisterのcandidについて深堀するとこの記事のスコープを超えてしまうので割愛しますが、気が向いたら別記事にでもまとめようと思います。

余談2: そのうちもっと分かりやすくなる

↑のツイートの通り、近い将来的dfx deploy時に該当のCandid UI URLが表示されるようになります。

今後は少し便利になりますね。

github.com

おわりに

今回は、ローカル開発でCandid UIを利用する方法をまとめました。

Internet Computerでは、Candidという独自規格でcanisterのインターフェースを定義します。 Candid UIは、それに慣れ親しむための有効なツールだと思います。

ぜひ使い慣れていきたいところです。

[関連記事]

www.bioerrorlog.work

www.bioerrorlog.work

www.bioerrorlog.work

参考

How to :: Internet Computer

GitHub - dfinity/candid: Candid Library for the Internet Computer

feat: dfx deploy shows frontend and candid urls by ericswanson-dfinity · Pull Request #2078 · dfinity/sdk · GitHub

dfxで任意のディレクトリ配下にidentityを生成する | Dfinity, Internet Computer

結論: HOMEを指定してdfx identity new またはdfx identity get-principalを実行します。

はじめに

こんにちは、@bioerrorlogです。

dfx (dfinity sdk)を使うと、identityを生成することが出来ます。

一番シンプルなやり方は単にidentity newコマンドを使うことでしょう。

dfx identity new alice
# Creating identity: "alice".
# Created identity: "alice".

## identity: aliceが作成されたことを確認
dfx identity list
# alice
# anonymous
# default *

## identity: alice用のprivate keyはホームディレクトリ配下に生成される
ls ~/.config/dfx/identity/alice/
# identity.pem

しかしこのやり方だと、ホームディレクトリ配下~/.config/dfx/identity/に変更が入ってしまいます。 一時的なテスト用途のダミーidentityを生成するだけなら、できれば任意のディレクトリにprivate keyを生成したいものです。

今回は、dfxを使って任意のディレクトリ配下にidentityを生成するやり方をメモします。

任意のディレクトリ配下にidentityを生成する

やり方

環境変数HOMEを指定してidentity newを実行することで、指定のディレクトリ配下にidentityを作成することが出来ます。 (冷静に考えれば当然かもですが。。)

mkdir alice
HOME=alice dfx identity new alice
# Creating identity: "alice".
# Creating the "default" identity.
#   - generating new key at alice/.config/dfx/identity/default/identity.pem
# Created the "default" identity.
# Created identity: "alice".

## 指定ディレクトリにdefault identityが生成されたことを確認
HOME=alice dfx identity list
# alice
# anonymous
# default *
ls alice/.config/dfx/identity/alice/
# identity.pem

## HOMEを指定しなければ元のホームディレクトリ配下のidentityが参照される
dfx identity list
# anonymous
# bob
# default *

これで、雑にディレクトリを切ってそこにテスト用のidentityを作成することが出来ます。

補足: dfx identity get-principalを使ったやり方

dfx identity get-principalを実行した場合でも、HOME指定のディレクトリに既存のidentityが存在しない場合はprivate keyが生成/default identityが作成されます。

mkdir alice
HOME=alice dfx identity get-principal
# Creating the "default" identity.
#   - generating new key at alice/.config/dfx/identity/default/identity.pem
# Created the "default" identity.
# tly4z-2hi4s-n3und-lovjl-3kn62-ofqjp-akobz-uuwfa-pjvea-boajs-oqe

## 指定ディレクトリにdefault identityが生成されたことを確認
HOME=alice dfx identity list
# anonymous
# default *
ls alice/.config/dfx/identity/default/
# identity.pem

## HOMEを指定しなければ元のホームディレクトリ配下のidentityが参照される
dfx identity list
# anonymous
# bob
# default *

活用事例

こうした任意ディレクトリ配下でのidentityは、shellスクリプトでcanister callのテストを書くときに活用できそうです。

複数のidenittyを切り替えながらcanister callのシナリオをテストしたいとき、上記のようなやり方で一時的なダミーidentityを複数生成し、HOMEを切り替えることでidentityをスイッチすることが出来ます。

Rocklabsの下記コードが事例として参考になります。 github.com

おわりに

今回は、dfxで任意のディレクトリ配下にidentityを生成する方法をメモしました。

先述のRocklabsのコードを眺めていて、なるほどshellでidentitiy切り替える時はこういう戦法があるのかーと思って備忘がてらに書きました。

ic-replなどツールでは大抵ランダムidentityの生成機能が提供されていますが、素のshellでパッと書きたいときの参考になれば幸いです。

[関連記事]

www.bioerrorlog.work

www.bioerrorlog.work

www.bioerrorlog.work

参考

DFusion/test.sh at main · rocklabs-io/DFusion · GitHub

Web3界隈のスラング "gm" / "gn" の意味

gm = "good morning".
gn = "good night".

どちらも挨拶の言葉です。

はじめに

どうも、@bioerrorlogです。

Web3 / crypto界隈では、新参者には分かりにくいスラングが存在します。 私もcryptoに興味を持ち始めた頃は海外の方々が使っている用語が分からず、???状態でした。

特に↑のgm/gnは頻出単語のわりに検索性が低く、なんだこれ?となっている方も少なくないと思いますので (私がそうでした)、記事を残します。

"gm" / "gn" の意味

gm = "good morning".
gn = "good night".

どちらも挨拶の言葉です。

Web3 / crypto / NFT界隈のスラングについては、下記サイトが参考になります。

www.one37pm.com

gmの意味:

GM means "good morning". We say good morning to each other because we are a friendly happy optimistic global community and it is nice to say good morning to your friends as you start your day.

gnの意味:

GN gn means "good night". We say good night to each other because we are a friendly happy optimistic global community and it is nice to say good night to your friends as you end your day (20 hours after you say gm and 4 hours before you say gm again).


ただの挨拶言葉ではありますが、これは裏を返せば"gm"とつぶやくことで「私はWeb3/cryptoに興味があります」という意思表示になり得ます。

(例: 河野さんがWeb3/crypto関係の発言をするようになった際の最初のつぶやき)

おわりに

スラングというのはコミュニティの一体感を醸成する一方、新参者には分かりにくいのが難点ですね。

どちらもググラビリティの低い単語ですので、この記事が誰かの役に立てば幸いです。

[関連記事]

www.bioerrorlog.work

www.bioerrorlog.work

www.bioerrorlog.work

参考

A Guide to NFT Twitter Terminology

Dfinityが目指す15個の目的を理解する | Internet Computer, ICP

Dfinity / Internet Computerが目指している15個の目的をまとめます。

はじめに

こんにちは、@bioerrorlogです。

Dfinity / Internet Computerの目指す方向性を理解するには、Dfinity公式のロードマップ記事を読み込むのが一つの方法でしょう。 medium.com

しかしこの記事は文量が多く、一度読んだだけで頭の中がクリアになるかというとなかなかそうもいきません。

本記事では、上記の記事で取り上げられているDfinityの15個の目的を、それぞれ個人的にかみ砕いた解釈で要約していきます。

あくまで私個人の解釈を含みますので、正確なニュアンスを掴むにはぜひ原文をあたってください。

それではやっていきます。

Dfinityが目指す15個の目的

公共財として成長し続けるネットワーク効果

Public Utility That Grows Exponentially With Builders

Internet Computerは、コード間・サービス間の機能共有コストを限りなくゼロに近づけ、ネットワーク効果を大きく増大させ続けていくことを目指しています。

Internet Computerでは、Canisterというスマートコントラクト単位でサービスが構築されます。 このCanisterで統一された世界では、コード同士はシームレスに直接機能を呼び出し合うことが可能です。 それぞれが別々に稼働しているサービスであったり、異なる言語で書かれていたとしても、Canister間で機能を共有することができます。

より多くの開発者がInternet Computer上で開発すればするほど、このネットワーク効果は増大し続けていきます。 既存のWeb2.0プラットフォーマーがそれぞれ成長したネットワークから利益を刈り取るのとは違い、(後述のnon-revocable API等の仕組みと合わせ)公共財としてのネットワーク効果が望める点もポイントとなりそうです。

参考
A Closer Look at Software Canisters, an Evolution of Smart Contracts | by DFINITY | The Internet Computer Review | Medium

インターネットそのものに匹敵する可用性

Systems and Services That Are Unstoppable Like the Internet

Internet Computer上で構築されたサービスが、インターネットそのものと同様の可用性・拡張性を持つことを目指しています。

インターネットは冷戦時代に設計されたもので、核爆発にも耐えうる可用性があります。 あるオンラインサービスがダウンしたということはあっても、インターネットそのものがダウンしたという状況は起こり得ません。

既存の商用クラウドのようなプラットフォーム上で構築されたサービスは、開発者がその可用性の担保する設計を組む必要があるため、サービスダウンはしばしば起こり得ます。 一方Internet Computer上で構築されたサービスは、デフォルトで分散された高可用性を持ち、基本的にサービス停止することはありません。

世界中の重要なオンラインサービスをInternet Computer上で再構築することで、より堅牢な世界の実現を目指しています。

デフォルトでセキュアかつプライバシーを保つ仕組み

Systems and Services That Are Secure by Default and Preserve Privacy

従来の方法論で構築されたシステムやサービスは、デフォルトではセキュアではありません。 開発者は常に、"セキュアでないものを守る"ための策を打つ必要があります。 しかし、どんなに念入りに設計してもそれら保護策が完璧であることはなく、いまも世界中で深刻なデータ漏洩・改ざんが起き続けています。

Internet ComputerはWebスピードのブロックチェーンネットワークであり、"デフォルトでセキュア"な仕組みを持っています。 そのデータが改ざん不可能であることは数学的に保証されたものであり、従来のあらゆるセキュリティ対策より根本的に強力なものです。

データが改ざん不可能であることに加え、Internet Computerではデータプライバシーも保証されます。 これはInternet Computerで採用されている"Chain Key cryptography"という暗号化方式によるものです。 この方式は他のブロックチェーンと違い、過去の取引履歴をダウンロードせずとも取引の正当性を検証できます。 これによりデータ取得方法を認可ベースで制御することが可能になり、データプライバシーを保証することが可能です。

また、Internet Computerノードに物理アクセスできる管理者に対するプライバシー対策も検討が進んでおり、物理アクセスであっても素のデータは取得できない機能が盛り込まれていく予定です。

参考
Chain Key Cryptography: The Scientific Breakthrough Behind the Internet Computer | by DFINITY | The Internet Computer Review | Medium

AMD SEV Virtual Machine Support - Roadmap - Internet Computer Developer Forum

システムの複雑性とスケール問題の解決

Crushing Complexity and Scaling Using Reimagined Smart Contracts

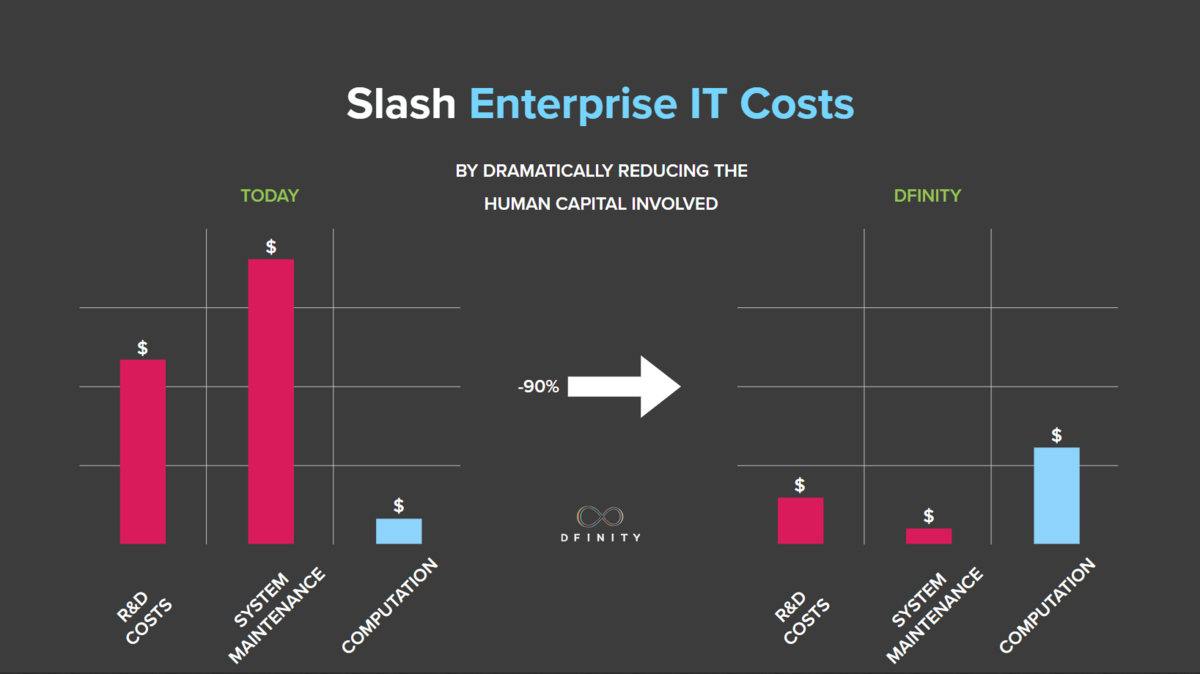
従来のシステムでは、コストの大半を人的コストが占めています。 というのも、これまでは往々にして複雑性の高いシステム構築が必要であり、絡み合う各コンポーネントの設計・開発や運用保守、バックアップやセキュリティ対策に多くの人的コストが必要だからです。

Internet Computerでは新たなスマートコントラクトの形である"canister"を活用することで、システムの複雑性を軽減し無駄なコストを大きく削減できます。 例えば、canisterはorthogonal persistence(動作が永続する性質)を持つため、データをメモリ上のプログラム変数に保持できます。 これによってデータベース等の永続層の構築・連携・管理をする必要がなくなり、システムの複雑性を抑えることが可能です。

また、Internet Computer上で動作するシステムは容易にスケールできます。 オンプレで構築されるシステムは常に物理ハードウェアの制約を受けますが、Internet Computerではcanisterという単位で必要に応じた柔軟なスケールが可能です。

ここに挙げたメリットはInternet Computerで発生する追加のオーバーヘッドで相殺されるのでは、と懸念する向きもあると思いますが、そうとも言えません。

Internet Computerでは最低7台のノードにレプリカが作成されますが、これは従来のシステムで利用されるクラウドやデータベースレプリカ、CDN等のレプリカを考えると特段多いわけではありません。 確かにメモリ料金(5$/GB/年)は従来の基盤に比べ高価ですが、これにより得られる効率性はそのコストを上回るでしょう (Ethereumのスマートコントラクトが$5,000,000/GBであることを考えると、スマートコントラクトとしては破格の値段です)。 また、Internet Computerで利用される暗号計算のオーバーヘッドも、複雑性やセキュリティ確保に必要な人的コストの代替として捉えればむしろ低コストと言えるでしょう。

画像はこちらのスライドより引用

インターネットの"エッジ"で動くウェブスピードのブロックチェーン

Blockchain at Web Speed That Runs on the Internet’s “Edge”

ブロックチェーンにおける古くからの課題の一つに、トランザクションが遅い、というものがあります。 Internet Computerはこの課題を克服し、条件によっては従来型のシステムよりも優れたパフォーマンスを発揮することを目指しています。

Internet Computerで採用されているChain Key cryptographyは、トランザクションスピードを1~2秒に抑えることを可能にしました。 しかし、ミリ秒単位の応答に慣れている通常のネットユーザーはこのスピードでは満足できません。 そこでInternet Computerはスマートコントラクトの実行を"アップデートコール"と"クエリコール"に二分し、クエリコールに関してはミリ秒単位の性能を引き出すことに成功しました。

さらに、Internet computerでは世界中に分散したノードにレプリカが作成されます。 クエリコールはいわゆるこの"エッジ"にあるノードに対して発行されるので、ユーザーはより早い応答を得ることが可能です。 従来のITスタックではCDNをシステム構成に組み込むことでこのようなエッジでの応答を実現させますが、それをデフォルトで、しかもより優れた形で実現できるInternet Computerのメリットは大きいと言えるでしょう。

ブロックチェーンシステムからの厄介な仲介者の排除

Removing Troublesome Intermediaries From Blockchain Systems

現在のブロックチェーンシステムは、仲介者の存在に依存している部分が多くあります。 例えば、既存のブロックチェーンノードはAWSのような"Big Tech"のクラウドサービス上で稼働していることも多くあり、この傾向はProof-of-Stakeへの移行に伴い今後も増えていくでしょう。

これは、仲介者を不要とするはずのブロックチェーンの思想とは逆行する、厄介な問題です。 政府による法的措置の結果として、あるいはブロックチェーンの存在を脅威に思った"Big Tech"の手によって、これらブロックチェーンノードが介入される可能性はないとは言い切れません。

Internet Computerでは、これらクラウドのような寡占的な仲介者を必要としません。 その代わり、NNS(Network Nervous System)によって選出されたデータセンターの標準化されたハードウェアでノードが稼働し、複数の地域や管轄権にまたがる分散化が実現できます。

ブロックチェーンシステム特有のユーザビリティ問題の解決

Removing Critical Usability Issues From Blockchain Systems

従来のブロックチェーン上で構築されたサービスを利用するには、ユーザーはウォレットを作成し、暗号通貨取引所にアカウントを登録し、面倒な本人確認手続きを通過し、お金を送金し、トークンを購入し、ウォレットに送金し、サービス内での取引方法を学び...などなど、面倒な手順を踏む必要があります。

これは特にブロックチェーンコミュニティ外のユーザーにとってかなりのハードルであり、サービスがユーザーを獲得する際の大きな障壁になります。 ユーザー獲得が命ともいえる新規サービス開発において、これは致命的な問題でした。

Internet Computerは、この問題を二つの方法で解決します。

一つ目は、サービスを利用するユーザー側がトークンを保持する必要をなくすことです。 従来のブロックチェーンでは、ユーザーは自分のアクセスで発生するスマートコントラクトの計算料を支払う必要がありました。 Internet Compuerでは、サービス側で前払いされた "cycle" を使って計算料を支払う “reverse gas model” が採用されており、ユーザー側はウォレット/トークンの用意をすることなくサービスを利用できます。

二つ目は、ユーザーにとって簡単な認証方法を提供することです。 ユーザーは暗号キーペアを使ってスマートコントラクトに認証される必要がありますが、Internet Computerは "Internet Identity" という仕組みを提供してこのプロセスを簡略化しています。 さらにWebAuthn規格と連携させることで、従来のユーザー名/パスワード認証よりも簡単な、生体認証/ハードウェア認証をシームレスに利用できます。

このようにユーザー側の負担を最小限に抑えることで、従来のブロックチェーンシステムが抱えていたユーザビリティ問題の解決を目指しています。

参考
Computation and Storage Costs :: Internet Computer

Internet Identity: The End of Usernames and Passwords | by DFINITY | The Internet Computer Review | Medium

自律的な進化を実現するガバナンスシステム

Unleashing Intelligent Governance and Autonomous Evolution

ブロックチェーンにおいて、ガバナンスは常に悩ましい問題です。 特定個人または特定組織が独裁的にガバナンスを握ってしまうと、コミュニティにとって好ましくない判断が下される可能性があります。 一方、ブロックチェーンを構成する複雑な技術スタックは常にアップデートやメンテナンスが必要なので、何かしらの形でのガバナンスは必要です。

しかし、アップデートのコンセンサスを得ること、そしてそのアップデートをグローバルに実行することは、これまでも技術的に難しい課題でした。

そこでInternet Computerでは、Network Nervous System (NNS)というオープンなガバナンスシステムを導入しています。 NNSでは、ICPトークンの保有者がトークンを投票ニューロンにロックすることで、NNSに提出された提案に票を入れることが出来ます。 可決された提案は自動で実行され、ネットワークの自律的なガバナンスが実現されます。

参考
The DFINITY “Blockchain Nervous System” | by Dominic Williams | The Internet Computer Review | Medium

The Network Nervous System: Governing the Internet Computer | by DFINITY | The Internet Computer Review | Medium

Understanding the Internet Computer’s Network Nervous System, Neurons, and ICP Utility Tokens | by DFINITY | The Internet Computer Review | Medium

トークンガバナンスによる“Open Internet Service”の実現

“Open Internet Services” With Tokenized Governance Systems

Internet Computerでは、ガバナンストークンによってオープンに制御・運営される“Open Internet Service”の実現を目指します。

Internet Computer上でサービスを構築する開発者は、そのサービス用のガバナンストークンを発行することで、運営をトークンベースに移行していくことが可能です。 そうなるとサービスに加えられるアップデートや修正は、ガバナンスシステムへの提案とトークン保持者による投票によって決定されるようになります。 ゆくゆくは特定の組織・開発者に依存しない、自律的なサービス運営の実現も可能でしょう。

またこの過程でトークンを販売することは、そのままサービスの資金調達にも繋がります。

Internet Computer上でこの“Open Internet Service”を実現するためのガバナンストークンを発行する仕組みは、現在 Service Nervous System (SNS)として仕様が議論されています。

参考
Open Internet Service - Dfinity Terminology

How the Service Nervous System (SNS) Will Bring Tokenized Governance to On-Chain Dapps | by DFINITY | The Internet Computer Review | Medium

Service Nervous System | Governance for Dapps - Roadmap - Internet Computer Developer Forum

プラットフォームリスクの無いトラストレスなエコシステム

A Trustless Programmable Web With Non-Revocable Sharing

従来の"Big Tech"のようなプラットフォーマーが提供するAPIを使ってサービスを構築するとき、そこには常に"プラットフォームリスク"が付き纏います。 プラットフォーマー側の一方的な方針転換により、API利用側が大きく損害を被った事例は決して珍しくありません。 また仮にプラットフォーマーでなくとも、他サービスの提供するAPIを利用している場合は常にAPIの提供方針が変更されるリスクを伴います。

この結果、他者のAPIに依存したサービス開発で資金調達することは難しくなってきており、イノベーションの機会が損なわれつつあります。

Internet Computerは、こうした状況の打破を目指しています。

まず一つは、“Open Internet Service”で取り下げ不可能(Non-Revocable)なAPI公開の仕組みを提供することです。 開発者がAPI公開を永続的なものとすることで、仮にガバナンスシステムがそれらを削除したり変更したりしようとしても、そのアップデートを適用できないようにします。

また、それでも何かしらAPI挙動の変化に影響を受けた場合は、NNSにオープンに提案を持ちかけることもできます。 もし採択されれば、Open Internet Serviceの然るべき機能を回復できる可能性が開けます。

こうしてInternet Computer上で永続的なネットワーク効果を蓄積し、より建設的なエコノミーの構築を目指しています。

参考
Non-revokable APIs - Developers - Internet Computer Developer Forum

世界中で均等な成功機会の提供

Democratizing Tech Opportunity by Extending It to the 99 Percent

現在、IT界の成功のほとんどはシリコンバレーのような一部地域で起きています。 資金調達の機会もそのような集積地に偏りがちで、世界のその他99%の人口は機会を失しているとも言えます。

この問題を解決するため、Internet Computerは世界中で均等な資金調達の機会を提供する仕組みを目指しています。

Internet Computer上で開発したサービスは、ガバナンストークンを発行することで“Open Internet Service”として運営することができます。 このガバナンストークンは、売りに出すことで資金を調達することが可能です。 この仕組みを使えば、開発者は世界のどこにいようとも、投資家との直接的なつながりがなくとも、資金調達することができます。

これはWeb3時代におけるサービス開発の資金調達方法として、注目すべき新たな形と言えるでしょう。

独占型Big Techに打ち勝つオープンなインターネットの構築

Building a Richer Open Internet That Beats Out Mega Monopolies

GoogleやFacebookといった"Big Tech"によるイノベーションの速度は、かつての勢いを失っていると言わざるを得ません。 そのようなBig Techがいま力を振り向けているのは、ユーザー情報を利用して効率的に収益を上げることや、競合他社の買収で独占領域を拡大すること、そして自分たちに有利(そして他社に不利)になるようロビー活動を行うこと、です。

このような独占型Big Techによる影響力が益々高まっている現状に危機感を持った投資家や起業家は、ブロックチェーンやICOブームに代表されるようにオープンなインターネットを取り戻そうとしています。

Interne Computertは、そのための手段を提供します。

Internet Computerではサービスの機能やデータをトラストレスに共有し合うことができるので、摩擦や交渉、プラットフォームリスクのないネットワーク効果を育み続けることが可能です。

また前述のように、トークンによる資金調達の機会を世界中の開発者に等しく提供することで、BigTechの独占的エコシステムよりもはるかに簡単に、より多くの開発者が成功の機会を得ることができるでしょう。

オープンにトークン化されたサービスはそのガバナンスシステムによって透明性が確保されるので、(既存Big Techがしばしばやらかすように)秘密裏にユーザーデータが売買されるようなこともありません。

計算リソースを利用したステーブルな価値

Using Computation to Provide Stable Liquidity to Contracts

Internet ComputerのトークンであるICPは、Internet Computer上の計算リソースを使うのに必要な"cycle"に変換することができます。

CycleはEthereumにおけるgasに相当しますが、その価格がステーブルに保たれる仕組みを持つのが特徴です。

まず、ICPトークンはNNSが設定したレートでcycleに変換できます。 変換レートはIMF SDR換算で固定され、0.65 SDRの価値を持つと評価されたICPトークンが1 trillion cycleに変換されます。 ICPトークン-SDR換算レートはICP価格の変動に応じて (NNS上の提案を経て) 修正されるので、cycle自体の価格はICP価格の変動に関係なく一定です。

そして、このcycle価値はInternet Computer上で計算リソースが動き続ける限り安定します。 NNS上の変換レートより高い価格でcycleが売りに出されたとしても、(ICPを自分で変換すればよいので) 市場にそれを買うの動機は発生しません。 逆にNNS上の変換レートより低い価格でcycleが売りに出された場合は、計算リソースを使いたい人がこのcycleを買い、計算リソースと引き換えにcycleを消費することで市場から直ちに取り除かれます。

こうした仕組みでcycle価値がステーブルに保たれることで、Internet Computer上でサービスを構築したい開発者はそのランニングコストを安定して見積もることができます。

参考
Understanding the Internet Computer’s Network Nervous System, Neurons, and ICP Utility Tokens | by DFINITY | The Internet Computer Review | Medium

Clearing stuff about cycles and what "a rate that keeps their real-world cost constant" means! : dfinity

Special Drawing Rights (SDR)

汎用仮想マシンとしてのWebAssemblyの定着

Making WebAssembly the World’s Virtual Machine

Ethereumでは、Solidityなど高レベル言語からコンパイルしたバイトコードを実行させるための仮想マシンを、Ethereum Virtual Machine (EVM)として独自に開発しました。 しかし、安全で効率的な仮想マシンを開発するのは、それ単体でも技術的に極めて難しいことです。 結果、EVMでできることは大幅に制限されてしまいました。 これは2014年時点の判断としては仕方のないことと言えるでしょう。

しかし、今ではWebAssemblyがあります。

WebAssemblyは、多くの高級プログラミング言語をサポートしていることや、そのバイトコードがネイティブに近いスピードで実行できることなど多くのメリットを持っています。 この規格はW3Cによって定められ、業界標準としての重要性とそこに向けられる開発者・利用者の関心は日々増加しています。

Internet Computerは、開発にWebAssemblyの共同設計者が参画しているおかげでWebAssemblyの規格と今後の発展性を最大限に活用できるよう設計されています。

Internet ComputerのcanisterはWebAssemblyのバイトコードで動作するため、プログラミング言語を問わずスマートコントラクトを記述できる可能性を持っています。 Canisterを通して、WebAssemblyをフロントエンドだけでなくバックエンドの優れた仮想マシンとしても定着させることを目指しています。

参考
Why WebAssembly?. WebAssembly (or Wasm) is one of the… | by Andreas Rossberg | The Internet Computer Review | Medium

Motoko, a programming language for building directly on the internet - Stack Overflow Blog

Motoko, a Programming Language Designed for the Internet Computer, Is Now Open Source | by Andreas Rossberg | The Internet Computer Review | Medium

Bringing the web up to speed with WebAssembly

ブロックチェーンのトリニティ-三位一体の関係の完成

Completing the Blockchain Trinity

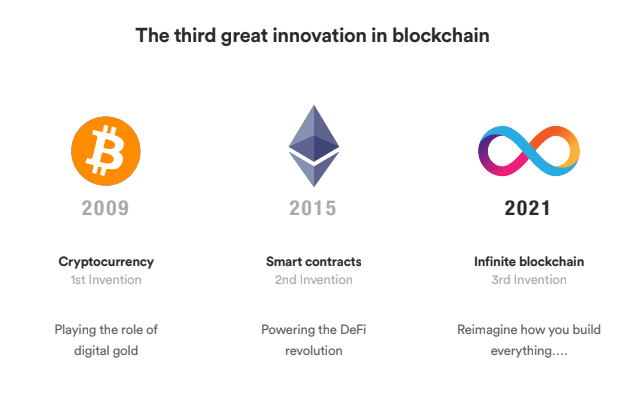
Internet Computerは、Bitcoinに始まり、Ethereumによって発展してきたブロックチェーンのトリニティ-三位一体の関係を完成すべく設計されました。 これら三者は、互いに補完し合う関係性を持っています。

Bitcoinの強みは、暗号通貨としての設計のシンプルさにあります。 シンプルゆえに目的が明確であり、おかげでデジタルゴールドとしての地位を確立することができました。 しかしそのシンプルさは、ブロックチェーンのより汎用的な多くの利用用途を制限してしまうことに繋がります。

その次に現れたEthereumは、高度にプログラム可能な暗号通貨として設計されました。 Ethereumで実行されるプログラムはチューリング完全であり、原理的にはあらゆるシステムの実装に使用することができます。 これによって、ブロックチェーンの適用範囲が暗号通貨からあらゆるスマートコントラクトに拡大され、Ethereumは大きな成功を収めています。

Internet Computerはさらにその範囲を拡大し、汎用のコンピュートプラットフォームとしての役割を目指しています。 ウェブスピードで動作し、無限に容量を増やすことができること。 わずかなコストで計算リソースやデータをホストし、簡単にスケールアップできること。 エンドユーザーのウェブブラウザにコンテンツを安全に提供し、より汎用的なシステム・サービスの構築に使用できること。 これらを満たすブロックチェーンネットワークを構築することが、Internet Computerの目指すところです。

今後は、Bitcoin・Ethereum・Internet Computerの三者が互いに取り込み合い、相互に付加価値を与え合うことになるでしょう。

画像はこちらのスライドより引用

参考
Motion Proposal to Integrate Bitcoin With the Internet Computer Adopted by Community | by DFINITY | The Internet Computer Review | Medium

Integrating the Internet Computer and Bitcoin Networks | E001 - YouTube

Internet Computer Overview | DFINITY

おわりに

以上、Dfinity / Internet Computerの目指す15個の目的をまとめました。

こうして改めて読み込んでみると、Internet Computerがいかに野心的なプロジェクトなのかが再認識できます。

私は普段AWSを主戦場としていますが、クラウドの次には何が来るんだろう?という考えを追及するうちにInternet Computerに興味を持ち始めました。 同じくInternet Computerに興味のある方、よければTwitterのフォローもよろしくお願いします。

[関連記事]

www.bioerrorlog.work

www.bioerrorlog.work

www.bioerrorlog.work

参考

Announcing the Internet Computer “Mainnet” and a 20-Year Roadmap | by Dominic Williams | The Internet Computer Review | Medium

A Closer Look at Software Canisters, an Evolution of Smart Contracts | by DFINITY | The Internet Computer Review | Medium

Chain Key Cryptography: The Scientific Breakthrough Behind the Internet Computer | by DFINITY | The Internet Computer Review | Medium

AMD SEV Virtual Machine Support - Roadmap - Internet Computer Developer Forum

Internet Computer Overview | DFINITY

https://dfinity.org/pdf-viewer/pdfs/viewer.html?file=../library/an-intelligent-decentralized-cloud.pdf

Computation and Storage Costs :: Internet Computer

Internet Identity: The End of Usernames and Passwords | by DFINITY | The Internet Computer Review | Medium

The DFINITY “Blockchain Nervous System” | by Dominic Williams | The Internet Computer Review | Medium

The Network Nervous System: Governing the Internet Computer | by DFINITY | The Internet Computer Review | Medium

Understanding the Internet Computer’s Network Nervous System, Neurons, and ICP Utility Tokens | by DFINITY | The Internet Computer Review | Medium

Open Internet Service - Dfinity Terminology

How the Service Nervous System (SNS) Will Bring Tokenized Governance to On-Chain Dapps | by DFINITY | The Internet Computer Review | Medium

Service Nervous System | Governance for Dapps - Roadmap - Internet Computer Developer Forum

Non-revokable APIs - Developers - Internet Computer Developer Forum

Special Drawing Rights (SDR)

Clearing stuff about cycles and what "a rate that keeps their real-world cost constant" means! : dfinity

Motoko, a programming language for building directly on the internet - Stack Overflow Blog

Motoko, a Programming Language Designed for the Internet Computer, Is Now Open Source | by Andreas Rossberg | The Internet Computer Review | Medium

Why WebAssembly?. WebAssembly (or Wasm) is one of the… | by Andreas Rossberg | The Internet Computer Review | Medium

Bringing the web up to speed with WebAssembly

Motion Proposal to Integrate Bitcoin With the Internet Computer Adopted by Community | by DFINITY | The Internet Computer Review | Medium

Integrating the Internet Computer and Bitcoin Networks | E001 - YouTube

dfxをバージョン指定してインストールする | Dfinity Canister SDK

dfx (Dfinity Canister SDK)をバージョン指定してインストールする方法を整理し、その実行コマンドの中身を読み解きます。

はじめに

こんにちは、@bioerrorlogです。

Dfinity Canister SDK / dfxをインストールするときはいつも、脳を空っぽにしてドキュメントにあるコマンドをコピペしていました。

内容を気にせずにコマンド実行するのも据わりが悪いので、一度くらいはインストールコマンドを読み解いておこうと思いました。

dfxバージョンを指定してインストールするコマンドをメモし、その実行内容を整理していきます。

dfxをバージョン指定してインストールする

インストールコマンド

ドキュメントの通り、例えばバージョン0.8.2をインストールするときは次のコマンドを実行します。

DFX_VERSION=0.8.2 sh -ci "$(curl -fsSL https://sdk.dfinity.org/install.sh)"

環境変数DFX_VERSIONに任意のバージョンを指定することで、指定のdfxバージョンをインストールすることができます。

インストールコマンド読み解き

では、上記インストールコマンドの処理内容を読み解いていきます。

DFX_VERSION=0.8.2 <実行コマンド>

このようにコマンドを実行することで、環境変数DFX_VERSIONにバージョン番号を代入した状態で以降のコマンドが実行されます。 exportコマンドに環境変数宣言部分を切り出したとしても、インストールするバージョンが指定できる点は同じです。

export DFX_VERSION=0.8.0
sh -ci "$(curl -fsSL https://sdk.dfinity.org/install.sh)"


sh -ci "$(xxxxx)"

この部分ではshコマンドによって"$(xxxxx)"から受け渡される文字列がshellプロセスとして実行されます。

-cオプションによって(標準入力でなく)後続の文字列をshellで実行することを指定できます。

-iオプションはコマンドをインタラクティブに実行することを指定するオプションです。 が、現状のインストールコマンドでは特にターミナルとやり取りする要素はないので不要なのでは...?と思っています。 (実際、-i部分を抜いてコマンドを実行しても変わりなくインストールできます。)

"$(xxxxx)"では、その内部を評価した後の文字列が渡されます。 (shellにおいては、ダブルクォーテーション部分はその評価後の状態が、シングルクォーテーションでは内部がそのままの文字列として渡されます。)


curl -fsSL https://sdk.dfinity.org/install.sh

この部分でcurlコマンドによってdfxのインストールスクリプトをダウンロードしています。

-fオプションは、リクエストが失敗したときにはなにも出力させず、代わりにexitコード22を返却するようにするものです。 (リクエストが失敗したときにエラー通知用HTMLがサーバーから返されたとしても、何も出力しない挙動にすることが出来ます)

-sSによって進捗メーター表示をなくします。 (厳密には-sによって進捗メーターとエラーメッセージの表示をなくし、加えて-Sを指定することでエラーメッセージは表示するよう設定されます。)

-Lは、リクエストページが移動してた場合に新しい場所に対して再リクエストを投げるようにするオプションです。

※各オプションの詳しい説明はmanページや下記リンクが参考になります:
explainshell.com - curl -fsSL https://sdk.dfinity.org/install.sh


上記curlコマンドによってhttps://sdk.dfinity.org/install.shから取得され、shコマンドによって実行されるdfxのインストールスクリプトの中身は以下です。

長いスクリプトなので内容は網羅しませんが、次の部分でインストール先ディレクトリにdfx実行ファイルを配置し、dfxがインストールされています。

$MV "$_dfx_file" "${_install_dir}" 2>/dev/null \

スクリプト全文:

#!/usr/bin/env sh
## 000_header.sh
##
## Borrowed from rustup (https://sh.rustup.rs)
##
## This is just a little script that can be downloaded from the internet to
## install dfx. It just does platform detection, downloads the installer
## and runs it.
##
## You are NOT AUTHORIZED to remove any license agreements or prompts from the following script.
##
set -u
## install/010_manifest.sh
get_tag_from_manifest_json() {
    cat \
        | tr -d '\n' \
        | grep -o "\"$1\":[[:space:]]*\"[a-zA-Z0-9.]*" \
        | grep -o "[0-9.]*$"
}
## 020_flags.sh
DFX_BOOL_FLAGS=""
define_flag_BOOL() {
    local VARNAME
    VARNAME="flag_$(echo "$1" | tr /a-z/ /A-Z)"
    eval "$VARNAME=\${$VARNAME:-}"
    DFX_BOOL_FLAGS="${DFX_BOOL_FLAGS}--${1} $VARNAME $2"
}
get_flag_name() {
    echo "$1"
}
get_var_name() {
    echo "$2"
}
read_flags() {
    while [ -n "$*" ]; do
        local ARG=$1
        shift
        OLD_IFS="$IFS"
        IFS=$'\n'
        for line in ${DFX_BOOL_FLAGS}; do
            [ "$line" ] || break
            IFS="$OLD_IFS"
            FLAG="$(get_flag_name "$line")"
            VARNAME="$(get_var_name "$line")"
            if [ "$ARG" == "$FLAG" ]; then
                eval "$VARNAME=1"
            fi
        done
    done
}
## 100_log.sh
log() {
    if "$_ansi_escapes_are_valid"; then
        printf "\33[1minfo:\33[0m %s\n" "$1" 1>&2
    else
        printf '%s\n' "$1" 1>&2
    fi
}
say() {
    printf 'dfinity-sdk: %s\n' "$1"
}
warn() {
    if $_ansi_escapes_are_valid; then
        printf "\33[1mwarn:\33[0m %s\n" "$1" 1>&2
    else
        printf '%s\n' "$1" 1>&2
    fi
}
err() {
    say "$1" >&2
    exit 1
}
## 110_assert.sh
need_cmd() {
    if ! check_cmd "$1"; then
        err "need '$1' (command not found)"
    fi
}
check_cmd() {
    command -v "$1" >/dev/null 2>&1
}
assert_nz() {
    if [ -z "$1" ]; then err "assert_nz $2"; fi
}
ensure() {
    if ! "$@"; then err "command failed: $*"; fi
}
ignore() {
    "$@"
}
## 200_downloader.sh
define_flag_BOOL "insecure" "Allows downloading from insecure URLs, either using HTTP or TLS 1.2 or less."
check_help_for() {
    local _cmd
    local _arg
    local _ok
    _cmd="$1"
    _ok="y"
    shift
    if check_cmd sw_vers; then
        case "$(sw_vers -productVersion)" in
            10.13*) ;;
            10.14*) ;;
            10.15*) ;;
            11.*) ;;
            *)
                warn "Detected OS X platform older than 10.13 (High Sierra)"
                _ok="n"
                ;;
        esac
    fi
    for _arg in "$@"; do
        if ! "$_cmd" --help | grep -q -- "$_arg"; then
            _ok="n"
        fi
    done
    test "$_ok" = "y"
}
check_support_for() {
    local err="$1"
    shift
    local cmd="$*"
    ! ($cmd 2>&1 | grep "$err" >/dev/null)
}
downloader() {
    local _dld
    if check_cmd curl; then
        _dld=curl
    elif check_cmd wget; then
        _dld=wget
    else
        _dld='curl or wget'
    fi
    if [ "$1" = --check ]; then
        need_cmd "$_dld"
    elif [ "$_dld" = curl ]; then
        if check_help_for curl --proto --tlsv1.2; then
            curl --proto '=https' --tlsv1.2 --silent --show-error --fail --location "$1" --output "$2"
        elif ! [ "$flag_INSECURE" ]; then
            warn "Not forcing TLS v1.2, this is potentially less secure"
            curl --silent --show-error --fail --location "$1" --output "$2"
        else
            err "TLS 1.2 is not supported on this platform. To force using it, use the --insecure flag."
        fi
    elif [ "$_dld" = wget ]; then
        if check_help_for wget --https-only --secure-protocol; then
            wget --https-only --secure-protocol=TLSv1_2 "$1" -O "$2"
        elif ! [ "$flag_INSECURE" ]; then
            warn "Not forcing TLS v1.2, this is potentially less secure"
            wget "$1" -O "$2"
        else
            err "TLS 1.2 is not supported on this platform. To force using it, use the --insecure flag."
        fi
    else
        err "Unknown downloader"
    fi
}
## 999_footer.sh
SDK_WEBSITE="https://sdk.dfinity.org"
DFX_RELEASE_ROOT="${DFX_RELEASE_ROOT:-$SDK_WEBSITE/downloads/dfx}"
DFX_MANIFEST_JSON_URL="${DFX_MANIFEST_JSON_URL:-$SDK_WEBSITE/manifest.json}"
DFX_VERSION="${DFX_VERSION:-}"
SCRIPT_COMMIT_DESC="aff944417cccf34abe58dac9283fdf2b92d10458"
get_tag_from_manifest_json() {
    cat \
        | tr -d '\n' \
        | grep -o "\"$1\":[[:space:]]*\"[a-zA-Z0-9.]*" \
        | grep -o "[0-9.]*$"
}
get_manifest_version() {
    local _version
    _version="$(downloader "${DFX_MANIFEST_JSON_URL}" - | get_tag_from_manifest_json latest)" || return 2
    printf %s "${_version}"
}
validate_install_dir() {
    local dir="${1%/}"
    if ! [ -d "$dir" ]; then
        if ! mkdir -p "$dir"; then
            if type sudo >/dev/null; then
                sudo mkdir -p "$dir"
            fi
        fi
    fi
    ! [ -d "$dir" ] && return 1
    ! [ -w "$dir" ] && return 2
    case ":$PATH:" in
        *:$dir:*) ;;
        *) return 3 ;;
    esac
    return 0
}
sdk_install_dir() {
    if [ "${DFX_INSTALL_ROOT:-}" ]; then
        validate_install_dir "${DFX_INSTALL_ROOT}"
        printf %s "${DFX_INSTALL_ROOT}"
    elif validate_install_dir /usr/local/bin; then
        printf %s /usr/local/bin
    elif [ "$(uname -s)" = Darwin ]; then
        validate_install_dir /usr/local/bin
        printf %s /usr/local/bin
    elif validate_install_dir /usr/bin; then
        printf %s /usr/bin
    else
        printf %s "${HOME}/bin"
    fi
}
main() {
    _ansi_escapes_are_valid=false
    if [ -t 2 ]; then
        if [ "${TERM+set}" = 'set' ]; then
            case "$TERM" in
                xterm* | rxvt* | urxvt* | linux* | vt*)
                    _ansi_escapes_are_valid=true
                    ;;
            esac
        fi
    fi
    read_flags "$@"
    log "Executing dfx install script, commit: $SCRIPT_COMMIT_DESC"
    downloader --check
    need_cmd uname
    need_cmd mktemp
    need_cmd chmod
    need_cmd mkdir
    need_cmd rm
    need_cmd tar
    need_cmd gzip
    need_cmd touch
    get_architecture || return 1
    local _arch="$RETVAL"
    assert_nz "$_arch" "arch"
    if [ -z "${DFX_VERSION}" ]; then
        DFX_VERSION=$(get_manifest_version)
    fi
    log "Version found: $DFX_VERSION"
    local _dfx_url="${DFX_RELEASE_ROOT}/${DFX_VERSION}/${_arch}/dfx-${DFX_VERSION}.tar.gz"
    local _dir
    _dir="$(mktemp -d 2>/dev/null || ensure mktemp -d -t dfinity-sdk)"
    local _dfx_archive="${_dir}/dfx.tar.gz"
    local _dfx_file="${_dir}/dfx"
    log "Creating uninstall script in ~/.cache/dfinity"
    mkdir -p "${HOME}/.cache/dfinity/"
    install_uninstall_script
    log "Checking for latest release..."
    ensure mkdir -p "$_dir"
    ensure downloader "$_dfx_url" "$_dfx_archive"
    tar -xf "$_dfx_archive" -O >"$_dfx_file"
    ensure chmod u+x "$_dfx_file"
    local _install_dir
    _install_dir="$(sdk_install_dir)"
    printf "%s\n" "Will install in: ${_install_dir}"
    mkdir -p "${_install_dir}" || true
    if [ -w "${_install_dir}" ]; then
        MV="mv"
    else
        if ! type sudo >/dev/null; then
            err "Install directory '${_install_dir}' not writable and sudo command not found"
        fi
        MV="sudo mv"
    fi
    $MV "$_dfx_file" "${_install_dir}" 2>/dev/null \
        || err "Failed to install the DFINITY Development Kit: please check your permissions and try again."
    log "Installed $_install_dir/dfx"
    ignore rm -rf "$_dir"
}
get_architecture() {
    local _ostype _cputype _arch
    _ostype="$(uname -s)"
    _cputype="$(uname -m)"
    if [ "$_ostype" = Darwin ] && [ "$_cputype" = i386 ]; then
        if sysctl hw.optional.x86_64 | grep -q ': 1'; then
            _cputype=x86_64
        fi
    fi
    if [ "$_ostype" = Darwin ] && [ "$_cputype" = arm64 ]; then
        _cputype=x86_64
    fi
    case "$_ostype" in
        Linux)
            _ostype=linux
            ;;
        Darwin)
            _ostype=darwin
            ;;
        *)
            err "unrecognized OS type: $_ostype"
            ;;
    esac
    case "$_cputype" in
        x86_64 | x86-64 | x64 | amd64)
            _cputype=x86_64
            ;;
        *)
            err "unknown CPU type: $_cputype"
            ;;
    esac
    _arch="${_cputype}-${_ostype}"
    RETVAL="$_arch"
}
install_uninstall_script() {
    set +u
    local uninstall_file_path
    local uninstall_script
    uninstall_script=$(
        cat <<'EOF'
#!/usr/bin/env sh
uninstall() {
    check_rm "${DFX_INSTALL_ROOT}/dfx"
    check_rm "${HOME}/bin/dfx"
    check_rm /usr/local/bin/dfx /usr/bin/dfx
    clean_cache
}
check_rm() {
    local file
    for file in "$@"
    do
        [ -e "${file}" ] && rm "${file}"
    done
}
clean_cache() {
    if [ -z "$HOME" ]; then
        exit "HOME environment variable unset."
    fi
    rm -Rf "${HOME}/.cache/dfinity"
}
uninstall
EOF
    )
    set -u
    assert_nz "${HOME}"
    uninstall_file_path="${HOME}/.cache/dfinity/uninstall.sh"
    log "uninstall path=${uninstall_file_path}"
    rm -f "${uninstall_file_path}"
    printf "%s" "$uninstall_script" >"${uninstall_file_path}"
    ensure chmod u+x "${uninstall_file_path}"
}
main "$@" || exit $?

おわりに

以上、dfxをバージョン指定してインストールする方法をメモし、その実行コマンドの中身を読み解きました。

dfxのインストール方法は非常シンプルかつ処理時間も短いので、色々なバージョンの実験が気軽にできます。

触って遊んで、その挙動に慣れ親しんでいきたいものです。

[関連記事]

www.bioerrorlog.work

www.bioerrorlog.work

www.bioerrorlog.work

参考

Installing the SDK | Internet Computer Home

explainshell.com - curl -fsSL example.org

explainshell.com - sh -ci

What is the sh -c command? - Ask Ubuntu

Dfinity, ICPでdapp開発入門 | ローカル環境でHello, World

Dfinity, Internet Computerへの入門第一歩として、Hello, Worldプロジェクトをローカル環境で動かします。

はじめに

こんにちは、@bioerrorlogです。

最近、Dfinity, Internet Computerに夢中になっています。

Internet Computerは、ブロックチェーンのセキュリティ/オープン性を利用して、コンピュートリソース/ストレージを分散したハードウェアから提供できる仕組みです。 AWS等の現行商用クラウドを置き換えることが出来る、と主張する向きもあるほどの野心的なプロジェクトであり、常日頃AWSを使っている身としても胸が熱くなるものがあります。

今回はこのDfinity, Internet Computerへの入門第一歩として、Hello, Worldプロジェクトをローカルで動かします。 実際にInternet Computer上にデプロイする訳ではないので、ICPトークンやウォレットの準備は不要です。

基本的な流れはドキュメントのExplore the default projectを参考にしています。

では、やっていきましょう。

※最終的なコードはこちらのレポジトリ参照: github.com

ローカル環境でHello, World

OS環境構築

まずは作業用のOS環境を整備します。
既にmacOSかLinux環境がある場合はスキップしてください。

ただ、Windowsを使っている場合はそのままではSDKを動かすことが出来ません。

Currently, the DFINITY Canister SDK only runs on computers with a macOS or Linux operating system.

ドキュメントより

Windowsの場合、次のどちらかの方法でLinux環境をWindows上に構築します。

  • Linux仮想マシンを構築する
  • WSLを使う

私は前者、仮想マシンを立てる方法でLinux(Ubuntu)環境を構築しました。
やり方はこちらを参照ください: www.bioerrorlog.work


WSLを使うやり方は、こちらのforumが参考になります: forum.dfinity.org

Linux環境が用意できたら、OS環境整備は完了です。

以後は次の環境(Ubuntu 20.04)を前提に作業を進めていきます。

$ lsb_release -a
No LSB modules are available.
Distributor ID: Ubuntu
Description:    Ubuntu 20.04.3 LTS
Release:    20.04
Codename:   focal

パッケージインストール

ではまず、ローカルでHello, Worldプロジェクトを動かすのに必要なパッケージとして、node.jsとSDK (DFINITY Canister Software Development Kit) をインストールします。

node.jsのインストール:

# node.jsのインストール
$ sudo apt install nodejs

# インストールできたことの確認
$ nodejs -v
v10.19.0


SDK (dfx)のインストール:

# Dfinity Canister SDKのインストール
$ sh -ci "$(curl -fsSL https://sdk.dfinity.org/install.sh)"
info: Executing dfx install script, commit: a5904a35274affca266f3cc825270fea68e6b0cb
info: Version found: 0.8.1
info: Creating uninstall script in ~/.cache/dfinity
info: uninstall path=/home/<username>/.cache/dfinity/uninstall.sh
info: Checking for latest release...
Will install in: /home/<username>/bin
info: Installed /home/<username>/bin/dfx

# インストールできたことの確認
$ dfx --version
dfx 0.8.1

dfxコマンドは、今後canisterに関するあらゆる操作で使用することになります。 使い方がわからないときは、コマンドリファレンスやdfxコマンドの--helpオプションを活用しましょう。

例) dfx ルートコマンドにおける--helpの出力結果:

$ dfx --help
dfx 0.8.1
The DFINITY Executor

USAGE:
    dfx [FLAGS] [OPTIONS] <SUBCOMMAND>

FLAGS:
    -h, --help       Prints help information
    -q, --quiet      
    -v, --verbose    
    -V, --version    Prints version information

OPTIONS:
        --identity <identity>    
        --logfile <logfile>      
        --log <logmode>          [default: stderr] [possible values: stderr, tee, file]

SUBCOMMANDS:
    bootstrap    Starts the bootstrap server
    build        Builds all or specific canisters from the code in your project. By default, all
                 canisters are built
    cache        Manages the dfx version cache
    canister     Manages canisters deployed on a network replica
    config       Configures project options for your currently-selected project
    deploy       Deploys all or a specific canister from the code in your project. By default,
                 all canisters are deployed
    generate     Generate type declarations for canisters from the code in your project
    help         Prints this message or the help of the given subcommand(s)
    identity     Manages identities used to communicate with the Internet Computer network.
                 Setting an identity enables you to test user-based access controls
    ledger       Ledger commands
    new          Creates a new project
    ping         Pings an Internet Computer network and returns its status
    replica      Starts a local Internet Computer replica
    start        Starts the local replica and a web server for the current project
    stop         Stops the local network replica
    toolchain    Manage the dfx toolchains
    upgrade      Upgrade DFX
    wallet       Helper commands to manage the user's cycles wallet

新規プロジェクト作成

では次に、dfx newコマンドで新規プロジェクトを作成します。

dfx new hello

このコマンドを実行すると、helloプロジェクトが作成されます。

プロジェクトの作成処理が終わったら、プロジェクトのルートディレクトリに移動します。 以降の作業は基本このプロジェクトルートから行います。

cd hello

生成されたデフォルトコードを読む

では、生成されたプロジェクトのコードを少し読んでみましょう。

まずはルートに生成されるdfx.jsonを眺めます。

{
  "canisters": {
    "hello": {
      "main": "src/hello/main.mo",
      "type": "motoko"
    },
    "hello_assets": {
      "dependencies": [
        "hello"
      ],
      "frontend": {
        "entrypoint": "src/hello_assets/src/index.html"
      },
      "source": [
        "src/hello_assets/assets",
        "dist/hello_assets/"
      ],
      "type": "assets"
    }
  },
  "defaults": {
    "build": {
      "args": "",
      "packtool": ""
    }
  },
  "dfx": "0.8.1",
  "networks": {
    "local": {
      "bind": "127.0.0.1:8000",
      "type": "ephemeral"
    }
  },
  "version": 1
}

まず確認したいのはcanistersセクションです。 hellohello_assetsの二つのcanisterが定義されています。
helloにはmainプログラムがsrc/hello/main.moであり、それがMotoko (Dfinityの独自言語)で書かれていることが、 hello_assetsにはフロントエンドアセットとしての各情報が記載されています。

またnetworksセクションを見てみると、接続するネットワークの情報が記載されています。 デフォルトでは、ローカルの127.0.0.1:8000にcanister実行環境をバインドする設定になってます。


では次に、mainプログラムとして定義されているMotokoコードsrc/hello/main.moを見てみます。

actor {
    public func greet(name : Text) : async Text {
        return "Hello, " # name # "!";
    };
};

MotokoはActorモデルを採用した言語なので、枠組みにはactorが宣言されています。 (本記事ではActorモデルについてこれ以上深く掘り下げません)

メソッドとしてはpublicに呼び出し可能な非同期関数greetが定義され、引数に指定したテキストと"Hello, ", "!"を連結して返却する処理が実装されています。

以上、ざっくりとコードの中身を眺めたので (フロントのコードは後のステップで確認します)、このコードをローカルで動かしていきます。

ローカルcanister実行環境の起動

では、ローカルでcanisterを実行するための環境を起動します。

またこの先はターミナルを二つ開いて作業していきます。 片方のターミナルでdfx startコマンドを実行し、ローカルcanister実行環境を起動します。

$ dfx start
Starting webserver for /_/
(中略)
Oct 03 08:45:37.662 INFO Log Level: INFO
Oct 03 08:45:37.663 INFO Starting server. Listening on http://127.0.0.1:8000/

dfx.jsonnetworksセクションで定義されたアドレス127.0.0.1:8000にバインドして、canister実行環境が起動されました。

以後このターミナルはそのまま放置し、別のターミナルで作業を進めます。

起動したcanister実行環境を疎通チェックは、dfx pingコマンドで行います。

$ dfx ping http://127.0.0.1:8000/
{
  "ic_api_version": "0.18.0"  "impl_hash": "84aeb5c0f83b7a8d61f48a8f3075b4201a5a036ec4adbf10b4926b1234567890"  "impl_version": "0.8.0"  "root_key": [48, 129, 130, 48, 29, 6, 13, 43, 6, 1, 4, 1, 130, 220, 124, 5, 3, 1, 2, 1, 6, 12, 43, 6, 1, 4, 1, 130, 220, 124, 5, 3, 2, 1, 3, 97, 0, 136, 24, 72, 227, 114, 53, 123, 45, 67, 890, 202, 191, 19, 35, 49, 159, 44, 209, 106, 35, 107, 138, 68, 13, 94, 102, 93, 9, 173, 139, 34, 81, 20, 150, 133, 184, 37, 16, 224, 235, 42, 177, 39, 24, 199, 215, 158, 49, 1, 1, 51, 236, 44, 155, 242, 188, 21, 33, 178, 126, 105, 84, 23, 221, 180, 142, 110, 70, 100, 131, 31, 121, 78, 86, 182, 30, 147, 71, 143, 162, 209, 24, 120, 177, 176, 117, 226, 54, 41, 165, 72, 147, 90, 78, 456, 123]
}

↑のように出力されれば、canister実行環境の起動は成功です。

※備考:canister実行環境を停止した状態でdfx pingコマンドを実行すると、次のような結果が出力されます。

$ dfx ping http://127.0.0.1:8000/
An error happened during communication with the replica: error sending request for url (http://127.0.0.1:8000/api/v2/status): error trying to connect: tcp connect error: Connection refused (os error 111)

Canister idの登録

ローカルのcanister実行環境を起動すれば、つぎはcanister idを登録することが出来ます。

dfx canister createは空のcanisterを作成し、canister名にcanister idを割り当てるコマンドです。

$ dfx canister create --help
dfx-canister-create 
Creates an empty canister on the Internet Computer and associates the Internet Computer assigned
Canister ID to the canister name


--allオプションを使って、dfx.jsonに定義した全てのcanisterにidを登録します。

$ dfx canister create --all
Creating a wallet canister on the local network.
The wallet canister on the "local" network for user "default" is "rwlgt-iiaaa-aaaaa-aaaaa-cai"
Creating canister "hello"...
"hello" canister created with canister id: "rrkah-fqaaa-aaaaa-aaaaq-cai"
Creating canister "hello_assets"...
"hello_assets" canister created with canister id: "ryjl3-tyaaa-aaaaa-aaaba-cai"

hello, hello_assets, そしてローカルwalletにcanister idが割り振られました。 これらcanister idは、もちろんローカルでのみ有効です。

canister id情報は.dfx/local/canister_ids.json.dfx/local/wallets.jsonに保存されています。

$ cat .dfx/local/canister_ids.json
{
  "hello": {
    "local": "rrkah-fqaaa-aaaaa-aaaaq-cai"
  },
  "hello_assets": {
    "local": "ryjl3-tyaaa-aaaaa-aaaba-cai"
  }
}

$ cat .dfx/local/wallets.json
{
  "identities": {
    "default": {
      "local": "rwlgt-iiaaa-aaaaa-aaaaa-cai"
    }
  }
}

Dappのビルド

では次に、プロジェクトコードをWebAssemblyモジュールにビルドしていきます。

ビルドはつぎのようにdfx buildコマンドで行います。

$ dfx build
Building canisters...
Building frontend...


ビルドが完了すると.dfx/local/canisters/ディレクトリが作成され、wasmファイルを含むビルドアーティファクトが格納されます。

$ tree .dfx/local/canisters/
.dfx/local/canisters/
├── hello
│   ├── hello.did
│   ├── hello.did.d.ts
│   ├── hello.did.js
│   ├── hello.wasm
│   └── index.js
├── hello_assets
│   ├── assets
│   │   ├── index.html
│   │   ├── index.js
│   │   ├── index.js.map
│   │   ├── logo.png
│   │   ├── main.css
│   │   └── sample-asset.txt
│   ├── assetstorage.did
│   ├── assetstorage.wasm
│   ├── hello_assets.did
│   ├── hello_assets.did.d.ts
│   ├── hello_assets.did.js
│   ├── hello_assets.wasm
│   └── index.js
└── idl

4 directories, 18 files

helloにはバックエンドのアーティファクトが、hello_assetsにはフロントエンドアセットが格納されています。


またsrc/declarationsディレクトリも、dfx buildによって作成されます。

$ tree src/declarations
src/declarations
├── hello
│   ├── hello.did
│   ├── hello.did.d.ts
│   ├── hello.did.js
│   └── index.js
└── hello_assets
    ├── assetstorage.did
    ├── hello_assets.did
    ├── hello_assets.did.d.ts
    ├── hello_assets.did.js
    └── index.js

2 directories, 9 files

.dfx/local/canisters/配下のビルドアーティファクトのうち、wasmファイル以外のファイル等が格納されています。

このsrc/declarationsディレクトリは機密情報を含まないので、git管理に含めることが推奨されています。 (一方.dfxディレクトリはデフォルトで.gitignoreに含まれており、git管理対象から外れています)

They do not contain any secrets, and we recommend committing these files along with the rest of your source code.

ドキュメントより

ローカル環境にデプロイ

ではいよいよ、コンパイルしたコードをcanisterとしてローカル環境にデプロイします。

dfx canister install --allコマンドで、dfx.jsonファイルに定義された全てのcanisterをデプロイ出来ます。

$ dfx canister install --all
Creating UI canister on the local network.
The UI canister on the "local" network is "r7inp-6aaaa-aaaaa-aaabq-cai"
Installing code for canister hello, with canister_id rrkah-fqaaa-aaaaa-aaaaq-cai
Installing code for canister hello_assets, with canister_id ryjl3-tyaaa-aaaaa-aaaba-cai
Authorizing our identity (default) to the asset canister...
Uploading assets to asset canister...
Starting batch.
Staging contents of new and changed assets:
  /sample-asset.txt 1/1 (24 bytes)
  /index.html 1/1 (573 bytes)
  /index.html (gzip) 1/1 (342 bytes)
  /index.js.map 1/1 (649260 bytes)
  /index.js.map (gzip) 1/1 (149157 bytes)
  /logo.png 1/1 (25397 bytes)
  /main.css 1/1 (484 bytes)
  /main.css (gzip) 1/1 (263 bytes)
  /index.js 1/1 (602204 bytes)
  /index.js (gzip) 1/1 (144150 bytes)
Committing batch.

ようやくここまで来ました。 いよいよdappの動作確認をしていきましょう。

動作確認

コマンドから

まずは、dfx canister callコマンドで直接canisterのgreetメソッドを呼び出してみます。

dfx canister call hello greet '("World": text)'

このコマンドにより、hello canisterのgreetメソッドを、引数'("World": text)'で呼び出します

次のような出力が返ってくれば成功です。

("Hello, World!")

フロントエンドdappから

次は、ブラウザからdappの動作を確認します。

まずは開発サーバを起動します。

npm start

npm startは、package.jsonscripts.startに指定されたコマンドを実行します。 このデフォルトプロジェクトではwebpack serve --mode development --env developmentが実行され、開発webpackサーバーが127.0.0.1:8080に起動します。

では上記コマンドが実行出来たら、ブラウザで127.0.0.1:8080にアクセスします。 このような画面が表示されたら、Enter your nameに任意の文字列を入力してClick Me!ボタンを押してみます。

↑の応答が得られれば成功です。


フロントのコードを読んでみると、ブラウザからどのような処理が呼び出されたのかが分かります。

src/hello_assets/src/index.jsを見てみましょう。

import { hello } from "../../declarations/hello";

document.getElementById("clickMeBtn").addEventListener("click", async () => {
  const name = document.getElementById("name").value.toString();
  // Interact with hello actor, calling the greet method
  const greeting = await hello.greet(name);

  document.getElementById("greeting").innerText = greeting;
});

ビルド時に作成されるdeclarationsからhelloをインポートすることで、hello canisterのインターフェースにアクセス出来るようになっています。

clickMeBtnのクリックをトリガーにしてhello canister のgreetメソッドが呼び出され、画面に応答が表示される、というのが今回裏で実行された処理の大まかな流れです。

ローカルcanister実行環境の停止

最後に、後片付けとして今回起動した各環境を停止します。

  1. npm startしたターミナルでCtrl+Cして開発サーバを停止
  2. dfx startしたターミナルでCtrl+C、またはdfx stopコマンドを実行してローカルcanister実行環境を停止

以上、おつかれさまでした。

おわりに

今回は、Dfinity, Internet Computerへの入門としてHello, Worldプロジェクトをローカル環境で動かしてみました。

実際にdappをローカル開発するときは、大きく↓のような流れになります。

画像はドキュメントより

Dfinityのエコシステムには早くも、面白いdappが沢山あります。

自分でも何か作れたら、最高に面白いですね。

[関連記事]

www.bioerrorlog.work

www.bioerrorlog.work

www.bioerrorlog.work

参考

Explore the default project :: Internet Computer

Local development :: Internet Computer

Developer Center | DFINITY

Command-line reference :: Internet Computer

Use the default cycles wallet :: Internet Computer

Dfx on windows for beginners - Community Tutorials & Video - Internet Computer Developer Forum

General Availability of Application Subnets - Developers - Internet Computer Developer Forum

Coding with Kyle | IC Avatar, Episode #1: Hello, World - YouTube

Generative Art 自作品まとめ - Processing

こんにちは、@bioerrorlogです。

主にProcessingで制作したGenerative artの作品/サンプルを、こちらにリストアップしていきます。
ソースコード/出力結果は各詳細ページにて記述しています。

Processingというプログラミング言語に聞き覚えがない、という方は是非こちらもご参考ください:
www.bioerrorlog.work

作品リスト

GenerativeArtNFT

https://cdn-ak.f.st-hatena.com/images/fotolife/B/BioErrorLog/20220702/20220702181725.png

GenerativeArtNFTで使ったアート画像生成ロジックをまとめています。

TokenIdをinputとして無限で多様なGenerative Artを生成する、というのがやりたかったことです。

www.bioerrorlog.work


Boids Flocking

エサを追いかけるような、可愛げのあるboidsたちの動きがなかなかのお気に入りです。

※こちらはProcessingの実装ではなく、Godot Engineを用いた実装です。詳しい実装は以下の記事をご覧ください。

www.bioerrorlog.work


Generative #14

序盤の規則的な四角い造形から、斜め方向に走るパターンが現れ、徐々に雨降る道路の水たまりのような、複雑な状態になっていく過程が面白いところです。

www.bioerrorlog.work


Generative #13

せわしなく動くクラゲの大群のような、あるいは解像度の低い煙のような雰囲気が面白いです。

www.bioerrorlog.work


Generative #12

生き物の初期胚が必死さが見えるような、少し神秘的でどこか微笑ましい雰囲気が気に入っています。

www.bioerrorlog.work


Generative #11

粒子が中央に集まったあともそのまま通り過ぎては拡散し、そしてまた中央へ収縮をはじめる、という繰り返しが気持ちいいです。

www.bioerrorlog.work


Generative #10

滑らかな樹の表面のような質感が好きです。パラメータをいじることで多様な絵を出力しています。

www.bioerrorlog.work


Generative #9

一つ一つの線の長さやノイズにかけ合わせる数の大きさによって、出力の雰囲気が大きく異なるのも面白いところです。

www.bioerrorlog.work


Generative #8

写真をもとに、油絵のような雰囲気の出力を出しました。 様々な画風も演出できそうで面白いです。

www.bioerrorlog.work


Generative #7

モデル全体がまるで生きているような、一定の拍動を打つのが面白いところです。 静止画として切り出すと、各タイミングで全く違った絵になるのも不思議なもの。

www.bioerrorlog.work


Generative #6

脳の染色画像のような、あるいは悪い夢を見ているときのような、不思議で不気味なパターンが面白いところです。

www.bioerrorlog.work


Generative #5

えんぴつで描き殴ったような、予測不能なパターンに風情を感じます。 www.bioerrorlog.work


Generative #4

sinやcosを利用して線を薄く重ねることで、綺麗なパターンが現れてきます。

www.bioerrorlog.work


Generative #3

チェスのポーンの駒のような、滑らかながら唐突な変化を見せる表面のパターンが好きです。

www.bioerrorlog.work


Generative #2

シルクの布のような、滑らかで涼しげなパターンがお気に入りです。

www.bioerrorlog.work


Generative #1

薄く、細くらせんを重ね合わせたシンプルなモデルです。 各要素にrandom()やnoise()を使い、ランダムでふわふわに見える中にもある特定のパターンが表れてくるのが面白いところでした。

www.bioerrorlog.work


関連URL

ソースコードはGitHubにもまとめています: github.com

作成した動画作品はYouTubeにまとめています:
www.youtube.com

高解像度の出力結果はこちらPixivにまとめています: www.pixiv.net