Dfinity, Internet Computerへの入門第一歩として、Hello, Worldプロジェクトをローカル環境で動かします。
はじめに
こんにちは、@bioerrorlogです。
最近、Dfinity, Internet Computerに夢中になっています。
Internet Computerは、ブロックチェーンのセキュリティ/オープン性を利用して、コンピュートリソース/ストレージを分散したハードウェアから提供できる仕組みです。 AWS等の現行商用クラウドを置き換えることが出来る、と主張する向きもあるほどの野心的なプロジェクトであり、常日頃AWSを使っている身としても胸が熱くなるものがあります。
今回はこのDfinity, Internet Computerへの入門第一歩として、Hello, Worldプロジェクトをローカルで動かします。 実際にInternet Computer上にデプロイする訳ではないので、ICPトークンやウォレットの準備は不要です。
基本的な流れはドキュメントのExplore the default projectを参考にしています。
では、やっていきましょう。
※最終的なコードはこちらのレポジトリ参照: github.com
ローカル環境でHello, World
OS環境構築
まずは作業用のOS環境を整備します。
既にmacOSかLinux環境がある場合はスキップしてください。
ただ、Windowsを使っている場合はそのままではSDKを動かすことが出来ません。
Currently, the DFINITY Canister SDK only runs on computers with a macOS or Linux operating system.
Windowsの場合、次のどちらかの方法でLinux環境をWindows上に構築します。
- Linux仮想マシンを構築する
- WSLを使う
私は前者、仮想マシンを立てる方法でLinux(Ubuntu)環境を構築しました。
やり方はこちらを参照ください:
www.bioerrorlog.work
WSLを使うやり方は、こちらのforumが参考になります:
forum.dfinity.org
Linux環境が用意できたら、OS環境整備は完了です。
以後は次の環境(Ubuntu 20.04)を前提に作業を進めていきます。
$ lsb_release -a
No LSB modules are available.
Distributor ID: Ubuntu
Description:    Ubuntu 20.04.3 LTS
Release:    20.04
Codename:   focal
パッケージインストール
ではまず、ローカルでHello, Worldプロジェクトを動かすのに必要なパッケージとして、node.jsとSDK (DFINITY Canister Software Development Kit) をインストールします。
node.jsのインストール:
# node.jsのインストール
$ sudo apt install nodejs

# インストールできたことの確認
$ nodejs -v
v10.19.0
SDK (dfx)のインストール:
# Dfinity Canister SDKのインストール
$ sh -ci "$(curl -fsSL https://sdk.dfinity.org/install.sh)"
info: Executing dfx install script, commit: a5904a35274affca266f3cc825270fea68e6b0cb
info: Version found: 0.8.1
info: Creating uninstall script in ~/.cache/dfinity
info: uninstall path=/home/<username>/.cache/dfinity/uninstall.sh
info: Checking for latest release...
Will install in: /home/<username>/bin
info: Installed /home/<username>/bin/dfx

# インストールできたことの確認
$ dfx --version
dfx 0.8.1
dfxコマンドは、今後canisterに関するあらゆる操作で使用することになります。
使い方がわからないときは、コマンドリファレンスやdfxコマンドの--helpオプションを活用しましょう。
例) dfx ルートコマンドにおける--helpの出力結果:
$ dfx --help
dfx 0.8.1
The DFINITY Executor

USAGE:
    dfx [FLAGS] [OPTIONS] <SUBCOMMAND>

FLAGS:
    -h, --help       Prints help information
    -q, --quiet
    -v, --verbose
    -V, --version    Prints version information

OPTIONS:
        --identity <identity>
        --logfile <logfile>
        --log <logmode>          [default: stderr] [possible values: stderr, tee, file]

SUBCOMMANDS:
    bootstrap    Starts the bootstrap server
    build        Builds all or specific canisters from the code in your project. By default, all
                 canisters are built
    cache        Manages the dfx version cache
    canister     Manages canisters deployed on a network replica
    config       Configures project options for your currently-selected project
    deploy       Deploys all or a specific canister from the code in your project. By default,
                 all canisters are deployed
    generate     Generate type declarations for canisters from the code in your project
    help         Prints this message or the help of the given subcommand(s)
    identity     Manages identities used to communicate with the Internet Computer network.
                 Setting an identity enables you to test user-based access controls
    ledger       Ledger commands
    new          Creates a new project
    ping         Pings an Internet Computer network and returns its status
    replica      Starts a local Internet Computer replica
    start        Starts the local replica and a web server for the current project
    stop         Stops the local network replica
    toolchain    Manage the dfx toolchains
    upgrade      Upgrade DFX
    wallet       Helper commands to manage the user's cycles wallet
新規プロジェクト作成
では次に、dfx newコマンドで新規プロジェクトを作成します。
dfx new hello
このコマンドを実行すると、helloプロジェクトが作成されます。
プロジェクトの作成処理が終わったら、プロジェクトのルートディレクトリに移動します。 以降の作業は基本このプロジェクトルートから行います。
cd hello
生成されたデフォルトコードを読む
では、生成されたプロジェクトのコードを少し読んでみましょう。
まずはルートに生成されるdfx.jsonを眺めます。
{
  "canisters": {
    "hello": {
      "main": "src/hello/main.mo",
      "type": "motoko"
    },
    "hello_assets": {
      "dependencies": [
        "hello"
      ],
      "frontend": {
        "entrypoint": "src/hello_assets/src/index.html"
      },
      "source": [
        "src/hello_assets/assets",
        "dist/hello_assets/"
      ],
      "type": "assets"
    }
  },
  "defaults": {
    "build": {
      "args": "",
      "packtool": ""
    }
  },
  "dfx": "0.8.1",
  "networks": {
    "local": {
      "bind": "127.0.0.1:8000",
      "type": "ephemeral"
    }
  },
  "version": 1
}
まず確認したいのはcanistersセクションです。
helloとhello_assetsの二つのcanisterが定義されています。
helloにはmainプログラムがsrc/hello/main.moであり、それがMotoko (Dfinityの独自言語)で書かれていることが、
hello_assetsにはフロントエンドアセットとしての各情報が記載されています。
またnetworksセクションを見てみると、接続するネットワークの情報が記載されています。
デフォルトでは、ローカルの127.0.0.1:8000にcanister実行環境をバインドする設定になってます。
では次に、mainプログラムとして定義されているMotokoコードsrc/hello/main.moを見てみます。
actor {
    public func greet(name : Text) : async Text {
        return "Hello, " # name # "!";
    };
};
MotokoはActorモデルを採用した言語なので、枠組みにはactorが宣言されています。
(本記事ではActorモデルについてこれ以上深く掘り下げません)
メソッドとしてはpublicに呼び出し可能な非同期関数greetが定義され、引数に指定したテキストと"Hello, ", "!"を連結して返却する処理が実装されています。
以上、ざっくりとコードの中身を眺めたので (フロントのコードは後のステップで確認します)、このコードをローカルで動かしていきます。
ローカルcanister実行環境の起動
では、ローカルでcanisterを実行するための環境を起動します。
またこの先はターミナルを二つ開いて作業していきます。
片方のターミナルでdfx startコマンドを実行し、ローカルcanister実行環境を起動します。
$ dfx start
Starting webserver for /_/
(中略)
Oct 03 08:45:37.662 INFO Log Level: INFO
Oct 03 08:45:37.663 INFO Starting server. Listening on http://127.0.0.1:8000/
dfx.jsonのnetworksセクションで定義されたアドレス127.0.0.1:8000にバインドして、canister実行環境が起動されました。
以後このターミナルはそのまま放置し、別のターミナルで作業を進めます。
起動したcanister実行環境を疎通チェックは、dfx pingコマンドで行います。
$ dfx ping http://127.0.0.1:8000/
{
  "ic_api_version": "0.18.0"  "impl_hash": "84aeb5c0f83b7a8d61f48a8f3075b4201a5a036ec4adbf10b4926b1234567890"  "impl_version": "0.8.0"  "root_key": [48, 129, 130, 48, 29, 6, 13, 43, 6, 1, 4, 1, 130, 220, 124, 5, 3, 1, 2, 1, 6, 12, 43, 6, 1, 4, 1, 130, 220, 124, 5, 3, 2, 1, 3, 97, 0, 136, 24, 72, 227, 114, 53, 123, 45, 67, 890, 202, 191, 19, 35, 49, 159, 44, 209, 106, 35, 107, 138, 68, 13, 94, 102, 93, 9, 173, 139, 34, 81, 20, 150, 133, 184, 37, 16, 224, 235, 42, 177, 39, 24, 199, 215, 158, 49, 1, 1, 51, 236, 44, 155, 242, 188, 21, 33, 178, 126, 105, 84, 23, 221, 180, 142, 110, 70, 100, 131, 31, 121, 78, 86, 182, 30, 147, 71, 143, 162, 209, 24, 120, 177, 176, 117, 226, 54, 41, 165, 72, 147, 90, 78, 456, 123]
}
↑のように出力されれば、canister実行環境の起動は成功です。
※備考:canister実行環境を停止した状態でdfx pingコマンドを実行すると、次のような結果が出力されます。
$ dfx ping http://127.0.0.1:8000/
An error happened during communication with the replica: error sending request for url (http://127.0.0.1:8000/api/v2/status): error trying to connect: tcp connect error: Connection refused (os error 111)
Canister idの登録
ローカルのcanister実行環境を起動すれば、つぎはcanister idを登録することが出来ます。
dfx canister createは空のcanisterを作成し、canister名にcanister idを割り当てるコマンドです。
$ dfx canister create --help
dfx-canister-create
Creates an empty canister on the Internet Computer and associates the Internet Computer assigned
Canister ID to the canister name
--allオプションを使って、dfx.jsonに定義した全てのcanisterにidを登録します。
$ dfx canister create --all
Creating a wallet canister on the local network.
The wallet canister on the "local" network for user "default" is "rwlgt-iiaaa-aaaaa-aaaaa-cai"
Creating canister "hello"...
"hello" canister created with canister id: "rrkah-fqaaa-aaaaa-aaaaq-cai"
Creating canister "hello_assets"...
"hello_assets" canister created with canister id: "ryjl3-tyaaa-aaaaa-aaaba-cai"
hello, hello_assets, そしてローカルwalletにcanister idが割り振られました。
これらcanister idは、もちろんローカルでのみ有効です。
canister id情報は.dfx/local/canister_ids.jsonと.dfx/local/wallets.jsonに保存されています。
$ cat .dfx/local/canister_ids.json
{
  "hello": {
    "local": "rrkah-fqaaa-aaaaa-aaaaq-cai"
  },
  "hello_assets": {
    "local": "ryjl3-tyaaa-aaaaa-aaaba-cai"
  }
}

$ cat .dfx/local/wallets.json
{
  "identities": {
    "default": {
      "local": "rwlgt-iiaaa-aaaaa-aaaaa-cai"
    }
  }
}
Dappのビルド
では次に、プロジェクトコードをWebAssemblyモジュールにビルドしていきます。
ビルドはつぎのようにdfx buildコマンドで行います。
$ dfx build
Building canisters...
Building frontend...
ビルドが完了すると.dfx/local/canisters/ディレクトリが作成され、wasmファイルを含むビルドアーティファクトが格納されます。
$ tree .dfx/local/canisters/
.dfx/local/canisters/
├── hello
│   ├── hello.did
│   ├── hello.did.d.ts
│   ├── hello.did.js
│   ├── hello.wasm
│   └── index.js
├── hello_assets
│   ├── assets
│   │   ├── index.html
│   │   ├── index.js
│   │   ├── index.js.map
│   │   ├── logo.png
│   │   ├── main.css
│   │   └── sample-asset.txt
│   ├── assetstorage.did
│   ├── assetstorage.wasm
│   ├── hello_assets.did
│   ├── hello_assets.did.d.ts
│   ├── hello_assets.did.js
│   ├── hello_assets.wasm
│   └── index.js
└── idl

4 directories, 18 files
helloにはバックエンドのアーティファクトが、hello_assetsにはフロントエンドアセットが格納されています。
またsrc/declarationsディレクトリも、dfx buildによって作成されます。
$ tree src/declarations
src/declarations
├── hello
│   ├── hello.did
│   ├── hello.did.d.ts
│   ├── hello.did.js
│   └── index.js
└── hello_assets
    ├── assetstorage.did
    ├── hello_assets.did
    ├── hello_assets.did.d.ts
    ├── hello_assets.did.js
    └── index.js

2 directories, 9 files
.dfx/local/canisters/配下のビルドアーティファクトのうち、wasmファイル以外のファイル等が格納されています。
このsrc/declarationsディレクトリは機密情報を含まないので、git管理に含めることが推奨されています。
(一方.dfxディレクトリはデフォルトで.gitignoreに含まれており、git管理対象から外れています)
They do not contain any secrets, and we recommend committing these files along with the rest of your source code.
ドキュメントより
ローカル環境にデプロイ
ではいよいよ、コンパイルしたコードをcanisterとしてローカル環境にデプロイします。
dfx canister install --allコマンドで、dfx.jsonファイルに定義された全てのcanisterをデプロイ出来ます。
$ dfx canister install --all
Creating UI canister on the local network.
The UI canister on the "local" network is "r7inp-6aaaa-aaaaa-aaabq-cai"
Installing code for canister hello, with canister_id rrkah-fqaaa-aaaaa-aaaaq-cai
Installing code for canister hello_assets, with canister_id ryjl3-tyaaa-aaaaa-aaaba-cai
Authorizing our identity (default) to the asset canister...
Uploading assets to asset canister...
Starting batch.
Staging contents of new and changed assets:
  /sample-asset.txt 1/1 (24 bytes)
  /index.html 1/1 (573 bytes)
  /index.html (gzip) 1/1 (342 bytes)
  /index.js.map 1/1 (649260 bytes)
  /index.js.map (gzip) 1/1 (149157 bytes)
  /logo.png 1/1 (25397 bytes)
  /main.css 1/1 (484 bytes)
  /main.css (gzip) 1/1 (263 bytes)
  /index.js 1/1 (602204 bytes)
  /index.js (gzip) 1/1 (144150 bytes)
Committing batch.
ようやくここまで来ました。 いよいよdappの動作確認をしていきましょう。
動作確認
コマンドから
まずは、dfx canister callコマンドで直接canisterのgreetメソッドを呼び出してみます。
dfx canister call hello greet '("World": text)'
このコマンドにより、hello canisterのgreetメソッドを、引数'("World": text)'で呼び出します
次のような出力が返ってくれば成功です。
("Hello, World!")
フロントエンドdappから
次は、ブラウザからdappの動作を確認します。
まずは開発サーバを起動します。
npm start
npm startは、package.jsonのscripts.startに指定されたコマンドを実行します。
このデフォルトプロジェクトではwebpack serve --mode development --env developmentが実行され、開発webpackサーバーが127.0.0.1:8080に起動します。
では上記コマンドが実行出来たら、ブラウザで127.0.0.1:8080にアクセスします。
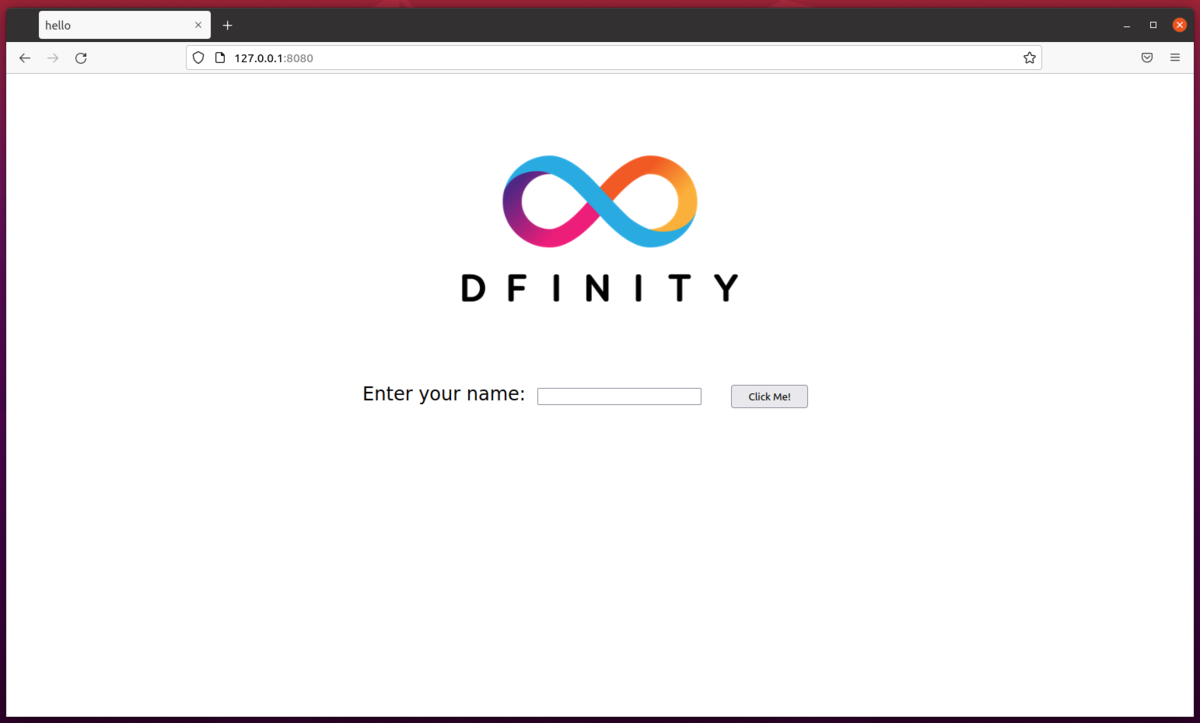 このような画面が表示されたら、
Enter your nameに任意の文字列を入力してClick Me!ボタンを押してみます。
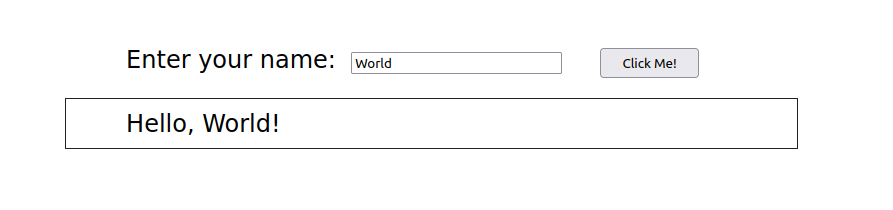
↑の応答が得られれば成功です。
フロントのコードを読んでみると、ブラウザからどのような処理が呼び出されたのかが分かります。
src/hello_assets/src/index.jsを見てみましょう。
import { hello } from "../../declarations/hello";

document.getElementById("clickMeBtn").addEventListener("click", async () => {
  const name = document.getElementById("name").value.toString();
  // Interact with hello actor, calling the greet method
  const greeting = await hello.greet(name);

  document.getElementById("greeting").innerText = greeting;
});
ビルド時に作成されるdeclarationsからhelloをインポートすることで、hello canisterのインターフェースにアクセス出来るようになっています。
clickMeBtnのクリックをトリガーにしてhello canister のgreetメソッドが呼び出され、画面に応答が表示される、というのが今回裏で実行された処理の大まかな流れです。
ローカルcanister実行環境の停止
最後に、後片付けとして今回起動した各環境を停止します。
npm startしたターミナルでCtrl+Cして開発サーバを停止dfx startしたターミナルでCtrl+C、またはdfx stopコマンドを実行してローカルcanister実行環境を停止
以上、おつかれさまでした。
おわりに
今回は、Dfinity, Internet Computerへの入門としてHello, Worldプロジェクトをローカル環境で動かしてみました。
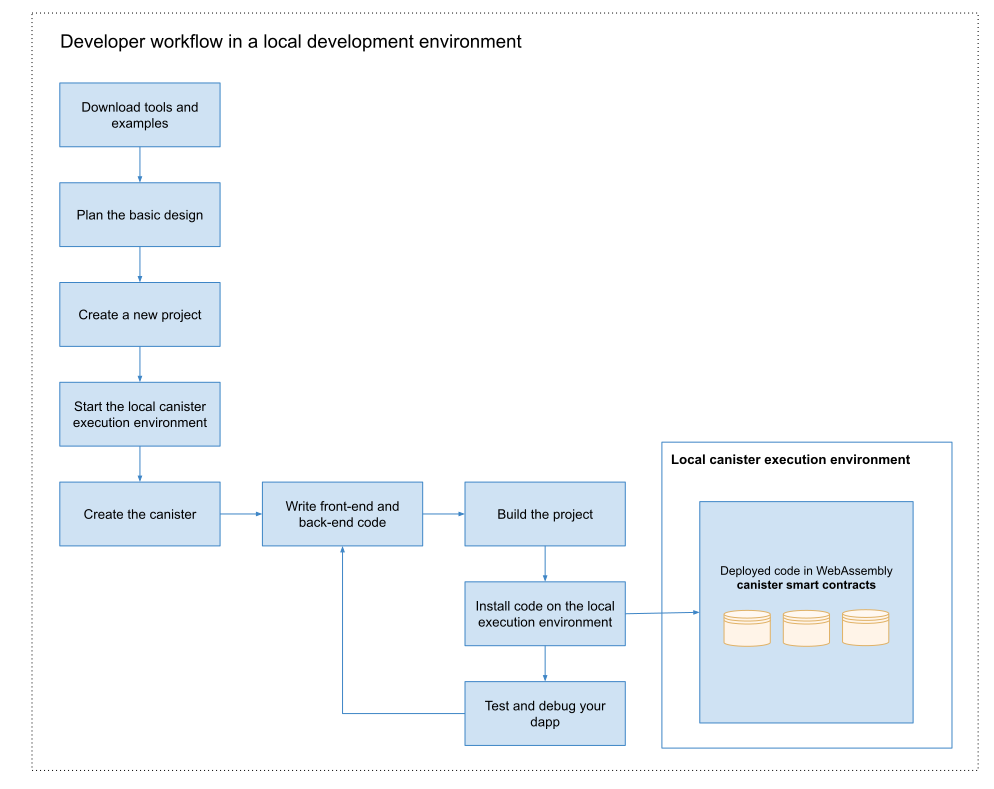
実際にdappをローカル開発するときは、大きく↓のような流れになります。
Dfinityのエコシステムには早くも、面白いdappが沢山あります。
自分でも何か作れたら、最高に面白いですね。
Dfinityのエコシステム by @NnsDaos
— BioErrorLog (@bioerrorlog) September 28, 2021
こうしてみると既にいろいろあって面白いなぁ pic.twitter.com/JmrqENmSAD
[関連記事]
参考
Explore the default project :: Internet Computer
Local development :: Internet Computer
Command-line reference :: Internet Computer
Use the default cycles wallet :: Internet Computer
Dfx on windows for beginners - Community Tutorials & Video - Internet Computer Developer Forum
General Availability of Application Subnets - Developers - Internet Computer Developer Forum
Coding with Kyle | IC Avatar, Episode #1: Hello, World - YouTube