API Gateway + Lambda + DynamoDB + Cognito + S3 を用いて、AWSでの基本的なサーバレスアプリケーションを構築します。
はじめに
おはよう。@bioerrorlogです。
ウェブアプリケーションにサーバレス構成を採用することは、今やデフォルトの選択肢のひとつになったと言っても過言ではないかと思います。
しかし、私は未だに自分の手でゼロからサーバレスアプリケーションを作ったことはありません。
今回は、AWSが提供しているこのチュートリアルを参考に、サーバレスアプリケーションの基本形を構築します。
aws.amazon.com
なお、本記事で使用したコードはこちらのGitHubにもまとめています。 github.com
概要
AWSのチュートリアルに従って、以下の特徴を持ったウェブアプリケーション "Wild Rydes" を作成していきます。
- ユーザーがユニコーンへの乗馬をリクエストできる
- ユーザーは乗馬する場所を指定できる
- リクエストを送信して近くのユニコーンを手配できる
- ユーザーがリクエスト処理を要求する前に、サービスに登録してログインするための機能を提供する
架空のUberのようなイメージですね。
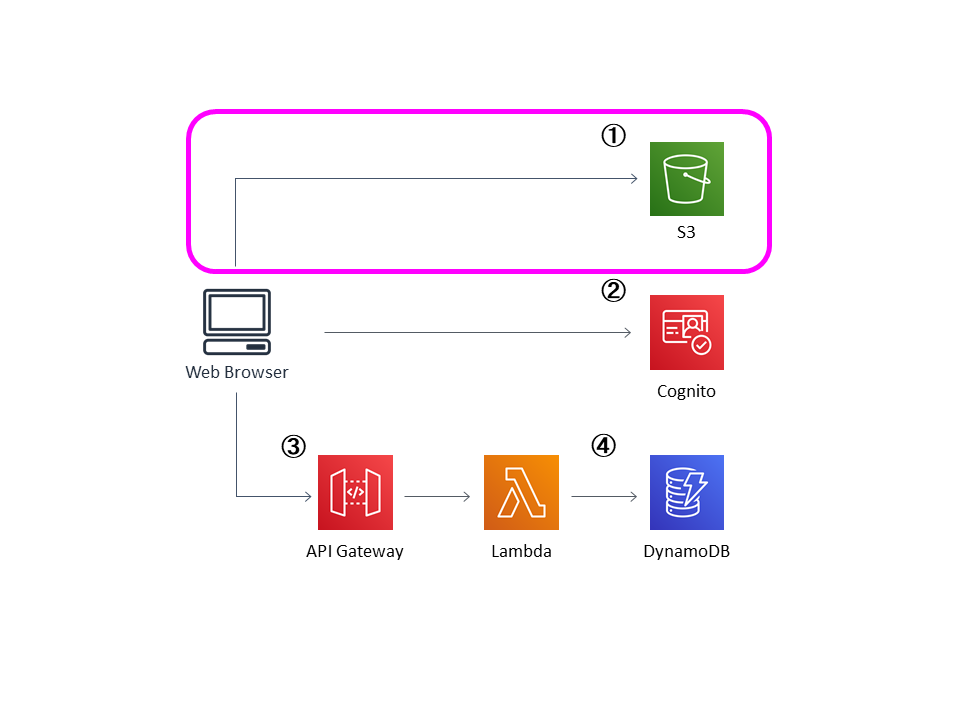
アーキテクチャ

①: 静的ウェブホスティング
S3は、静的なリソース(HTML、CSS、JavaScript、イメージファイル)をホスティングします。
②: ユーザー管理
Cognitoは、ユーザーを管理・認証します。
③: RESTful API
ウェブブラウザで実行される JavaScript は、API Gateway + Lambda で構築されたパブリックバックエンド API からデータを送受信します。
④: バックエンド
DynamoDB には、Lambda によってデータが格納されます。
それでは、さっそく構築していきます。
アプリケーションの構築
静的Webホスティング
最初に、静的コンテンツを配信するためのS3を作成・設定していきます。
S3バケットを作成する
まずは、静的なリソース(HTML、CSS、JavaScript、イメージファイル)を格納するS3を作成します。
ユーザーはこのS3によって公開されているURL http://{bucket-name}.s3-website.{region}.amazonaws.com によってサイトにアクセスすることになります。
S3のマネジメントコンソールから、
バケット名: bioerrorlog-serverless (任意のバケット名)
リージョン: 東京 (任意のリージョン)
でS3バケットを作成しました。

コンテンツをアップロードする
まずはこちらのGitHubリンクから、zipされたコンテンツをダウンロードします。
ダウンロードしたらzipを解凍したら、WebApplication/1_StaticWebHosting/website ディレクトリ内のファイルをすべてS3にアップロードします。
アップロードするコンテンツは、次のようにhtml, favicon, css, fonts, images, javascriptによって構成されています。
.
│  apply.html
│  faq.html
│  favicon.ico
│  index.html
│  investors.html
│  register.html
│  ride.html
│  robots.txt
│  signin.html
│  unicorns.html
│  verify.html
│
├─css
│      bootstrap.min.css
│      bootstrap.min.css.map
│      font.css
│      index.css
│      main.css
│      mapbox-gl.css
│      message.css
│      normalize.css
│      ride.css
│
├─fonts
│      fairplex-wide-n4.woff
│      fairplex-wide-n7.woff
│      glyphicons-halflings-regular.eot
│      glyphicons-halflings-regular.svg
│      glyphicons-halflings-regular.ttf
│      glyphicons-halflings-regular.woff
│      glyphicons-halflings-regular.woff2
│
├─images # ファイル数が多いので中身は省略
│
└─js
    │  cognito-auth.js
    │  config.js
    │  esri-map.js
    │  main.js
    │  ride.js
    │  vendor.js
    │
    └─vendor
            amazon-cognito-identity.min.js
            aws-cognito-sdk.min.js
            bootstrap.min.js
            html5shiv.min.js
            jquery-3.1.0.js
            modernizr.js
            moment.min.js
            respond.min.js
            unicorn-icon
S3バケットのパブリック読み込みを許可する
ユーザーがS3に保存したサイトコンテンツにアクセスできるよう、S3バケットのパブリック読み込みを許可させます。
まずは、S3のコンソールから アクセス権限 > ブロックパブリックアクセスへ行き、パブリックアクセスをすべてブロックのチェックを外します。
次に、バケットポリシーに以下のポリシーを入力します。
[YOUR_BUCKET_NAME]はバケット名に置き換えます(今回の私の場合、bioerrorlog-serverlessとなります)。
{
    "Version": "2012-10-17",
    "Statement": [
        {
            "Effect": "Allow",
            "Principal": "*",
            "Action": "s3:GetObject",
            "Resource": "arn:aws:s3:::[YOUR_BUCKET_NAME]/*"
        }
    ]
}
このポリシーは以下の意味を持っています。
"Resource": "arn:aws:s3:::[YOUR_BUCKET_NAME]/*"
-> このバケットの全てのオブジェクトに対して、"Principal": "*"
-> 誰もが、"Action": "s3:GetObject"
-> オブジェクトを取得"Effect": "Allow"
-> できる
以上で、S3バケットのパブリック読み込みが許可されました。
[関連記事] S3バケットポリシーとIAMポリシーの関係を整理する
ウェブサイトのホスティングを有効にする
次は、このS3でウェブサイトをホスティングするための設定をします。
S3のコンソールから、プロパティ > Static website hostingのカードを選択し、
このバケットを使用してウェブサイトをホストするにチェックを入れて、
インデックスドキュメントに index.html と入力、保存します。
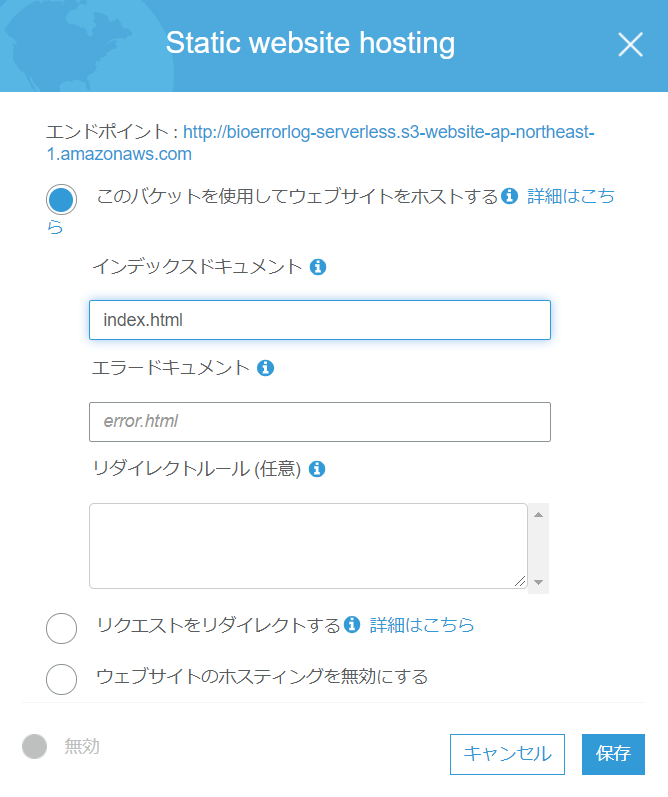
これで、静的ウェブコンテンツを配信する準備は整いました。
Static website hostingのカード上部に表示されているエンドポイントをクリックすれば、サイトにアクセスすることが出来ます。

ユーザー管理
つぎは、Cognitoによるユーザー管理を実装していきます。

Cognitoによるユーザー認証には、次のふたつの仕組みが用意されています。
- Cognito ユーザープールによる、サインアップおよびサインイン機能
- Cognito ID プールによる、Facebook、Twitter、Amazon などのソーシャル ID プロバイダー経由の SAML ID または独自の ID システムを使用したユーザー認証
今回は、ユーザープールを使用したサインアップ・サインインを実装します。
Cognitoユーザープールを作成する
Cognitoのマネジメントコンソールから ユーザープールの管理 を選択し、
ユーザープールを作成する を選択します。
ユーザープールの名前を任意に入力したら、デフォルトを確認する を選択します。
確認ページで プールの作成 をクリックすれば、ひとまず作成完了です。
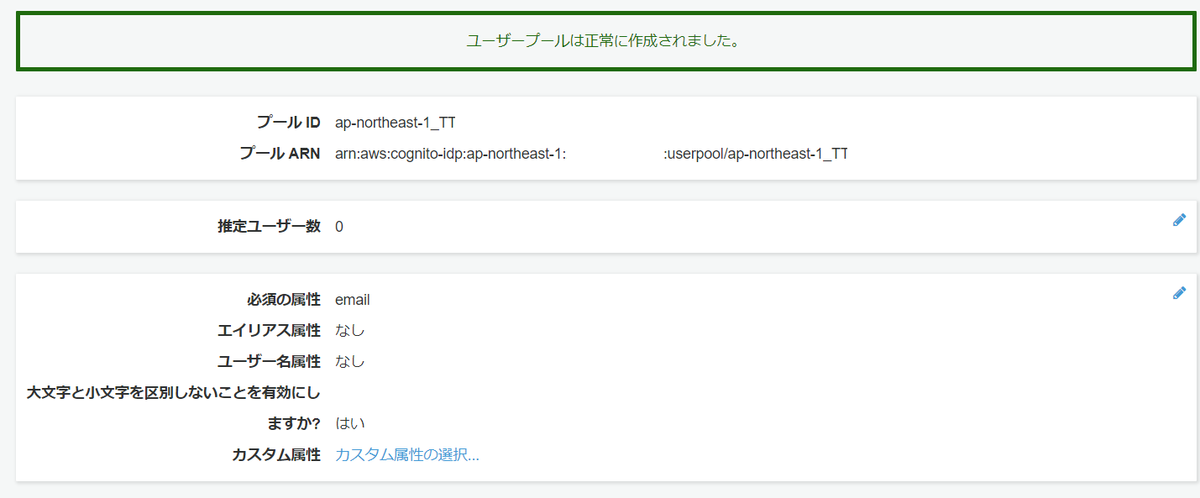
後で使うことになるので、ここで プール ID をメモしておきます。
ユーザープールにアプリを追加する
つぎは、作成したユーザープールにアプリを追加していきます。
ユーザープールのページで、ナビゲーションバーの左側の 全般設定 セクションから アプリクライアント を選択し、
アプリクライアントの追加 をクリックします。
アプリクライアント名にwildridesappなど任意の名前を入力し、
クライアントシークレットを生成 オプションをオフにします (クライアントシークレットは、現在ブラウザベースのアプリケーションでの使用はサポートされていないようです)。
アプリクライアントの作成 をクリックすれば、操作は完了です(下図)。
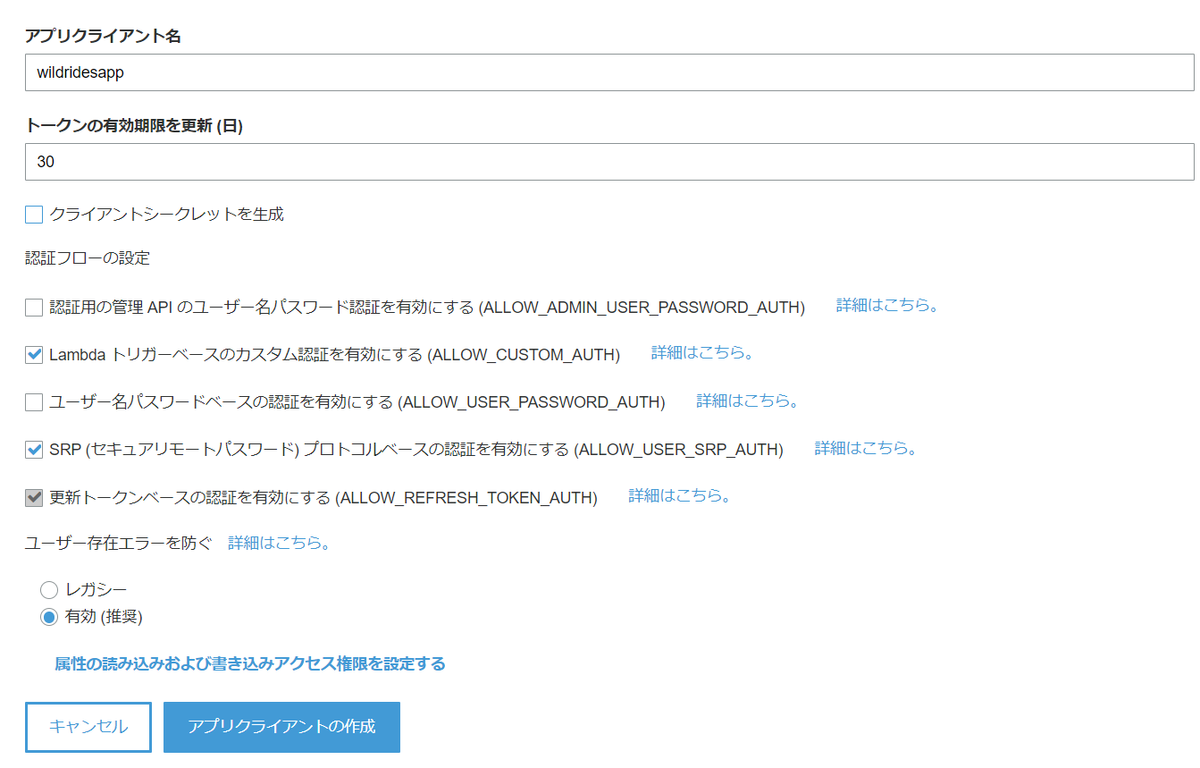
ここで、作成直後に表示される アプリクライアント ID をメモしておきます。
[関連記事] Amplify & GraphQLでのデータモデル設計事例集
ウェブサイトの設定を更新する
作成したCognitoのユーザープール ID、アプリクライアント ID、およびリージョンの設定を、/js/config.js ファイルを更新してアプリケーションに反映させます。
/js/config.js ファイルは以下のようになっています。
window._config = {
    cognito: {
        userPoolId: '', // e.g. us-east-2_uXboG5pAb
        userPoolClientId: '', // e.g. 25ddkmj4v6hfsfvruhpfi7n4hv
        region: '' // e.g. us-east-2
    },
    api: {
        invokeUrl: '' // e.g. https://rc7nyt4tql.execute-api.us-west-2.amazonaws.com/prod,
    }
};
userPoolIdに プール ID を、
userPoolClientIdに アプリクライアント ID を、
regionに リージョン名 (東京ならap-northeast-1)を入力します。
入力したら、S3の/js/config.js ファイルをアップロードし直して更新完了です。
なお、/js/config.js にはID情報などを埋め込むだけですが、実際の認証処理は以下の/js/cognito-auth.jsが行っています。
ご参考までに。
/*global WildRydes _config AmazonCognitoIdentity AWSCognito*/

var WildRydes = window.WildRydes || {};

(function scopeWrapper($) {
    var signinUrl = 'signin.html';

    var poolData = {
        UserPoolId: _config.cognito.userPoolId,
        ClientId: _config.cognito.userPoolClientId
    };

    var userPool;

    if (!(_config.cognito.userPoolId &&
          _config.cognito.userPoolClientId &&
          _config.cognito.region)) {
        $('#noCognitoMessage').show();
        return;
    }

    userPool = new AmazonCognitoIdentity.CognitoUserPool(poolData);

    if (typeof AWSCognito !== 'undefined') {
        AWSCognito.config.region = _config.cognito.region;
    }

    WildRydes.signOut = function signOut() {
        userPool.getCurrentUser().signOut();
    };

    WildRydes.authToken = new Promise(function fetchCurrentAuthToken(resolve, reject) {
        var cognitoUser = userPool.getCurrentUser();

        if (cognitoUser) {
            cognitoUser.getSession(function sessionCallback(err, session) {
                if (err) {
                    reject(err);
                } else if (!session.isValid()) {
                    resolve(null);
                } else {
                    resolve(session.getIdToken().getJwtToken());
                }
            });
        } else {
            resolve(null);
        }
    });


    /*
     * Cognito User Pool functions
     */

    function register(email, password, onSuccess, onFailure) {
        var dataEmail = {
            Name: 'email',
            Value: email
        };
        var attributeEmail = new AmazonCognitoIdentity.CognitoUserAttribute(dataEmail);

        userPool.signUp(email, password, [attributeEmail], null,
            function signUpCallback(err, result) {
                if (!err) {
                    onSuccess(result);
                } else {
                    onFailure(err);
                }
            }
        );
    }

    function signin(email, password, onSuccess, onFailure) {
        var authenticationDetails = new AmazonCognitoIdentity.AuthenticationDetails({
            Username: email,
            Password: password
        });

        var cognitoUser = createCognitoUser(email);
        cognitoUser.authenticateUser(authenticationDetails, {
            onSuccess: onSuccess,
            onFailure: onFailure
        });
    }

    function verify(email, code, onSuccess, onFailure) {
        createCognitoUser(email).confirmRegistration(code, true, function confirmCallback(err, result) {
            if (!err) {
                onSuccess(result);
            } else {
                onFailure(err);
            }
        });
    }

    function createCognitoUser(email) {
        return new AmazonCognitoIdentity.CognitoUser({
            Username: email,
            Pool: userPool
        });
    }

    /*
     *  Event Handlers
     */

    $(function onDocReady() {
        $('#signinForm').submit(handleSignin);
        $('#registrationForm').submit(handleRegister);
        $('#verifyForm').submit(handleVerify);
    });

    function handleSignin(event) {
        var email = $('#emailInputSignin').val();
        var password = $('#passwordInputSignin').val();
        event.preventDefault();
        signin(email, password,
            function signinSuccess() {
                console.log('Successfully Logged In');
                window.location.href = 'ride.html';
            },
            function signinError(err) {
                alert(err);
            }
        );
    }

    function handleRegister(event) {
        var email = $('#emailInputRegister').val();
        var password = $('#passwordInputRegister').val();
        var password2 = $('#password2InputRegister').val();

        var onSuccess = function registerSuccess(result) {
            var cognitoUser = result.user;
            console.log('user name is ' + cognitoUser.getUsername());
            var confirmation = ('Registration successful. Please check your email inbox or spam folder for your verification code.');
            if (confirmation) {
                window.location.href = 'verify.html';
            }
        };
        var onFailure = function registerFailure(err) {
            alert(err);
        };
        event.preventDefault();

        if (password === password2) {
            register(email, password, onSuccess, onFailure);
        } else {
            alert('Passwords do not match');
        }
    }

    function handleVerify(event) {
        var email = $('#emailInputVerify').val();
        var code = $('#codeInputVerify').val();
        event.preventDefault();
        verify(email, code,
            function verifySuccess(result) {
                console.log('call result: ' + result);
                console.log('Successfully verified');
                alert('Verification successful. You will now be redirected to the login page.');
                window.location.href = signinUrl;
            },
            function verifyError(err) {
                alert(err);
            }
        );
    }
}(jQuery));
Cognitoの動作を確認する
では、Cognitoの動作確認も兼ねて、サイトにサインアップしてみます。
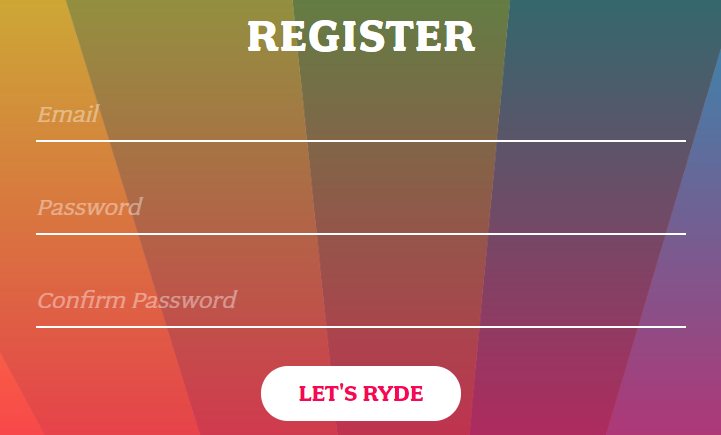
トップページの GIDDY UP! ボタンからREGISTERページに飛び、メールアドレスとパスワードを登録します。
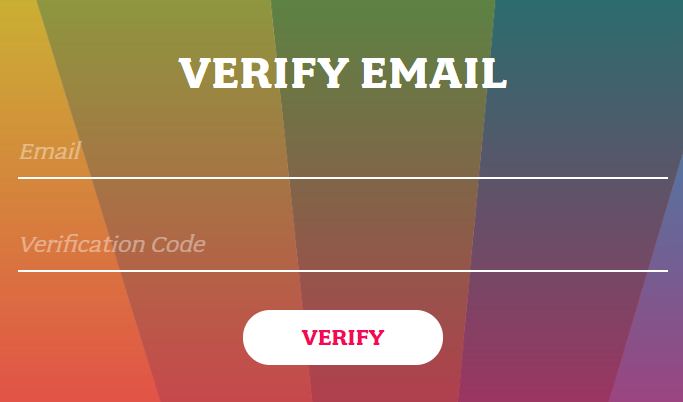
メールアドレスとパスワードを送信すると、no-reply@verificationemail.comから次のようなメールが送られてきます (この確認メールはSESを使用して自分のドメインから送信することもできるようです)。
Your confirmation code is {6桁の数字}
送られてきたコードを、自動遷移先のVERYFY EMAILページに入力して、登録作業は完了です。
登録が完了したら、SIGN INページからログインすることが出来ます (この段階ではまだ、ログイン後の画面にはAPIが未作成である旨のエラーが表示されます)。
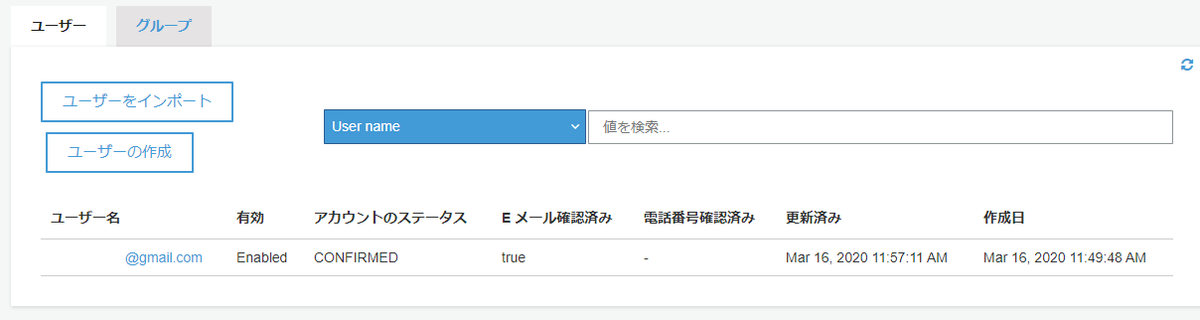
Cognito側でも、ユーザーが作成されたことを確認することが出来ます。
Cognitoマネジメントコンソールから、サイドバー ユーザーとグループを選択すると、登録されたユーザー情報を確認できます (下の画像ではメールアドレスをマスクしています)。
Cognitoによるユーザー管理の実装は以上です。
バックエンド
次は、LambdaとDynamoDBからなるバックエンド部分を構築していきます。
このウェブサイトでは、ユーザーがユニコーンをリクエストするたびにLambdaが呼び出され、そのリクエストをDynamoDBテーブルに記録してから、ユニコーンに関する詳細をフロントエンドに返します。
LambdaはAPI Gatewayから呼び出されますが、こちらの接続は次章で実装します。
この章では、Lambda - DynamoDB間の接続を実装していきます。

DynamoDBを作成する
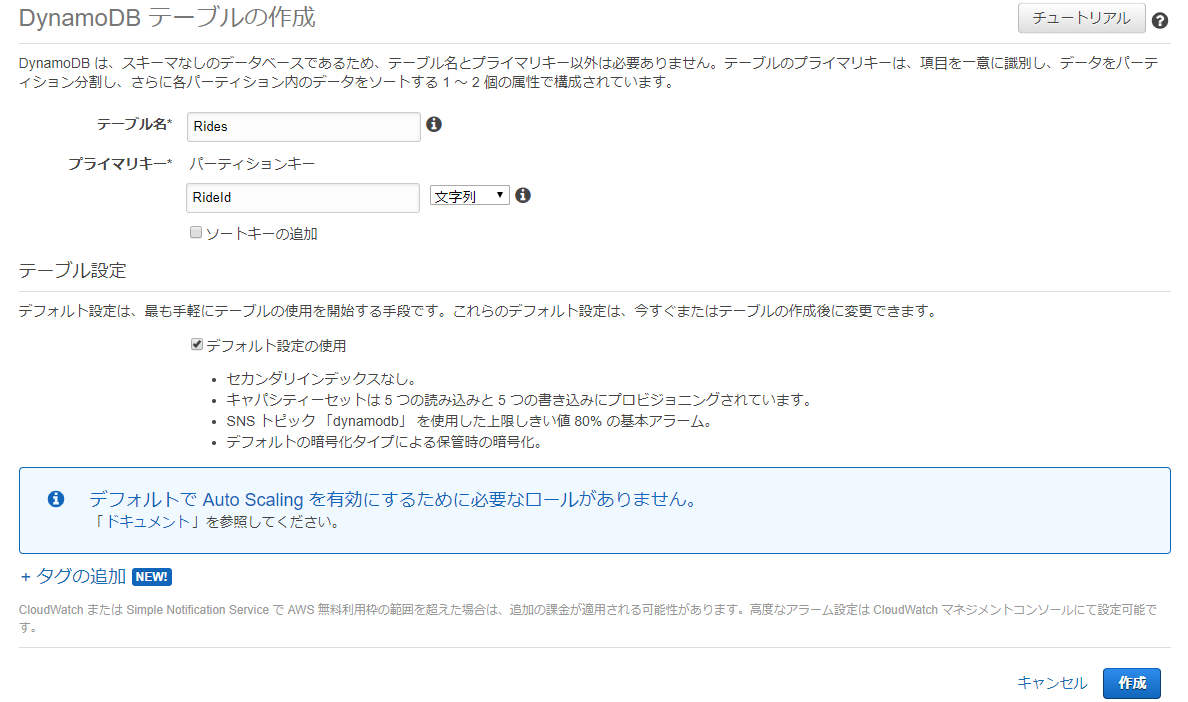
まず、DynamoDBテーブルを作成していきます。
DynamoDBマネジメントコンソールから、テーブルの作成を選択し、
テーブル名: Rides
パーティションキー: RideId
と入力してテーブルを作成します。
※ここのパーティションキーとは、データがどのパーティションに保存されるかを決定するキーです (DynamoDBのデータは、複数のパーティションに分散して保存されます)。
テーブルが作成できたら、 テーブル詳細セクションの下部にあるARN をメモしておきます。
Lambda用の IAM ロールを作成する
次は、Lambdaに必要なIAM ロールを作ります。
LambdaがログをCloudWatch Logs に書き込むアクセス許可と、DynamoDB テーブルに書き込むアクセス許可を付与するIAM ロールを作成します。
IAMのマネジメントコンソールから、サードバー ロール > ロールの作成をクリックします。
信頼されたエンティティの種類を選択にてAWS サービスが選択されていることを確認して、
ユースケースの選択からLambdaを選択し、
次のステップ:アクセス権限をクリックします。
つぎに、ポリシーからAWSLambdaBasicExecutionRoleを選択し、
チェックボックスをオンにします。
次のステップ を選択して ロールの作成 ページまで進み、
WildRydesLambdaのロール名でロールを作成します。
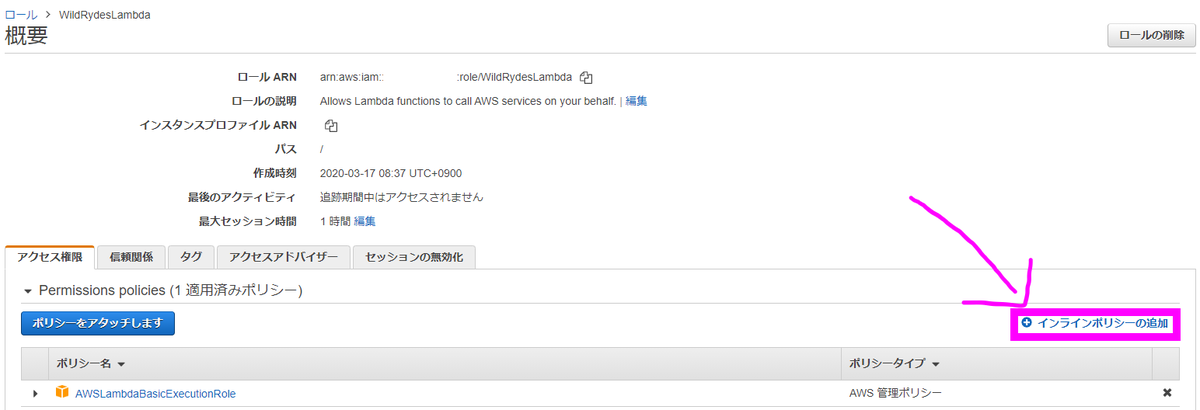
WildRydesLambdaロールが作成できたら、つぎはDynamoDBへの書き込みを許可するインラインポリシーを作成します。
マネジメントコンソールからWildRydesLambdaロールのページへ行き、インラインポリシーの追加をクリックします。
JSONタブから、以下のポリシーを入力します。
{
    "Version": "2012-10-17",
    "Statement": [
        {
            "Sid": "VisualEditor0",
            "Effect": "Allow",
            "Action": "dynamodb:PutItem",
            "Resource": "arn:aws:dynamodb:ap-northeast-1:[アカウントid]:table/Rides"
        }
    ]
}
"Resource"部分は、作成したDynamoDBのARNに置き換えてください。
このポリシーをDynamoDBWriteAccesszという名前で作成して、IAM ロールの作成は完了です。
Lambdaを作成する
次は、Lambdaを作成します。
Lambdaのマネジメントコンソールから、関数の作成をクリックします。
次の画面では、デフォルトの 一から作成 カードを選択したまま、
関数名: RequestUnicorn
ランタイム: Node.js x.x
実行ロールの選択または作成 > 既存のロールを使用する から、
既存のロール: WildRydesLambda
と入力します。
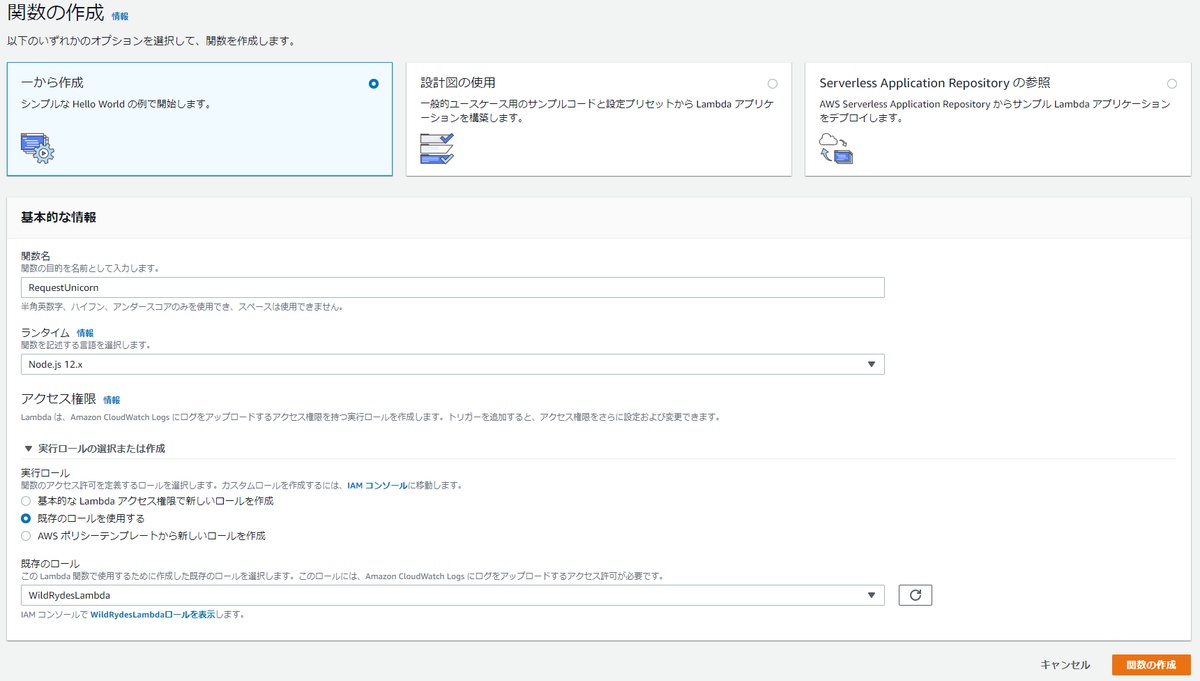
これで、関数の作成をクリックして、Lambdaの作成します。
Lambdaを作成できたら、関数コードセクションのindex.jsの中身を、以下のrequestUnicorn.jsの内容に書き換えます。
const randomBytes = require('crypto').randomBytes;

const AWS = require('aws-sdk');

const ddb = new AWS.DynamoDB.DocumentClient();

const fleet = [
    {
        Name: 'Bucephalus',
        Color: 'Golden',
        Gender: 'Male',
    },
    {
        Name: 'Shadowfax',
        Color: 'White',
        Gender: 'Male',
    },
    {
        Name: 'Rocinante',
        Color: 'Yellow',
        Gender: 'Female',
    },
];

exports.handler = (event, context, callback) => {
    if (!event.requestContext.authorizer) {
      errorResponse('Authorization not configured', context.awsRequestId, callback);
      return;
    }

    const rideId = toUrlString(randomBytes(16));
    console.log('Received event (', rideId, '): ', event);

    // Because we're using a Cognito User Pools authorizer, all of the claims
    // included in the authentication token are provided in the request context.
    // This includes the username as well as other attributes.
    const username = event.requestContext.authorizer.claims['cognito:username'];

    // The body field of the event in a proxy integration is a raw string.
    // In order to extract meaningful values, we need to first parse this string
    // into an object. A more robust implementation might inspect the Content-Type
    // header first and use a different parsing strategy based on that value.
    const requestBody = JSON.parse(event.body);

    const pickupLocation = requestBody.PickupLocation;

    const unicorn = findUnicorn(pickupLocation);

    recordRide(rideId, username, unicorn).then(() => {
        // You can use the callback function to provide a return value from your Node.js
        // Lambda functions. The first parameter is used for failed invocations. The
        // second parameter specifies the result data of the invocation.

        // Because this Lambda function is called by an API Gateway proxy integration
        // the result object must use the following structure.
        callback(null, {
            statusCode: 201,
            body: JSON.stringify({
                RideId: rideId,
                Unicorn: unicorn,
                UnicornName: unicorn.Name,
                Eta: '30 seconds',
                Rider: username,
            }),
            headers: {
                'Access-Control-Allow-Origin': '*',
            },
        });
    }).catch((err) => {
        console.error(err);

        // If there is an error during processing, catch it and return
        // from the Lambda function successfully. Specify a 500 HTTP status
        // code and provide an error message in the body. This will provide a
        // more meaningful error response to the end client.
        errorResponse(err.message, context.awsRequestId, callback)
    });
};

// This is where you would implement logic to find the optimal unicorn for
// this ride (possibly invoking another Lambda function as a microservice.)
// For simplicity, we'll just pick a unicorn at random.
function findUnicorn(pickupLocation) {
    console.log('Finding unicorn for ', pickupLocation.Latitude, ', ', pickupLocation.Longitude);
    return fleet[Math.floor(Math.random() * fleet.length)];
}

function recordRide(rideId, username, unicorn) {
    return ddb.put({
        TableName: 'Rides',
        Item: {
            RideId: rideId,
            User: username,
            Unicorn: unicorn,
            UnicornName: unicorn.Name,
            RequestTime: new Date().toISOString(),
        },
    }).promise();
}

function toUrlString(buffer) {
    return buffer.toString('base64')
        .replace(/\+/g, '-')
        .replace(/\//g, '_')
        .replace(/=/g, '');
}

function errorResponse(errorMessage, awsRequestId, callback) {
  callback(null, {
    statusCode: 500,
    body: JSON.stringify({
      Error: errorMessage,
      Reference: awsRequestId,
    }),
    headers: {
      'Access-Control-Allow-Origin': '*',
    },
  });
}
コードを書き換えたら、ページ右上の保存ボタンを押して、Lambda関数の作成は完了です。
[関連記事] LambdaでAWS CLIを実行する | AWS Lambda Layer
バックエンドの動作をテストする
次は、Lambdaのテスト機能を用いてバックエンドの動作を確認していきます。
Lambdaの編集画面で テストイベントの選択 ドロップダウンから テストイベントの設定 を選択し、
新しいテストイベントの作成 を選択したまま、
イベント名 にTestRequestEventと入力し、
以下のコードをエディタに貼り付けます。
{
    "path": "/ride",
    "httpMethod": "POST",
    "headers": {
        "Accept": "*/*",
        "Authorization": "eyJraWQiOiJLTzRVMWZs",
        "content-type": "application/json; charset=UTF-8"
    },
    "queryStringParameters": null,
    "pathParameters": null,
    "requestContext": {
        "authorizer": {
            "claims": {
                "cognito:username": "the_username"
            }
        }
    },
    "body": "{\"PickupLocation\":{\"Latitude\":47.6174755835663,\"Longitude\":-122.28837066650185}}"
}
作成 をクリックすれば、テストが作成されます。
このテストを実行するには、ドロップダウンから TestRequestEvent が選択された状態で テスト をクリックします。
コード編集画面のExecution Resultsセクションに、次のような実行結果が表示されればテストは成功です。
{
  "statusCode": 201,
  "body": "{\"RideId\":\"llZmgFJrLuAVD4oPDD7y5g\",\"Unicorn\":{\"Name\":\"Bucephalus\",\"Color\":\"Golden\",\"Gender\":\"Male\"},\"UnicornName\":\"Bucephalus\",\"Eta\":\"30 seconds\",\"Rider\":\"the_username\"}",
  "headers": {
    "Access-Control-Allow-Origin": "*"
  }
}
RESTful API
Lambda + DynamoDBのバックエンドが構築できたので、最後はAPI Gatewayを利用してこのLambda関数を公開します。
このAPIはインターネットに開かれていますが、Cognitoを使用してそのアクセスを保護します。
またAPIに対してAjax呼び出しを行うクライアント側のJavascriptを追加して、静的ウェブサイトを動的アプリケーションに変換させます。

REST API を作成する
まずはAPI GatewayのマネジメントコンソールからAPIを作成します。
API Gatewayコンソール画面からAPIの作成をクリックし、REST APIの構築をクリックします。
API作成画面では、
プロトコルを選択する: REST
新しいAPIの作成: 新しいAPI
API名: WildRydes
エンドポイントタイプ: エッジ最適化
として、APIの作成をクリックします(下図)。

※エンドポイントタイプについて
エッジ最適化は、インターネットからアクセスされるパブリックAPI用のエンドポイントです。
同一リージョン内からアクセスさせるAPIを作成する場合は、一般にリージョンのエンドポイントを利用します。
Cognito ユーザープールオーソライザーを作成する
API Gatewayが作成出来たら、次はオーソライザーを作成します。
API Gateway のオーソライザーは、Cognito から渡されるトークンを使用して、API コールが登録されたユーザーによるものかどうかを認証することができます。
さっそく、作っていきます。
作成したAPI Gateway: WildRydesの画面から、左サイドバー オーソライザーを選択し、新しいオーソライザーの作成をクリックします。
オーソライザーの作成画面で、
名前: WildRydes
タイプ: Cognito
Cognito ユーザープール: wildrides (作成したユーザープールの名前)
トークンのソース: Authorization
と入力して、作成をクリックします(下図)。

これでオーソライザーの作成は完了です。
オーソライザーをテストする
つぎは、作成したオーソライザーの動作を確認します。
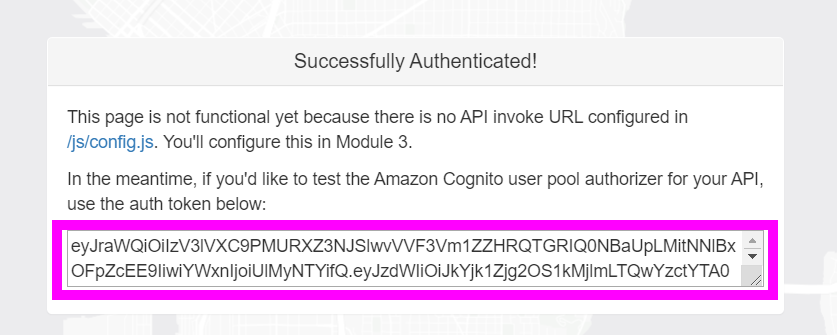
サインインした状態でWildRidesにアクセスしたときに発行されるトークンを用いて、API Gatewayのオーソライザーをテストします。
まずは、ウェブサイトの/ride.htmlにサインインした状態でアクセスし (サインインしてない場合はサインインページにリダイレクトされます)、表示されたトークンをコピーします(下図)。
次にAPI Gatewayの画面に戻り、作成したオーソライザーWildRydesのカードのテストをクリックします。
ポップアップの認証トークンにサイトから取得したトークンを張り付け、テストを実行します(下図)。

応答結果として、
Response Code(応答コード): 200
と同時に、ユーザー情報のjsonが表示されれば、認証動作の確認は成功です。
APIリソースとメソッドを作成する
次は、API 内で/ride というリソースを作成します。
また、リソース用の POST メソッドを作成し、作成したLambda関数 RequestUnicorn と統合します。
WildRydes APIのサイドバーからリソースを選択し、
アクションドロップダウンからリソースの作成をクリックします。
リソース名を ride とし、API Gateway CORS を有効にするのチェックボックスをオンにして、リソースの作成をクリックします(下図)。

リソースが作成できたら、次はこのリソース内にメソッドを作成します。
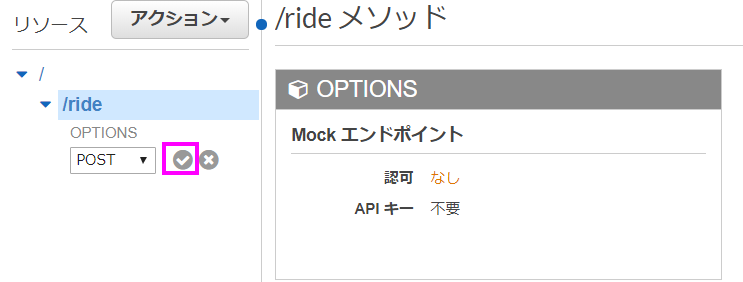
/ride リソースが選択された状態で、アクション ドロップダウンから メソッドの作成 をクリックします。
表示されたドロップダウンで POST を選択し、チェックマークをクリックします(下図)。
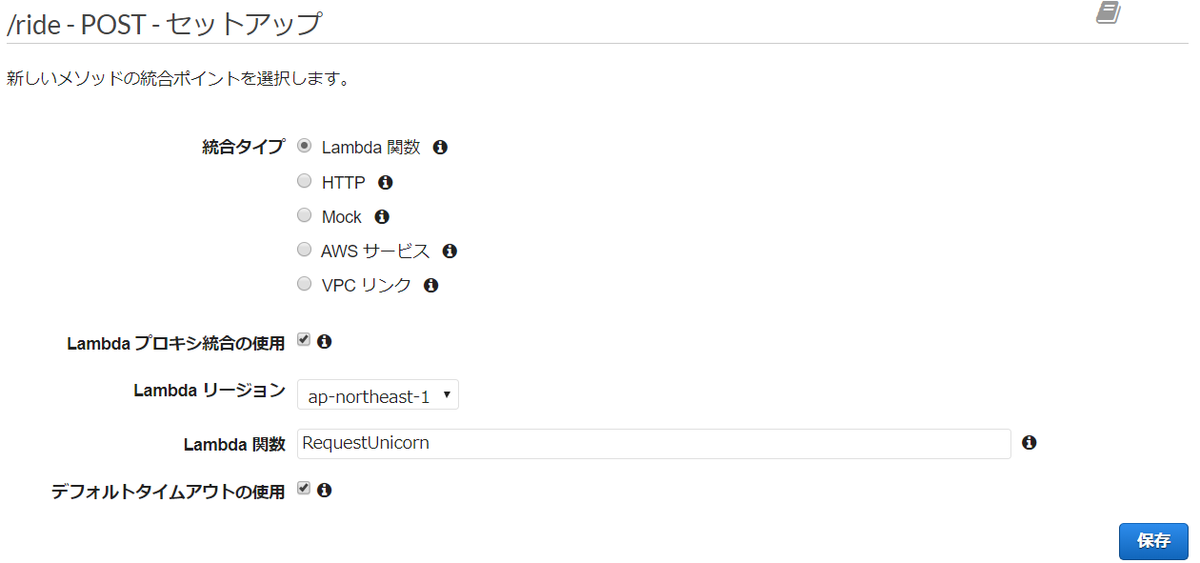
メソッドのセットアップ画面では、統合タイプとしてLambda関数を選択し、
Lambda プロキシ統合の使用をオンにし、
作成したLambda関数の名前 RequestUnicorn を Lambda 関数 に入力して、
保存をクリックします(下図)。
なお、ポップアップで関数を呼び出すための権限をAPI Gateway に付与するように求められるので、OK を選択します。
これで、メソッドが作成されます(下図)。
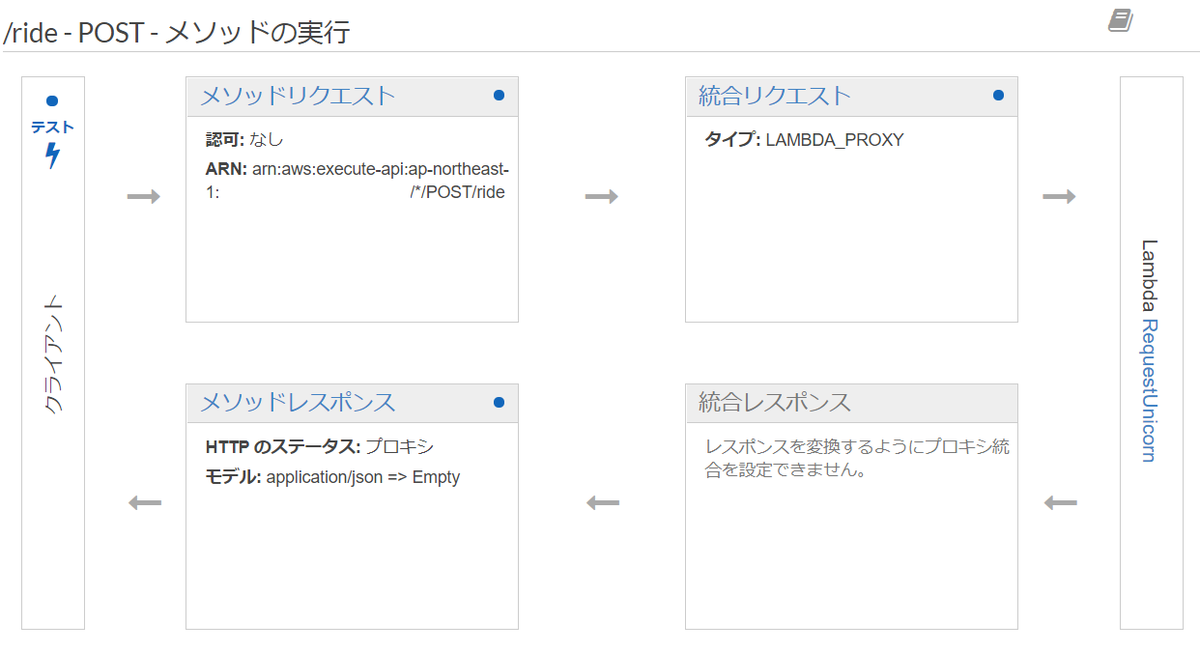
最後に、メソッドリクエストにオーソライザーによる認可を追加します。
メソッドリクエストのカードをクリックし、
認可 の横の鉛筆アイコンを選択、
ドロップダウンのCognito ユーザープールオーソライザーから WildRydes を選択し、チェックマークアイコンをクリックします。
これで、メソッドの作成・設定は完了です。
API をデプロイする
次は、作成したAPIをデプロイします。
API Gatewayコンソールから、アクション > APIのデプロイを選択します。
表示される画面では、
デプロイされるステージ: [新しいステージ]
ステージ名: prod
と入力し、デプロイをクリックします(下図)。

デプロイしたら、表示されるURL の呼び出し をメモしておきます。
ウェブサイトの設定を更新する
作成したAPIをウェブサイトから利用するために、config.jsを更新します。
Cognitoを作成した時もconfig.jsも変更しましたが、今回はこのファイルのinvokeUrl部分を追記します。
window._config = {
    cognito: {
        userPoolId: 'XXX', // 追記済み e.g. us-east-2_uXboG5pAb
        userPoolClientId: 'XXX', // 追記済み e.g. 25ddkmj4v6hfsfvruhpfi7n4hv
        region: 'XXX' // 追記済み e.g. us-east-2
    },
    api: {
        invokeUrl: '' // ここを追記 e.g. https://rc7nyt4tql.execute-api.us-west-2.amazonaws.com/prod,
    }
};
invokeUrlの部分に先ほどメモしたURL の呼び出しのURLを追記し、S3のconfig.jsの格納されているディレクトリに再アップします。
これで、ウェブサイト側の設定変更は完了です。
アプリケーションの動作テスト
さて、結構手間がかかりましたが、以上でアプリケーションの作成は完了です。
最後に、完成したアプリケーションの動作を確認しましょう。
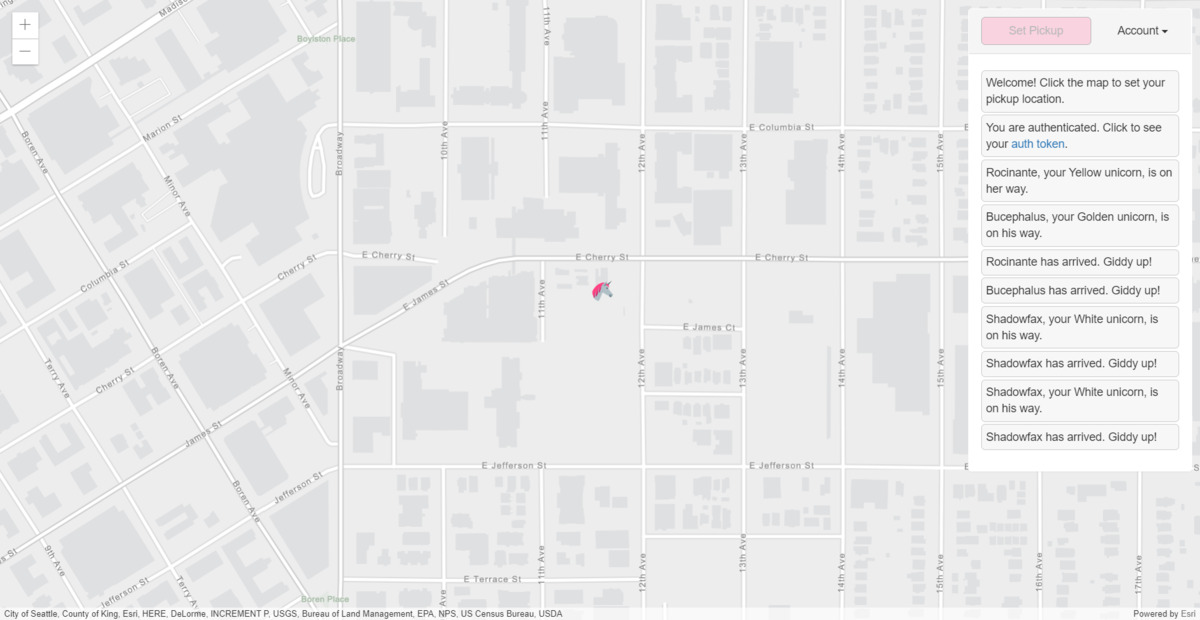
まず、ウェブサイトの /ride.html にアクセスします。
地図がロードされたら、マップをクリックしてユニコーンをリクエストする場所を指定します。
Request Unicorn をクリックすると、右のサイドバーの通知でユニコーンが向かっていることが表示されます。 そして、乗る場所にユニコーンのアイコンが移動するのが確認できます(下図)。
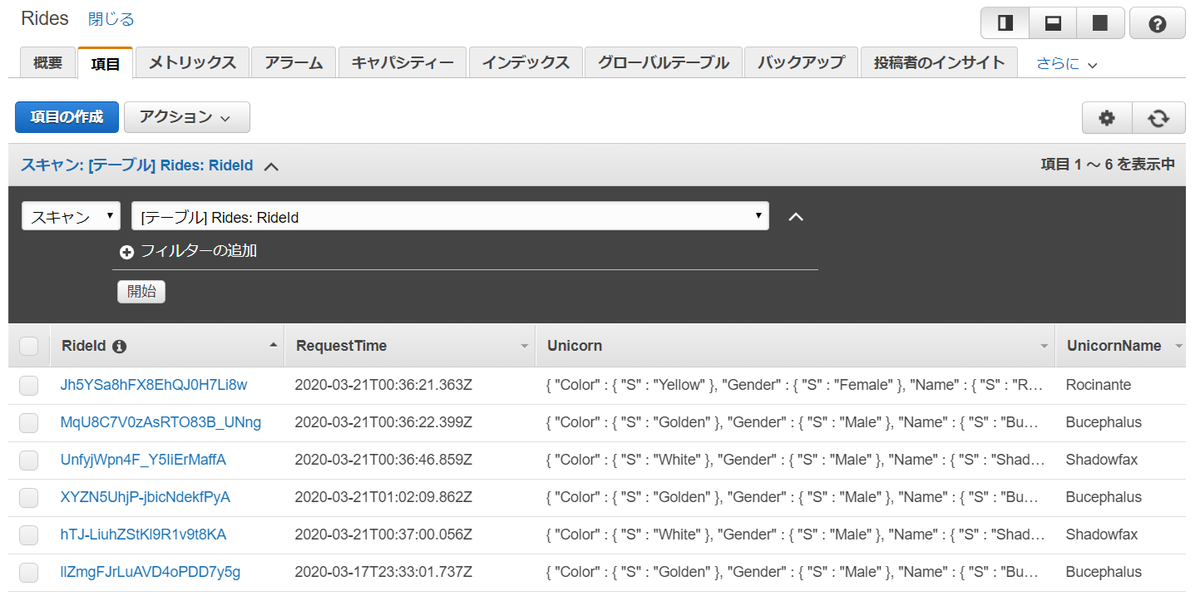
なお、DynamoDBテーブルにおいても、ユニコーンのリクエストが追加されていることが確認できます(下図)。
おわりに
以上で、サーバレスアプリケーション構築のチュートリアルは終了です。
今回利用したコードを参考にすれば、自分の好きなウェブアプリも比較的簡単に構築できそうです。
なお、今回は全てのリソースを手動で作成しましたが、これはなかなか手間のかかる作業でした。
Serverless FrameworkやSAM、Chaliceなどのフレームワークを使用すれば、もっと早くリソースが作成できそうです。
そこらへんも徐々に手を出していきたいと思っています。
[関連記事] AWS ChaliceアプリケーションをCDKでデプロイする | cdk-chalice
参考
aws-serverless-workshops/WebApplication at master · aws-samples/aws-serverless-workshops · GitHub
Cloud-Tips/serverless-tutorial at master · bioerrorlog/Cloud-Tips · GitHub