Boids Flockingの実装を通して、Go製のゲームエンジンEbitengineに入門します。
はじめに Go製のゲームエンジンEbitengineというものを見つけて面白そうだったので、取り急ぎ何か作ってみようと思いました。
以前に他のゲームエンジンで実装したことのある Boids Flockingを実装し、Ebitengineに入門していきたいと思います。
Go: 1 .20 .7
Ebitengine: v2.5 .6
Ebitengineとは
Ebitengineは、
Go製のオープンソース2Dゲームエンジン
マルチプラットフォーム対応 (Nintendo Switchもサポート)
ミニマムなAPI
「全ては矩形画像である」- 矩形画像から矩形画像へ描画でゲームを構成する
という特徴を持ったゲームエンジンです。
ebitengine.org
設計思想はEbitengine作者様の記事にわかりやすく解説されていますので、ご興味があれば一読をお勧めします。
Ebitenginで作られた有名どころのゲーム事例としては、
などがあります。
どちらもOdencat さんからのゲーム(Nintendo Switchにも移植されてる)なのですが、OdencatさんがEbitengineを採用するに至った経緯や、このツールの活用方法を語った下記の資料も面白いのでおすすめです。
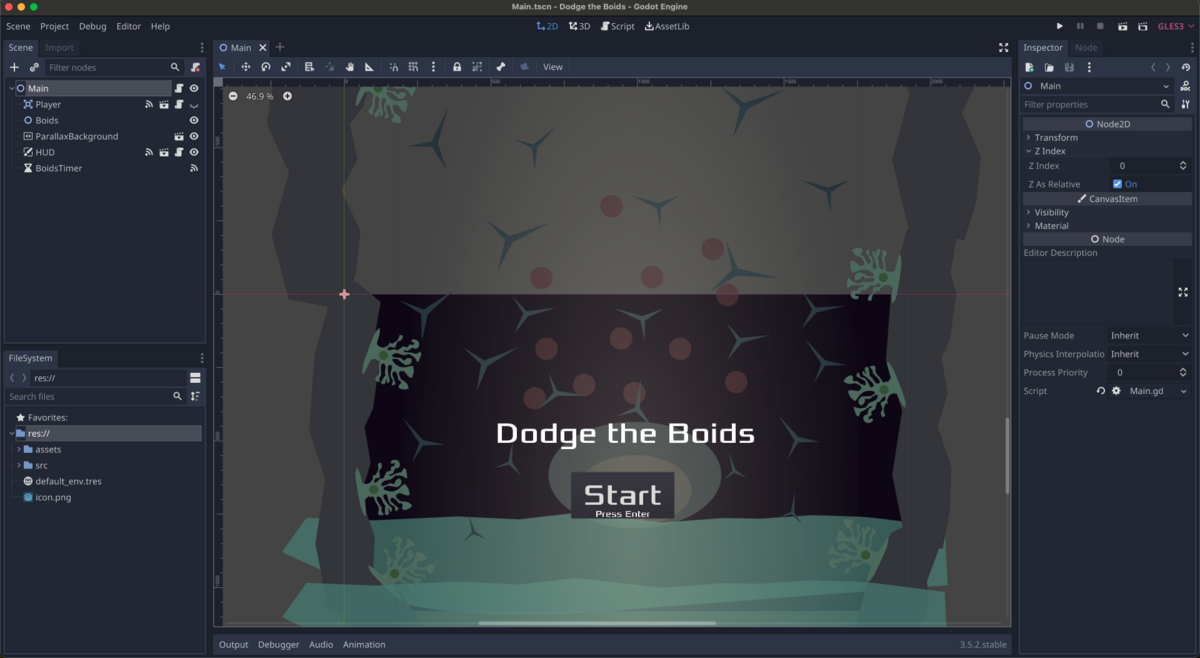
www.slideshare.net 今回作ったもの: Boids Flocking
Boids Flockingは、鳥の群れの動きをシミュレートする人工生命モデルです。
"Bird-oid"「鳥っぽいもの」という意味で、Boidsと呼ばれています。
Boids Flockingのアルゴリズム自体の説明については過去記事 で整理しましたので、そちらを参照ください。
最終的なコードはGitHubに配置していますので、以降はこのコードを元にしながらポイントを整理していきます:
github.com
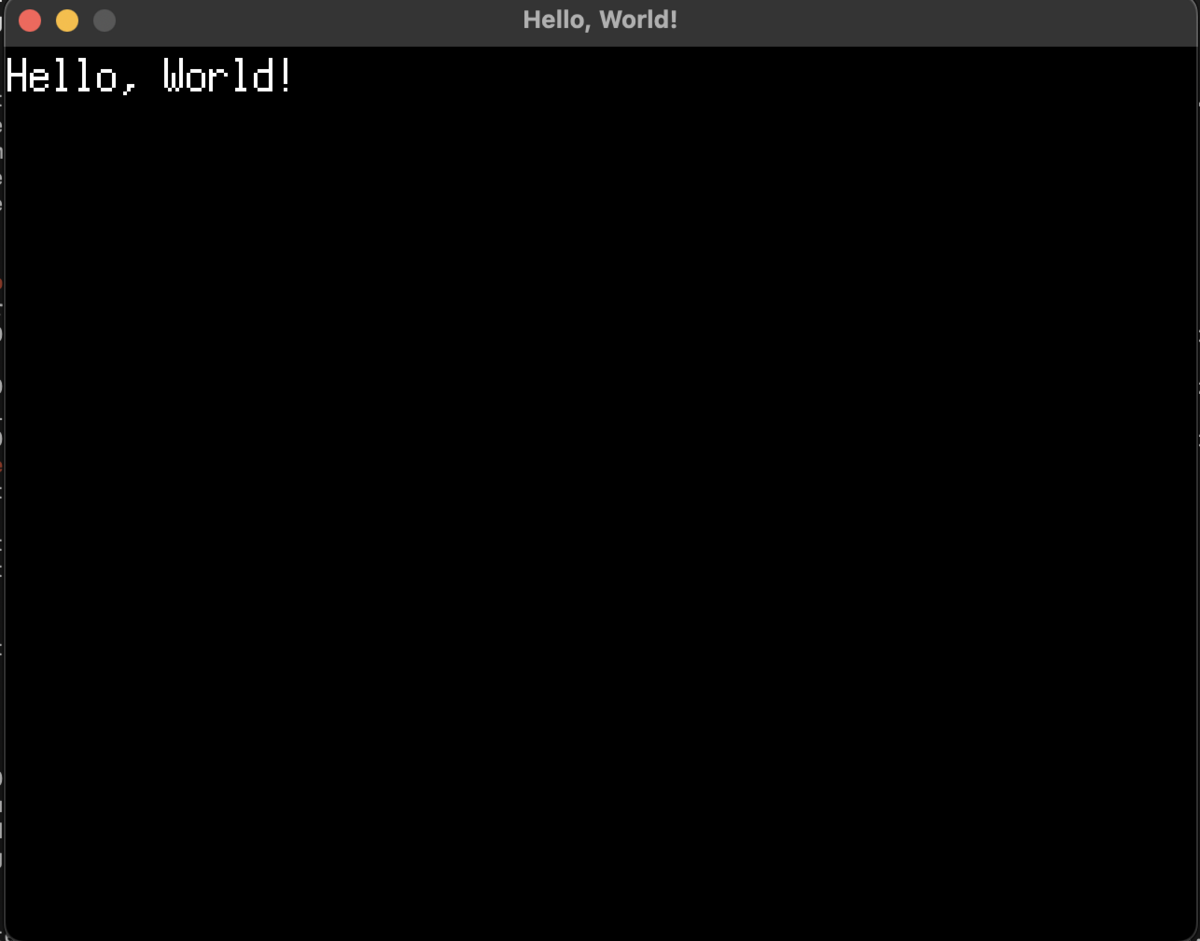
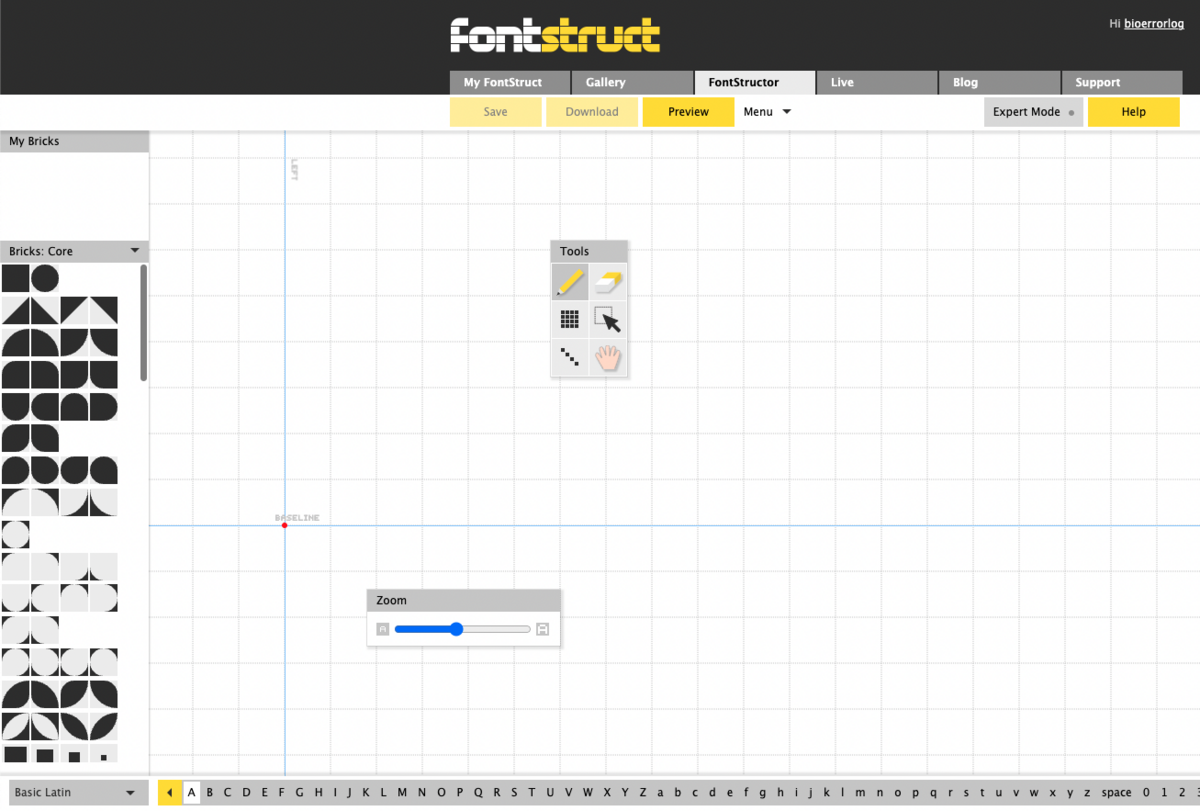
Boids Flockingを実装する 最小構成: Hello, World!
Boids Flockingの実装に移る前に、まずはEbitengine製ゲームにおける最小構成を確認しておきます。
package main
import (
"log"
"github.com/hajimehoshi/ebiten/v2"
"github.com/hajimehoshi/ebiten/v2/ebitenutil"
)
type Game struct {}
func (g *Game) Update() error {
return nil
}
func (g *Game) Draw(screen *ebiten.Image) {
ebitenutil.DebugPrint(screen, "Hello, World!" )
}
func (g *Game) Layout(outsideWidth, outsideHeight int ) (screenWidth, screenHeight int ) {
return 320 , 240
}
func main() {
ebiten.SetWindowSize(640 , 480 )
ebiten.SetWindowTitle("Hello, World!" )
if err := ebiten.RunGame(&Game{}); err != nil {
log.Fatal(err)
}
}
Game structを用意し、3つの関数Update Draw Layoutを実装して上記のようにRunGameに渡してあげれば、ゲームを実行することができます。
Updateはフレームごとに呼び出される処理で、主にゲームロジックの実行/ゲームステートの更新を担わせます。Drawもフレームごとに呼び出される処理で、こちらは描画処理を担います。Layoutはゲームのスクリーンサイズを定義します。
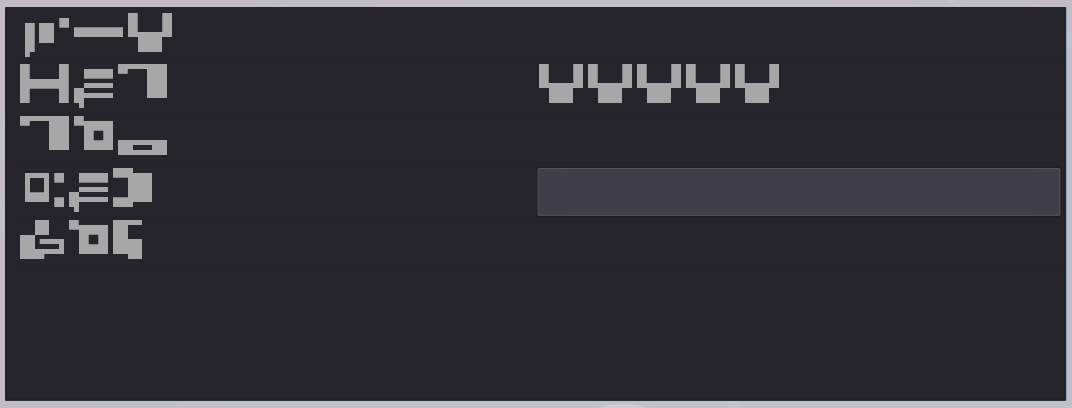
go run main.goでゲームを実行できます。
Ebitengineで Hello, World! を表示
Boids Flockingを実装する時も同じく、ロジックをUpdateに実装し、Drawで描画処理を実装する、という形をとっていきます。
ディレクトリ構成
Boids Flockingを実装するにあたって、main.goに全コードを書くと流石に読みにくくなってしまうので、下記のようなディレクトリ構成にしてみました。
.
├── go.mod
├── go.sum
├── main.go
├── boids
│ ├── boid.go
│ └── game.go
└── vector
├── vec2.go
└── vec2_test.go
エントリーポイントとなるmain.go、ゲームロジックを実装するboidsパッケージ、あとは二次元ベクトル操作処理を実装するvectorパッケージです。
ベクトル処理は既存のライブラリを使った方が良いのでしょうが、今回は諸々の入門として自分で書いています。
main.goは、boidsパッケージで定義するgameロジックを呼び出すだけにとどめています。
package main
import (
"log"
"github.com/bioerrorlog/boids-ebitengine/boids"
"github.com/hajimehoshi/ebiten/v2"
)
func main() {
game, err := boids.NewGame()
if err != nil {
log.Fatal(err)
}
ebiten.SetWindowSize(boids.ScreenWidth, boids.ScreenHeight)
ebiten.SetFullscreen(true )
ebiten.SetWindowTitle("Boids" )
if err := ebiten.RunGame(game); err != nil {
log.Fatal(err)
}
}
Ref. GitHub - bioerrorlog/boids-ebitengine at aa86fe9fe9d4a8626ef1d652338a5dce1e7a5f84
ゲームロジックの実装
こちらが大本となるゲームロジックです。
package boids
import (
"fmt"
"image/color"
"math/rand"
"github.com/bioerrorlog/boids-ebitengine/vector"
"github.com/hajimehoshi/ebiten/v2"
"github.com/hajimehoshi/ebiten/v2/ebitenutil"
)
const (
ScreenWidth = 1920
ScreenHeight = 1080
boidCount = 100
)
type Game struct {
boids []*Boid
}
func NewGame() (*Game, error ) {
g := &Game{
boids: make ([]*Boid, boidCount),
}
for i := range g.boids {
g.boids[i] = NewBoid(
rand.Float64()*ScreenWidth,
rand.Float64()*ScreenHeight,
vector.Vec2{X: ScreenWidth / 2 , Y: ScreenHeight / 2 },
)
}
return g, nil
}
func (g *Game) Update() error {
for _, b := range g.boids {
b.Update(g.boids)
}
return nil
}
func (g *Game) Draw(screen *ebiten.Image) {
screen.Fill(color.RGBA{255 , 245 , 228 , 0xff })
for _, b := range g.boids {
b.Draw(screen)
}
fps := fmt.Sprintf("FPS: %0.2f" , ebiten.ActualFPS())
ebitenutil.DebugPrint(screen, fps)
}
func (g *Game) Layout(outsideWidth, outsideHeight int ) (screenWidth, screenHeight int ) {
return ScreenWidth, ScreenHeight
}
Ref. boids-ebitengine/boids/game.go at aa86fe9fe9d4a8626ef1d652338a5dce1e7a5f84 · bioerrorlog/boids-ebitengine · GitHub
NewGame関数からGame structを外部から取得できるようにしています。
Game structは後述するBoidを配列で保持しており、UpdateではBoidのUpdate関数を呼び出します。
Drawでは描写を行っており、順番に背景描画、Boidsの描画、デバッグ(fps表示)描画を行っています。
Boids Flockingロジックの実装
次はGameから呼び出しているBoid個々のロジックの実装です。
package boids
import (
"image/color"
"math/rand"
"github.com/bioerrorlog/boids-ebitengine/vector"
"github.com/hajimehoshi/ebiten/v2"
ev "github.com/hajimehoshi/ebiten/v2/vector"
)
const (
moveSpeed = 20
perceptionRadius = 100
steerForce = 1
alignmentForce = 0.1
cohesionForce = 0.05
separationForce = 0.3
centralizationForce = 0.3
centralizationForceRadius = 200
)
type Boid struct {
position, velocity, targetCenter vector.Vec2
}
func NewBoid(x, y float64 , targetCenter vector.Vec2) *Boid {
return &Boid{
position: vector.Vec2{X: x, Y: y},
velocity: vector.Vec2{X: rand.Float64()*2 - 1 , Y: rand.Float64()*2 - 1 },
targetCenter: targetCenter,
}
}
func (b *Boid) Draw(screen *ebiten.Image) {
ev.DrawFilledCircle(screen, float32 (b.position.X), float32 (b.position.Y), 20 , color.RGBA{255 , 148 , 148 , 0xff }, true )
}
func (b *Boid) Update(boids []*Boid) {
neighbors := b.getNeighbors(boids)
alignment := b.alignment(neighbors)
cohesion := b.cohesion(neighbors)
separation := b.separation(neighbors)
centering := b.centralization()
b.velocity = b.velocity.Add(alignment).Add(cohesion).Add(separation).Add(centering).Limit(moveSpeed)
b.position = b.position.Add(b.velocity)
}
Ref. boids-ebitengine/boids/boid.go at aa86fe9fe9d4a8626ef1d652338a5dce1e7a5f84 · bioerrorlog/boids-ebitengine · GitHub
NewBoidで初期化されたBoidを返し、Drawで描画、UpdateでBoidsアルゴリズムを実行しています。
Boidsアルゴリズムとして、
alignment: 近隣のboidsと同じ方向に進もうとする力cohesion: 近隣のboids集合の中心地に向かおうとする力separation: 近隣のboidsと近づきすぎないよう距離をとる力
の3つを掛け合わせています。
それとは別に、boids達が画面外に行ってしまわないよう画面中心へと向かう力centralizationも追加しています。
それぞれの力についての詳しい実装はここでは取り上げない(上記コード// 以下略部分)ので、ご興味ある方はソースコード をご覧ください。
あとはconstで定めた各パラメータの微修正を繰り返し、なんとなく滑らかでいい感じになるようにしました。
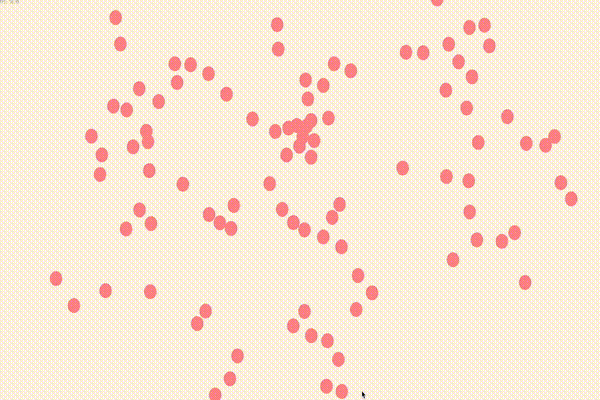
出来上がったBoidsたちの動きは、なかなか気に入っています。
(再掲)
Vector処理の実装
上記Boidの実装では、自前のvector処理を利用しています。
(本来はライブラリを使った方が良いと思いますが、せっかくの入門なので自分で書いています)
package vector
import "math"
type Vec2 struct {
X, Y float64
}
func (v Vec2) Add(other Vec2) Vec2 {
return Vec2{v.X + other.X, v.Y + other.Y}
}
func (v Vec2) Sub(other Vec2) Vec2 {
return Vec2{v.X - other.X, v.Y - other.Y}
}
func (v Vec2) Mul(scalar float64 ) Vec2 {
return Vec2{v.X * scalar, v.Y * scalar}
}
func (v Vec2) Div(scalar float64 ) Vec2 {
return Vec2{v.X / scalar, v.Y / scalar}
}
func (v Vec2) Length() float64 {
return math.Sqrt(v.X*v.X + v.Y*v.Y)
}
func (v Vec2) Normalize() Vec2 {
length := v.Length()
if length != 0 {
return Vec2{v.X / length, v.Y / length}
}
return Vec2{0 , 0 }
}
func (v Vec2) Limit(max float64 ) Vec2 {
if v.Length() > max {
return v.Normalize().Mul(max)
}
return v
}
func (v Vec2) DistanceTo(other Vec2) float64 {
diff := v.Sub(other)
return diff.Length()
}
Ref. boids-ebitengine/vector/vec2.go at aa86fe9fe9d4a8626ef1d652338a5dce1e7a5f84 · bioerrorlog/boids-ebitengine · GitHub
Boidsアルゴリズムで使うことになる、二次元ベクトル操作の実装です。
ゲームロジックや描画の実装にはなかなかテストを書きにくいこともありますが、このような純粋なGoコードであれば普通にテストが書けます:
package vector
import (
"math"
"testing"
)
func TestVec2_Add(t *testing.T) {
tests := []struct {
name string
v Vec2
other Vec2
want Vec2
}{
{"basic add" , Vec2{3 , 4 }, Vec2{1 , 2 }, Vec2{4 , 6 }},
{"add with zero" , Vec2{3 , 4 }, Vec2{0 , 0 }, Vec2{3 , 4 }},
{"add with negative values" , Vec2{3 , 4 }, Vec2{-1 , -2 }, Vec2{2 , 2 }},
{"add with same values" , Vec2{3 , 4 }, Vec2{3 , 4 }, Vec2{6 , 8 }},
{"add with floating values" , Vec2{3.5 , 4.5 }, Vec2{1.5 , 2.5 }, Vec2{5 , 7 }},
{"add with mix of positive and negative" , Vec2{3 , -4 }, Vec2{-1 , 2 }, Vec2{2 , -2 }},
}
for _, tt := range tests {
t.Run(tt.name, func (t *testing.T) {
if got := tt.v.Add(tt.other); got != tt.want {
t.Errorf("Vec2.Add() = %v, want %v" , got, tt.want)
}
})
}
}
func TestVec2_Sub(t *testing.T) {
tests := []struct {
name string
v Vec2
other Vec2
want Vec2
}{
{"basic subtraction" , Vec2{3 , 4 }, Vec2{1 , 2 }, Vec2{2 , 2 }},
{"subtract with zero" , Vec2{3 , 4 }, Vec2{0 , 0 }, Vec2{3 , 4 }},
{"subtract negative values" , Vec2{3 , 4 }, Vec2{-1 , -2 }, Vec2{4 , 6 }},
{"subtract same values" , Vec2{3 , 4 }, Vec2{3 , 4 }, Vec2{0 , 0 }},
{"subtract floating values" , Vec2{3.5 , 4.5 }, Vec2{1.5 , 2.5 }, Vec2{2 , 2 }},
{"subtract mix of positive and negative" , Vec2{3 , -4 }, Vec2{-1 , 2 }, Vec2{4 , -6 }},
{"subtract resulting in negative" , Vec2{3 , 4 }, Vec2{5 , 6 }, Vec2{-2 , -2 }},
}
for _, tt := range tests {
t.Run(tt.name, func (t *testing.T) {
if got := tt.v.Sub(tt.other); got != tt.want {
t.Errorf("Vec2.Sub() = %v, want %v" , got, tt.want)
}
})
}
}
Ref. boids-ebitengine/vector/vec2_test.go at aa86fe9fe9d4a8626ef1d652338a5dce1e7a5f84 · bioerrorlog/boids-ebitengine · GitHub
テストを実行し、ALL PASSすれば安心です。
$ go test -v ./...
? github.com/bioerrorlog/boids-ebitengine [ no test files]
? github.com/bioerrorlog/boids-ebitengine/boids [ no test files]
=== RUN TestVec2_Add
=== RUN TestVec2_Add/basic_add
=== RUN TestVec2_Add/add_with_zero
=== RUN TestVec2_Add/add_with_negative_values
=== RUN TestVec2_Add/add_with_same_values
=== RUN TestVec2_Add/add_with_floating_values
=== RUN TestVec2_Add/add_with_mix_of_positive_and_negative
--- PASS: TestVec2_Add (0 .00s)
--- PASS: TestVec2_Add/basic_add (0 .00s)
--- PASS: TestVec2_Add/add_with_zero (0 .00s)
--- PASS: TestVec2_Add/add_with_negative_values (0 .00s)
--- PASS: TestVec2_Add/add_with_same_values (0 .00s)
--- PASS: TestVec2_Add/add_with_floating_values (0 .00s)
--- PASS: TestVec2_Add/add_with_mix_of_positive_and_negative (0 .00s)
# 中略
PASS
ok github.com/bioerrorlog/boids-ebitengine/vector (cached)
ゲーム側の実装はこれで完成です。
CIの実装
最後にGitHub Actionsを設定して、コードの静的解析やbuild、testの実行を自動化させます。
name : Test
on :
- push
- pull_request
jobs :
test :
runs-on : ubuntu-latest
steps :
- name : Checkout
uses : actions/checkout@v2
- name : Setup Go
uses : actions/setup-go@v3
with :
go-version : '1.20'
- name : Install dependencies
run : |
sudo apt-get update
sudo apt-get install -y libasound2-dev libgl1-mesa-dev libxcursor-dev libxi-dev libxinerama-dev libxrandr-dev libxxf86vm-dev
- name : Run golangci-lint
uses : golangci/golangci-lint-action@v3
with :
version : latest
- name : Vet
run : go vet ./...
- name : Build
run : go build -v ./...
- name : Test
run : go test -v ./...
Ref. boids-ebitengine/.github/workflows/test.yml at aa86fe9fe9d4a8626ef1d652338a5dce1e7a5f84 · bioerrorlog/boids-ebitengine · GitHub
必要なライブラリをインストールしたのち、静的解析(golangci-lintとgo vet)、go build、go testを実行しています。
Install dependenciesではいろんなものをインストールさせていますが、これをしないとubuntuではgo vetが落ちるので注意です。
(インストールするライブラリは本家Ebitengineのworkflow を参考にしました)
おわりに Go製のゲームエンジンEbitengineで、Boids Flockingを実装してみました。
個人的にはこれまで、
自分でゲーム作るならシンプルな2Dゲーム一択 (2Dゲーム好きだし、3D酔いしやすいので)
そうなると、既存のゲームエンジンはぶっちゃけ機能が過剰
何かにハマったときの切り分けがつらい (徐々にモチベに悪影響)
(もちろん使いこなせば高い生産性が出せるのかもしれないが...)
という思いを抱いてきたので、APIがシンプルなEbitengineは触っていて心地良かったです。
以上、ちょっとした一例としてどなたかの参考になれば幸いです。
[関連記事]
www.bioerrorlog.work
www.bioerrorlog.work
www.bioerrorlog.work
参考 GitHub - hajimehoshi/ebiten: Ebitengine - A dead simple 2D game engine for Go
Ebitengine - A dead simple 2D game engine for Go
ebiten package - github.com/hajimehoshi/ebiten/v2 - Go Packages
ゲームエンジンはアートである - 8 年以上自作ゲームエンジンをメンテし続けている話|Hajime Hoshi
既に拡張性のある無料のゲームエンジンがある中,なぜ時間と労力をかけて独自のゲームエンジンを開発していらっしゃるのでしょうか? | mond
Real-world game development with Ebitengine - How to make the best-selling Go game | PPT
GitHub - bioerrorlog/boids-ebitengine: Boids flocking simulation with Ebitengine